# Guide to Get Results
> **In simple terms:** After someone completes a verification, you need to see the results. This guide shows you how to view and download verification results from the Dashboard or get them automatically through your system.
This guide explains how to search and retrieve results from **Identity Processes** and **Validations** using Truora's **dashboard** or **API**.
## Get the results of a process
### From Truora's Dashboard
#### Searching process results
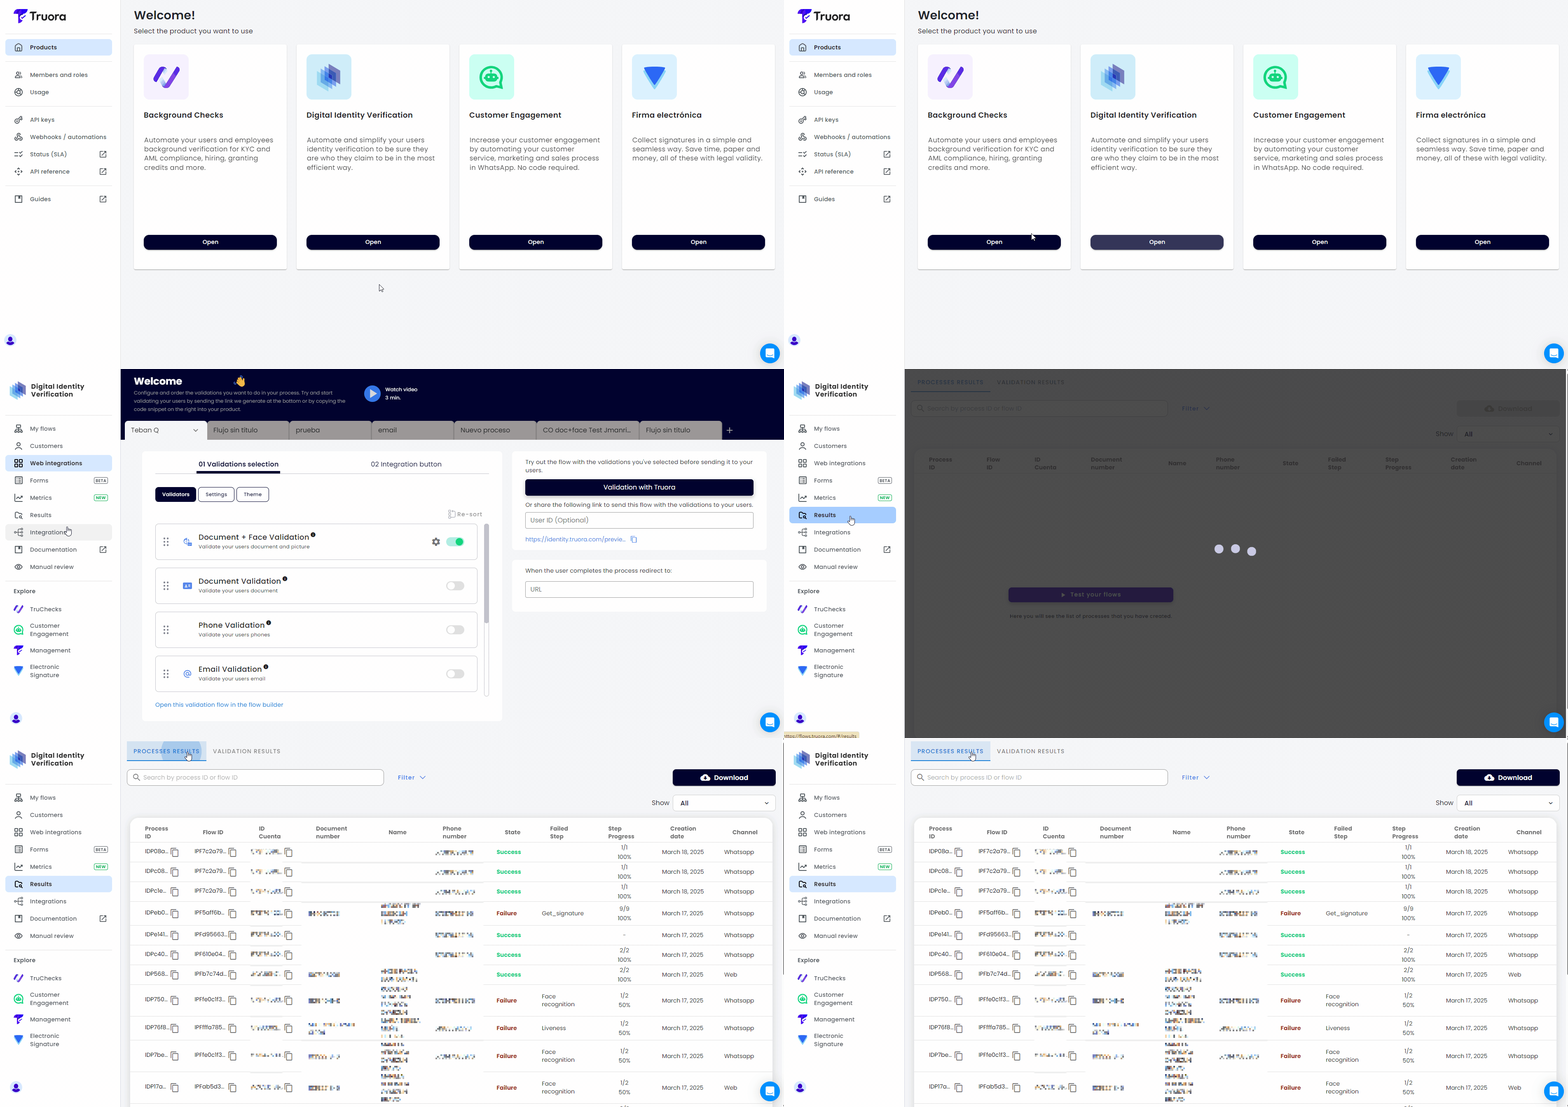
1. In the **Digital Identity** dashboard, go to the **Results** tab in the side menu.
2. At the top, ensure the **PROCESSES RESULTS** tile is selected.
{{ }}
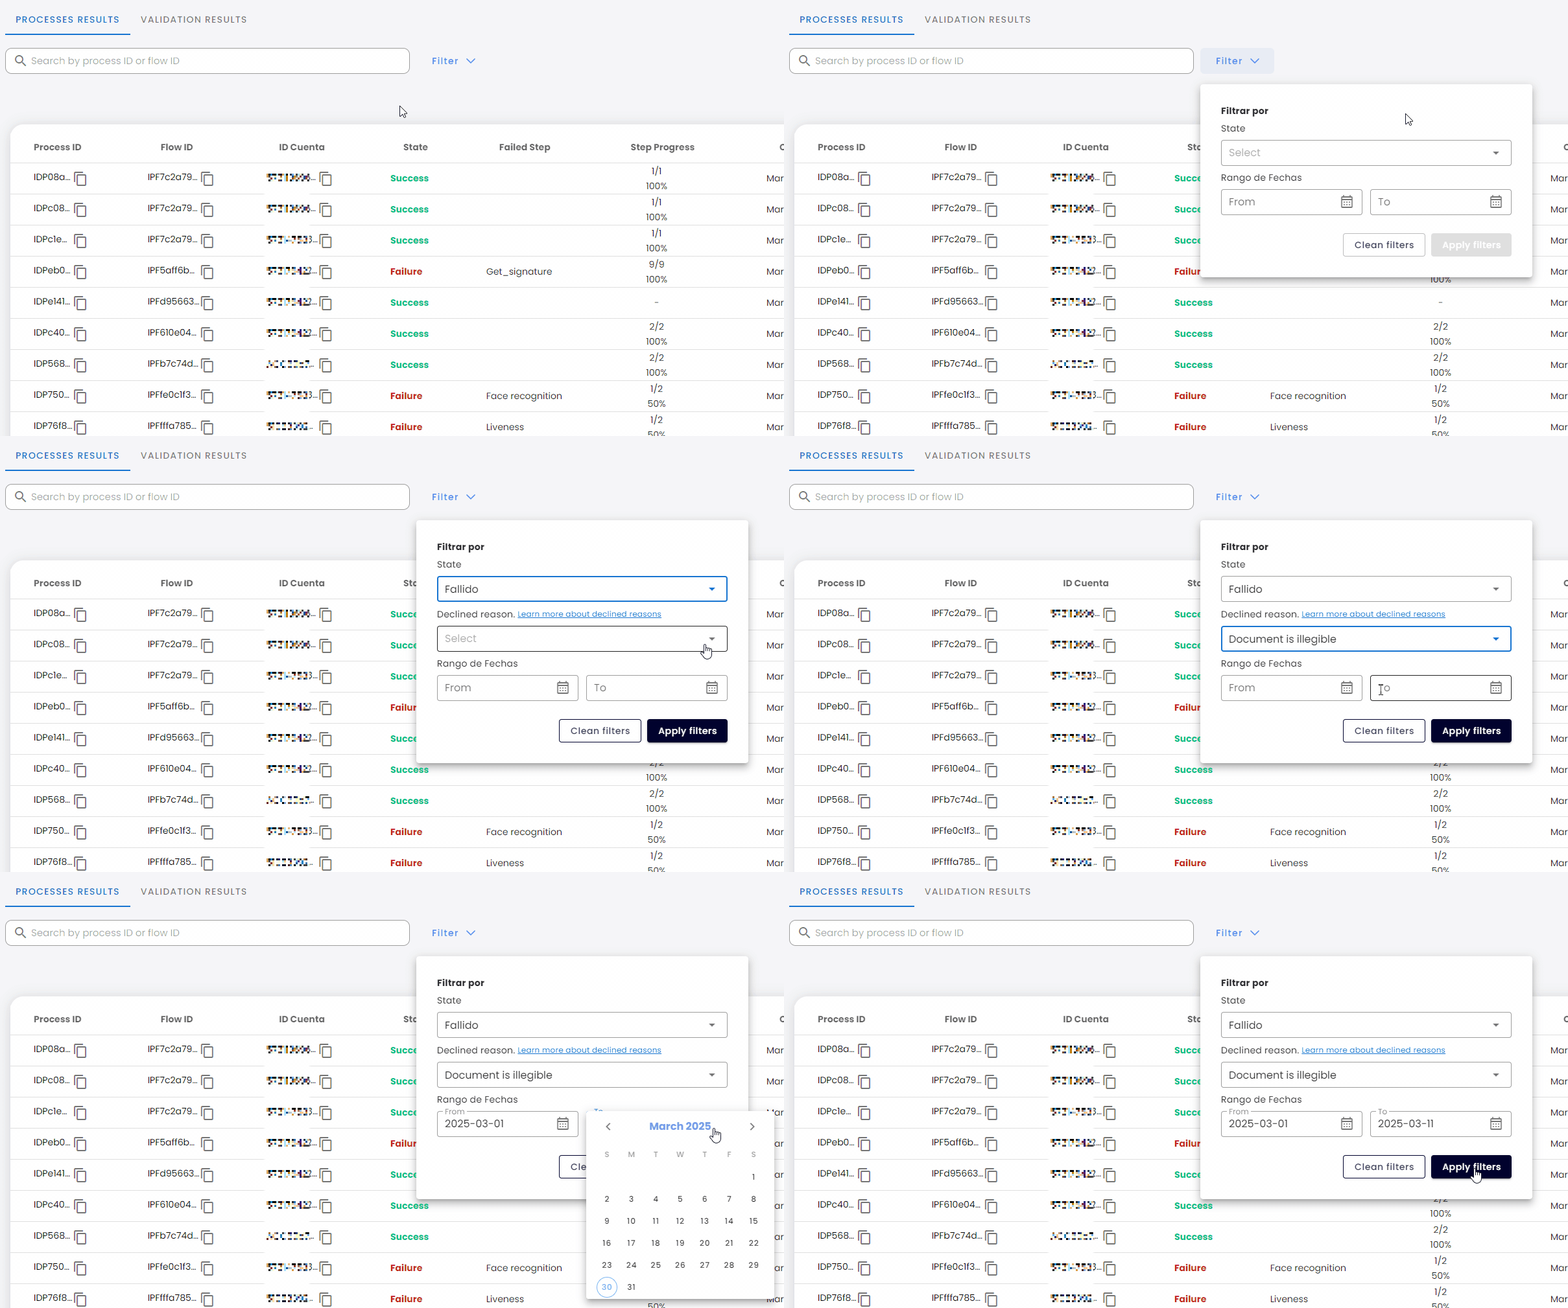
3. Use the **Search** bar to look up results:
Search by one of these parameters:
- For **Process ID** and **Flow ID**, an exact match is required.
- For **Account ID**, **Document Number**, **Phone number** and **Name**, partial matches are supported.
Additionally you can apply a **Filter** to refine your search by:
- **State** - Filter by process **Status**: *Success*, *Pending* or *Failure*. If **Failure** is selected, you may further filter by the {{< newtab href="/guides/declined_reasons_details/" >}}**Declined Reason**{{< /newtab >}}.
- **Date Range** - Select a date range for search.
{{
}}
3. Use the **Search** bar to look up results:
Search by one of these parameters:
- For **Process ID** and **Flow ID**, an exact match is required.
- For **Account ID**, **Document Number**, **Phone number** and **Name**, partial matches are supported.
Additionally you can apply a **Filter** to refine your search by:
- **State** - Filter by process **Status**: *Success*, *Pending* or *Failure*. If **Failure** is selected, you may further filter by the {{< newtab href="/guides/declined_reasons_details/" >}}**Declined Reason**{{< /newtab >}}.
- **Date Range** - Select a date range for search.
{{ }}
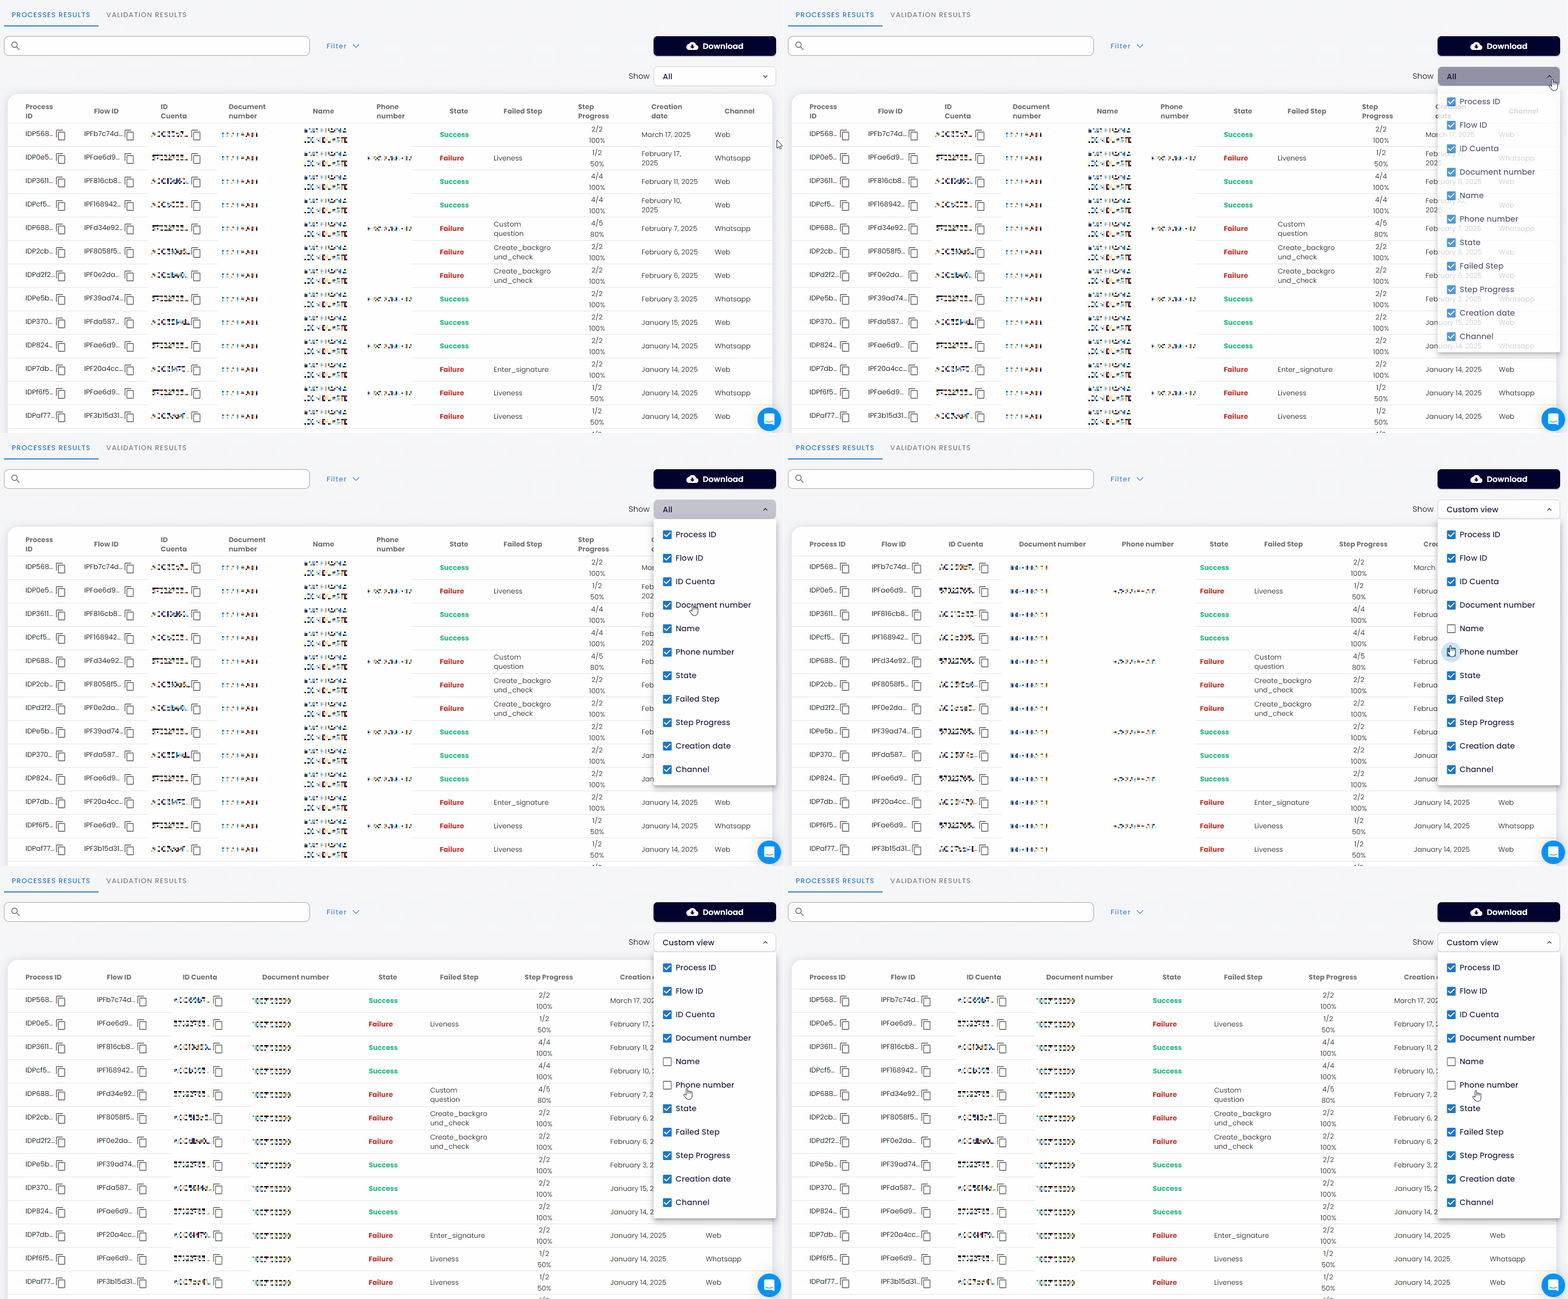
4. Use the **Show** dropdown menu to customize visible columns in the results list. By default, **ALL** columns are displayed:
- **Process ID, Flow ID, Account ID** - Unique identifiers for the process, flow and the user account.
- **Document number, Name, Phone number** - User details associated to the process.
- **State** - The process outcome: *Success*, *Pending* or *Failure*.
- **Failed Step** - The step where the process failed (if applicable).
- **Channel** - The channel used to perform the process (Web or Whatsapp).
- **Creation date** - Timestamp of when the process started.
- **Step Progress** - Number of completed steps vs. total steps in the process.
{{
}}
4. Use the **Show** dropdown menu to customize visible columns in the results list. By default, **ALL** columns are displayed:
- **Process ID, Flow ID, Account ID** - Unique identifiers for the process, flow and the user account.
- **Document number, Name, Phone number** - User details associated to the process.
- **State** - The process outcome: *Success*, *Pending* or *Failure*.
- **Failed Step** - The step where the process failed (if applicable).
- **Channel** - The channel used to perform the process (Web or Whatsapp).
- **Creation date** - Timestamp of when the process started.
- **Step Progress** - Number of completed steps vs. total steps in the process.
{{ }}
#### Viewing details of a specific process
To view details about a specific process, just click on it in the list. The details displayed will depend on the process content:
{{
}}
#### Viewing details of a specific process
To view details about a specific process, just click on it in the list. The details displayed will depend on the process content:
{{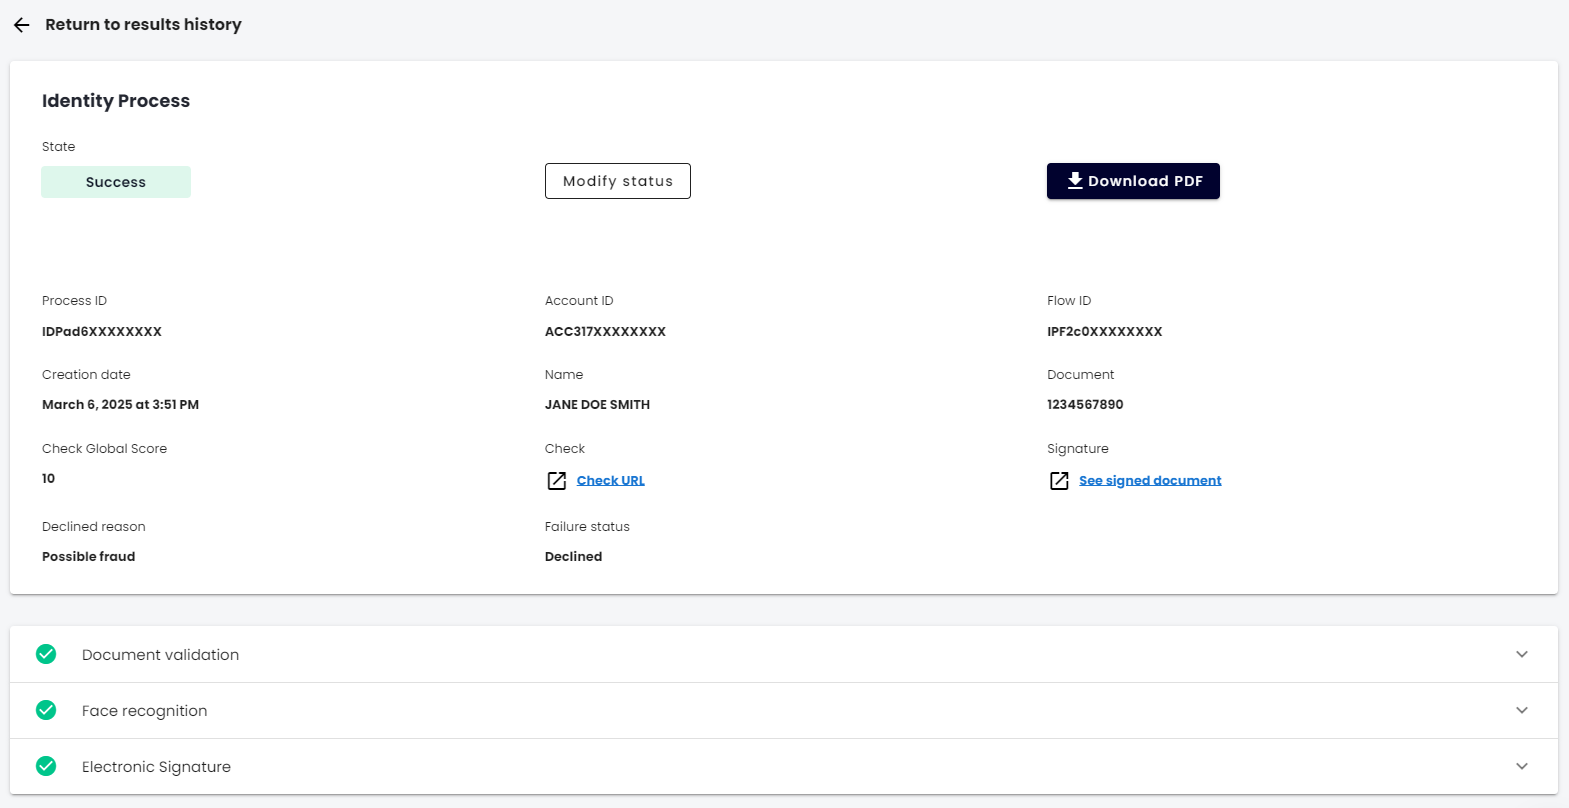 }}
- **General process details**
- **Process ID** - The unique ID of the process carried out by the user.
- **Account ID** - The account ID of the user who initiated the process.
- **Flow ID** - The ID of the flow related to the user's process.
- **Creation date** - Timestamp of when the process started.
- **Failure, Declination, or Expiration details**
- **Failure status** - Information on why the process failed.
- **Declined reason** - The reason why the process was cancelled.
- **Expiration reason** - The reason why the process expired.
- **Validations details**
- You may find information about validations, and at the bottom of the view, you may expand the details on each validation performed within the process and its outcome.
- **Download PDF and Override Status**
- At the top of the details, you may click the **Download PDF** button to download a report of the process results. For details, see the {{< newtab href="/guides/download_process_pdf/" >}}**Download Process PDF**{{< /newtab >}} guide.
- If you have the necessary permissions, you may see a **Modify Status** button. This allows you to override the final status of a completed process. For details, see the {{< newtab href="/guides/override_process/" >}}**Override process status**{{< /newtab >}} guide.
#### Downloading Process History (CSV)
You can download a **CSV file** containing a summary of process results within a **specific date range** (up to two months). If needed, you can include a **Flow ID** to filter results by a specific flow.
To find a **Flow ID**, you have at least two options:
1. Copy the **Flow ID** with the copy icon when [Viewing details of a specific process](./#viewing-details-of-a-specific-process).
2. Go to **My flows** and copy the desired **Flow ID** from the copy icon:
{{
}}
- **General process details**
- **Process ID** - The unique ID of the process carried out by the user.
- **Account ID** - The account ID of the user who initiated the process.
- **Flow ID** - The ID of the flow related to the user's process.
- **Creation date** - Timestamp of when the process started.
- **Failure, Declination, or Expiration details**
- **Failure status** - Information on why the process failed.
- **Declined reason** - The reason why the process was cancelled.
- **Expiration reason** - The reason why the process expired.
- **Validations details**
- You may find information about validations, and at the bottom of the view, you may expand the details on each validation performed within the process and its outcome.
- **Download PDF and Override Status**
- At the top of the details, you may click the **Download PDF** button to download a report of the process results. For details, see the {{< newtab href="/guides/download_process_pdf/" >}}**Download Process PDF**{{< /newtab >}} guide.
- If you have the necessary permissions, you may see a **Modify Status** button. This allows you to override the final status of a completed process. For details, see the {{< newtab href="/guides/override_process/" >}}**Override process status**{{< /newtab >}} guide.
#### Downloading Process History (CSV)
You can download a **CSV file** containing a summary of process results within a **specific date range** (up to two months). If needed, you can include a **Flow ID** to filter results by a specific flow.
To find a **Flow ID**, you have at least two options:
1. Copy the **Flow ID** with the copy icon when [Viewing details of a specific process](./#viewing-details-of-a-specific-process).
2. Go to **My flows** and copy the desired **Flow ID** from the copy icon:
{{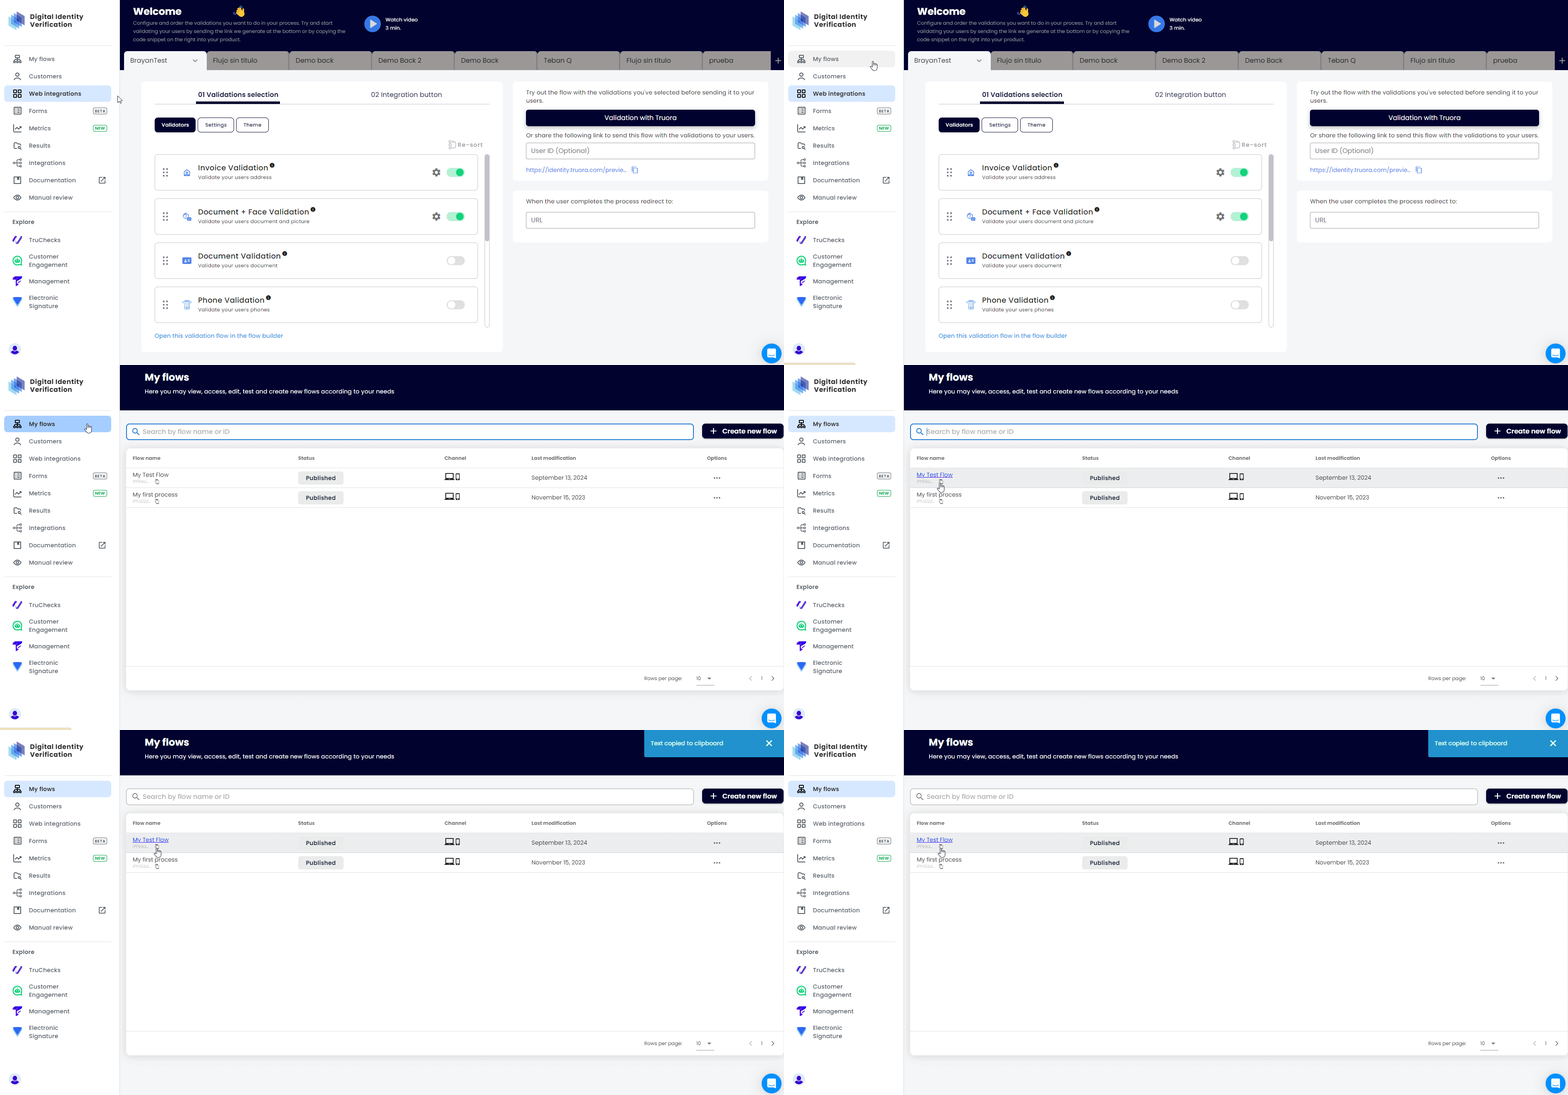 }}
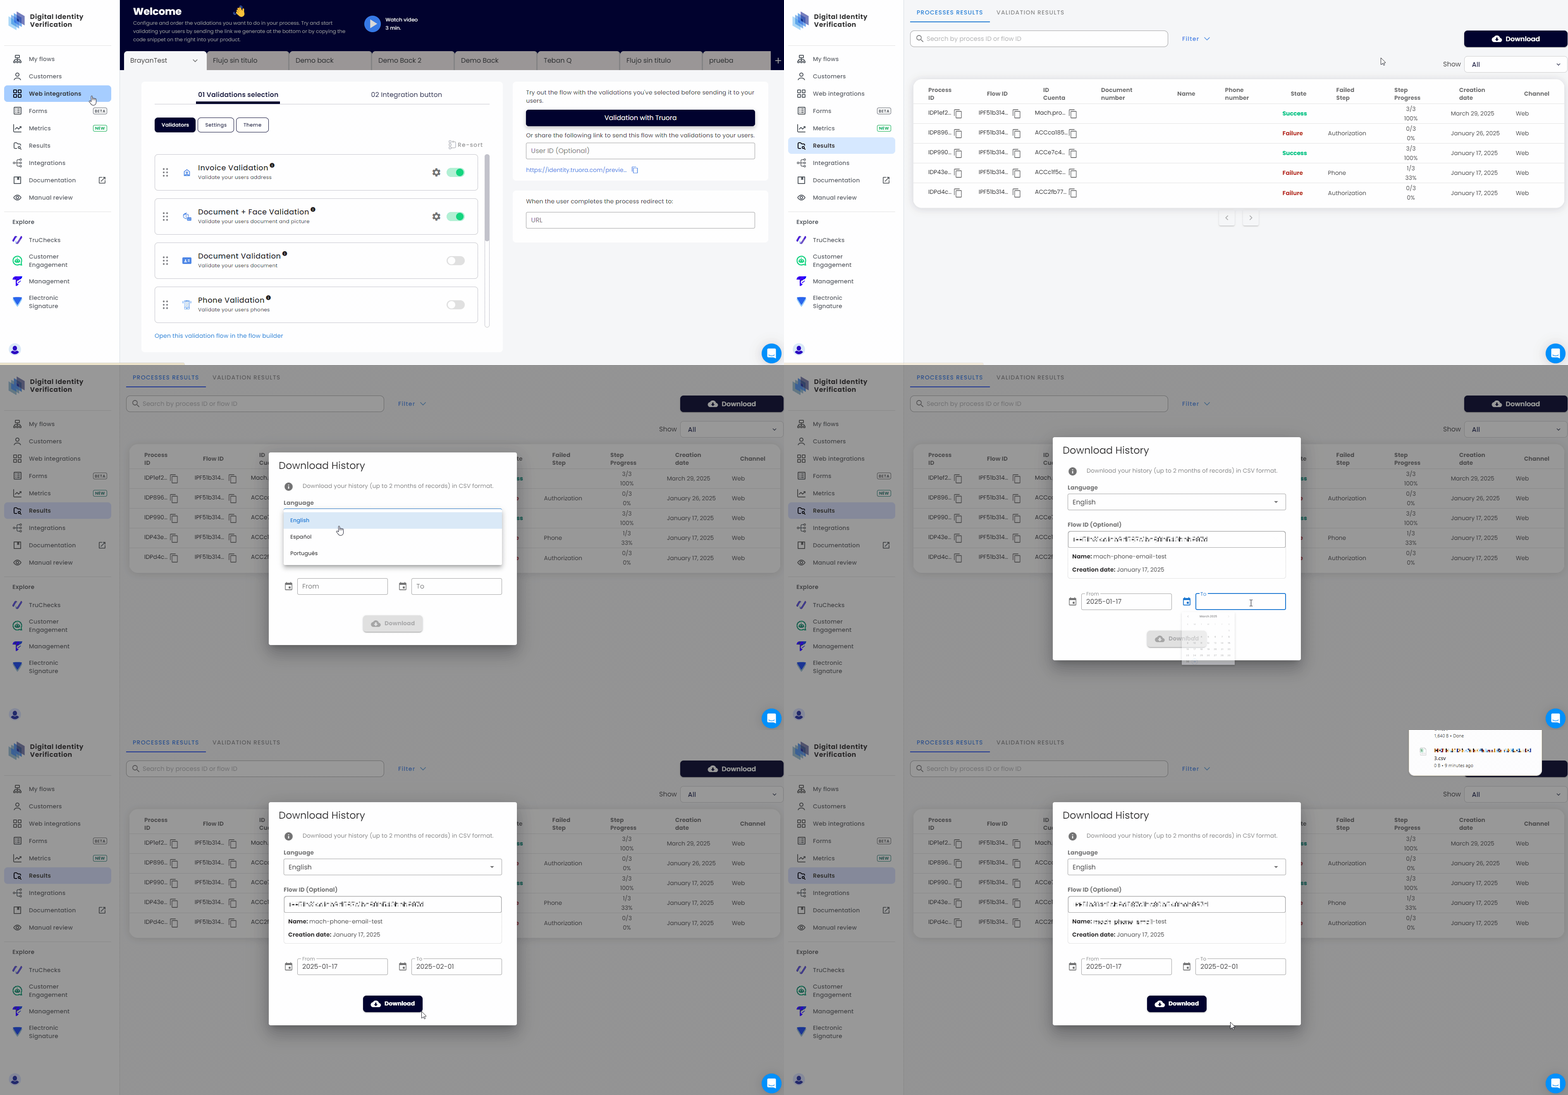
Once you have the **Flow ID**, follow these steps:
1. Go to **Results** and click on the **Download** button.
2. **Select the language**: Choose from *English*, *Spanish*, or *Portuguese*.
3. **Advanced Options** (optional): You can request additional information by enabling advanced options. These may include:
- **Custom integration variables**: Include data obtained from external services integrated in your flows.
- **Background check ID**: Include the unique ID associated with background check processes.
- **Geolocation data**: Include geographical location information collected during user interactions.
- **Agent Conversations**: Include complete conversation history and support interactions.
- **Referral tracking information from Whatsapp**: This information indicates the origin of users who send inbounds, useful for tracking campaign effectiveness.
4. You may filter results by:
- **Range of dates only (Required)** - Download history for all processes within a specific date range, up to two months.
- **Range of dates and a Flow ID (Optional)** - Download history for processes related to the specific flow within the selected date range.
5. Click **Download**.
{{
}}
Once you have the **Flow ID**, follow these steps:
1. Go to **Results** and click on the **Download** button.
2. **Select the language**: Choose from *English*, *Spanish*, or *Portuguese*.
3. **Advanced Options** (optional): You can request additional information by enabling advanced options. These may include:
- **Custom integration variables**: Include data obtained from external services integrated in your flows.
- **Background check ID**: Include the unique ID associated with background check processes.
- **Geolocation data**: Include geographical location information collected during user interactions.
- **Agent Conversations**: Include complete conversation history and support interactions.
- **Referral tracking information from Whatsapp**: This information indicates the origin of users who send inbounds, useful for tracking campaign effectiveness.
4. You may filter results by:
- **Range of dates only (Required)** - Download history for all processes within a specific date range, up to two months.
- **Range of dates and a Flow ID (Optional)** - Download history for processes related to the specific flow within the selected date range.
5. Click **Download**.
{{ }}
### By means of Truora's API
To get process results via {{< newtab href="/docs/#get-result-section" >}}Truora's API{{< /newtab >}} follow these steps:
1. Create a **GET** request to ``https://api.identity.truora.com/v1/processes/{process_id}/result``
2. Replace ``{process_id}`` in the URL with the **Process ID** obtained from **Truora's Dashboard**, or by setting up a rule to receive process updates via {{< newtab href="/guides/webhook_rule/" >}}Webhooks{{< /newtab >}}. **\***
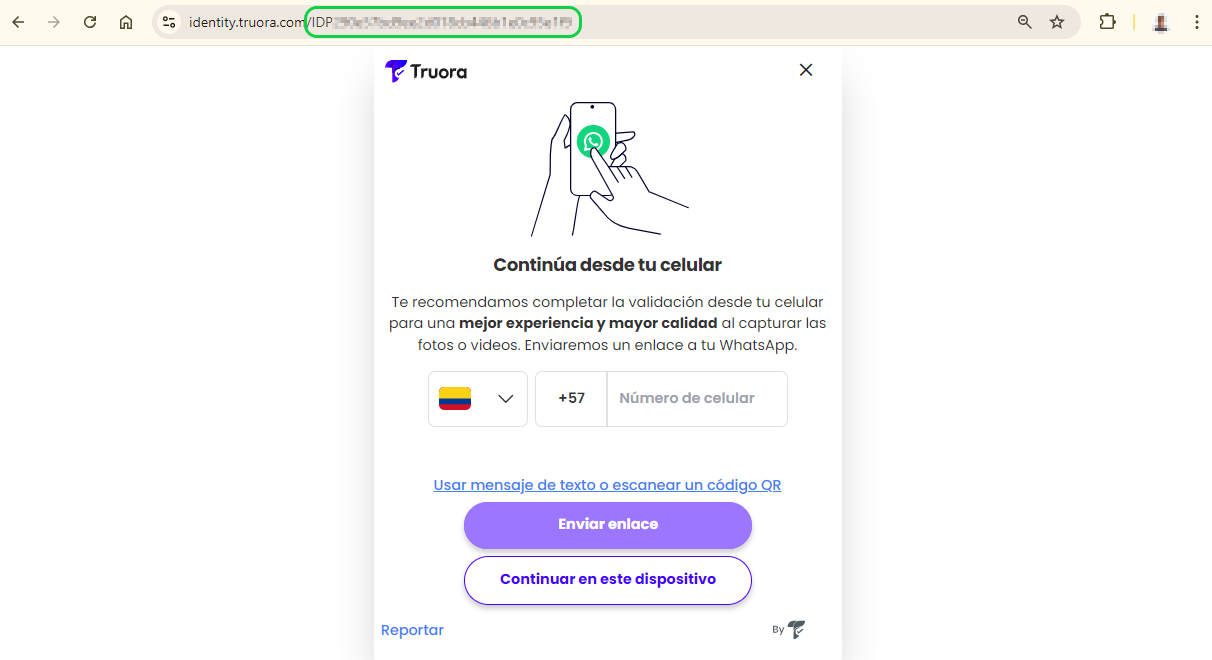
**\*** **Note:** For testing purposes, when {{< newtab href="/guides/flows_web/#testing-the-flow-template" >}}Testing a flow template{{< /newtab >}} you can extract the **Process ID** from the process URL in this format: ``https://identity.truora.com/{process_id}`` (e.g., ``https://identity.truora.com/IDP58eec9282cxxxxxxxxx``).
{{
}}
### By means of Truora's API
To get process results via {{< newtab href="/docs/#get-result-section" >}}Truora's API{{< /newtab >}} follow these steps:
1. Create a **GET** request to ``https://api.identity.truora.com/v1/processes/{process_id}/result``
2. Replace ``{process_id}`` in the URL with the **Process ID** obtained from **Truora's Dashboard**, or by setting up a rule to receive process updates via {{< newtab href="/guides/webhook_rule/" >}}Webhooks{{< /newtab >}}. **\***
**\*** **Note:** For testing purposes, when {{< newtab href="/guides/flows_web/#testing-the-flow-template" >}}Testing a flow template{{< /newtab >}} you can extract the **Process ID** from the process URL in this format: ``https://identity.truora.com/{process_id}`` (e.g., ``https://identity.truora.com/IDP58eec9282cxxxxxxxxx``).
{{ }}
3. Create a **Header** named ``Truora-API-Key`` and set its value to your API key.
4. Send the request. The response will include the process results.
{{
}}
3. Create a **Header** named ``Truora-API-Key`` and set its value to your API key.
4. Send the request. The response will include the process results.
{{}}
{{}}
**Process Statuses** - The possible states of a process are:
- **Pending** - Indicates the process is still ongoing.
- **Success** - All steps in the process have been completed successfully. If the flow includes validation steps, all validation statuses are successful.
- **Failure** - Can occur if the process is declined or expired, due to a timeout, or because of an internal error.
> **Notes:**
> - If you registered **additional information** when generating the {{< newtab href="/guides/web_integration_token" >}}Web Integration Token{{< /newtab >}}, you'll find it in the ``metadata`` section of the response. The following is a **partial response** showing a ``metadata`` section example:
{{}}
"metadata": {
"company": "ACME",
"field": "Construction"
}
{{}}
> - If the final status was manually **overridden** by an authorized user, the response will contain the fields ``override_status`` and ``override_status_history``. Use the ``override_status`` instead of ``status`` to determine the actual final status of the process. The ``override_status_history`` logs all status changes, including timestamps and user details. The following is a **partial response** showing an example of how ``status``, ``override_status`` and ``override_status_history`` are returned:
{{}}
{
"status": "success",
"override_status": "failure",
"override_status_history": [
{
"username": "admin_user@mycompany.com",
"current_status": "success",
"override_status": "failure",
"reason_category": "other",
"reason_description": "other",
"date": "2025-03-13T19:56:12.812196504Z",
"ip_address": "192.XXX.XXX.XXX",
"files": null
}
]
}
{{}}
#### Devices information
As part of the API response results, you have access to information about the devices used during the identity verification process in the ``devices_info`` field. The available data may include the following:
- ``model``: Model of the device (e.g., iPhone 12).
- ``type``: Type of device (e.g., mobile, computer).
- ``os``: Operating system of the device (e.g., Android, macOS, iOS).
- ``os_version``: Operating system version (e.g., 10.0.0, 13.0.0, 14.3.0).
- ``browser``: Browser used during the process, (e.g., Chrome, Safari)
- ``browser_version``: Version of the browser used during the process (e.g., 123.0.0.0, 5.1.7)
You will find two possible scenarios:
- **Scenario 1:** Only one device
This case occurs when the entire process is conducted using a single device. In the response, you will receive information similar to the following:
{{}}
{
"devices_info": [
{
"model": "SM-N9600",
"type": "mobile",
"os": "Android",
"os_version": "10.0.0",
"browser": "Chrome",
"browser_version": "123.0.0.0"
}
],
}
{{}}
- **Scenario 2:** Two devices involved in the process
An example of this case is when the process initiates on a PC and then continues on a mobile device using the redirection feature. In the response, you will receive information similar to the following:
{{}}
{
"devices_info": [
{
"type": "computer",
"os": "Windows",
"os_version": "15.0.0",
"browser": "Chrome",
"browser_version": "123.0.0.0"
},
{
"model": "SM-N9600",
"type": "mobile",
"os": "Android",
"os_version": "10.0.0",
"browser": "Chrome",
"browser_version": "123.0.0.0"
}
],
}
{{}}
---
## Get the results of a validation
To get the results of a validation, a validation must have been created and completed. Below are the guides for creating validations based on your integration type:
- **Document Validation**: From {{< newtab href="/guides/document/" >}}Web process{{< /newtab >}} or via {{< newtab href="/guides/document_validation_api/" >}}API{{< /newtab >}}.
- **Face Validation**: From {{< newtab href="/guides/face/" >}}Web process{{< /newtab >}} or via {{< newtab href="/guides/face_validation_api/" >}}API{{< /newtab >}}.
- **Document and Face Validation**: From {{< newtab href="/guides/documentandface/" >}}Web process{{< /newtab >}}.
- **Phone Validation**: From {{< newtab href="/guides/phone_validation/" >}}Web process{{< /newtab >}} or via {{< newtab href="/guides/phone_validation_api/" >}}API{{< /newtab >}}.
- **Email Validation**: From {{< newtab href="/guides/email_validation/" >}}Web process{{< /newtab >}} or via {{< newtab href="/guides/email_validation_api/" >}}API{{< /newtab >}}.
- **WhatsApp to Validate Identity**: Using **Digital Identity** validators (Document, Face, Phone, and Email) in {{< newtab href="/guides/how_use_whatsapp_kyc/" >}}WhatsApp to Validate Identity{{< /newtab >}}.
- **Electronic Signature**: Via {{< newtab href="/guides/electronic_signature_web_flow/" >}}Web process{{< /newtab >}}, {{< newtab href="/guides/electronic_signature_wa_flow/" >}}WhatsApp{{< /newtab >}}, or {{< newtab href="/guides/electronic_signature/" >}}API{{< /newtab >}}.
**Note:** Whenever a validation fails due to inconsistencies in the validation process or expires in the validation process, the API provides a reason to indicate why the validation was declined or expired:
- To learn more about the possible declined reasons, please visit the {{< newtab href="/guides/declined_reasons_details/" >}}Declined Reasons{{< /newtab >}} guide.
- To learn more about the possible expired reason, please visit the {{< newtab href="/guides/expired_reasons_details/" >}}Expired Reasons{{< /newtab >}} guide.
### From Truora's Dashboard
#### Searching validation results
1. In the **Digital Identity** dashboard, go to the **Results** tab in the side menu.
2. At the top, ensure the **VALIDATION RESULTS** tile is selected.
{{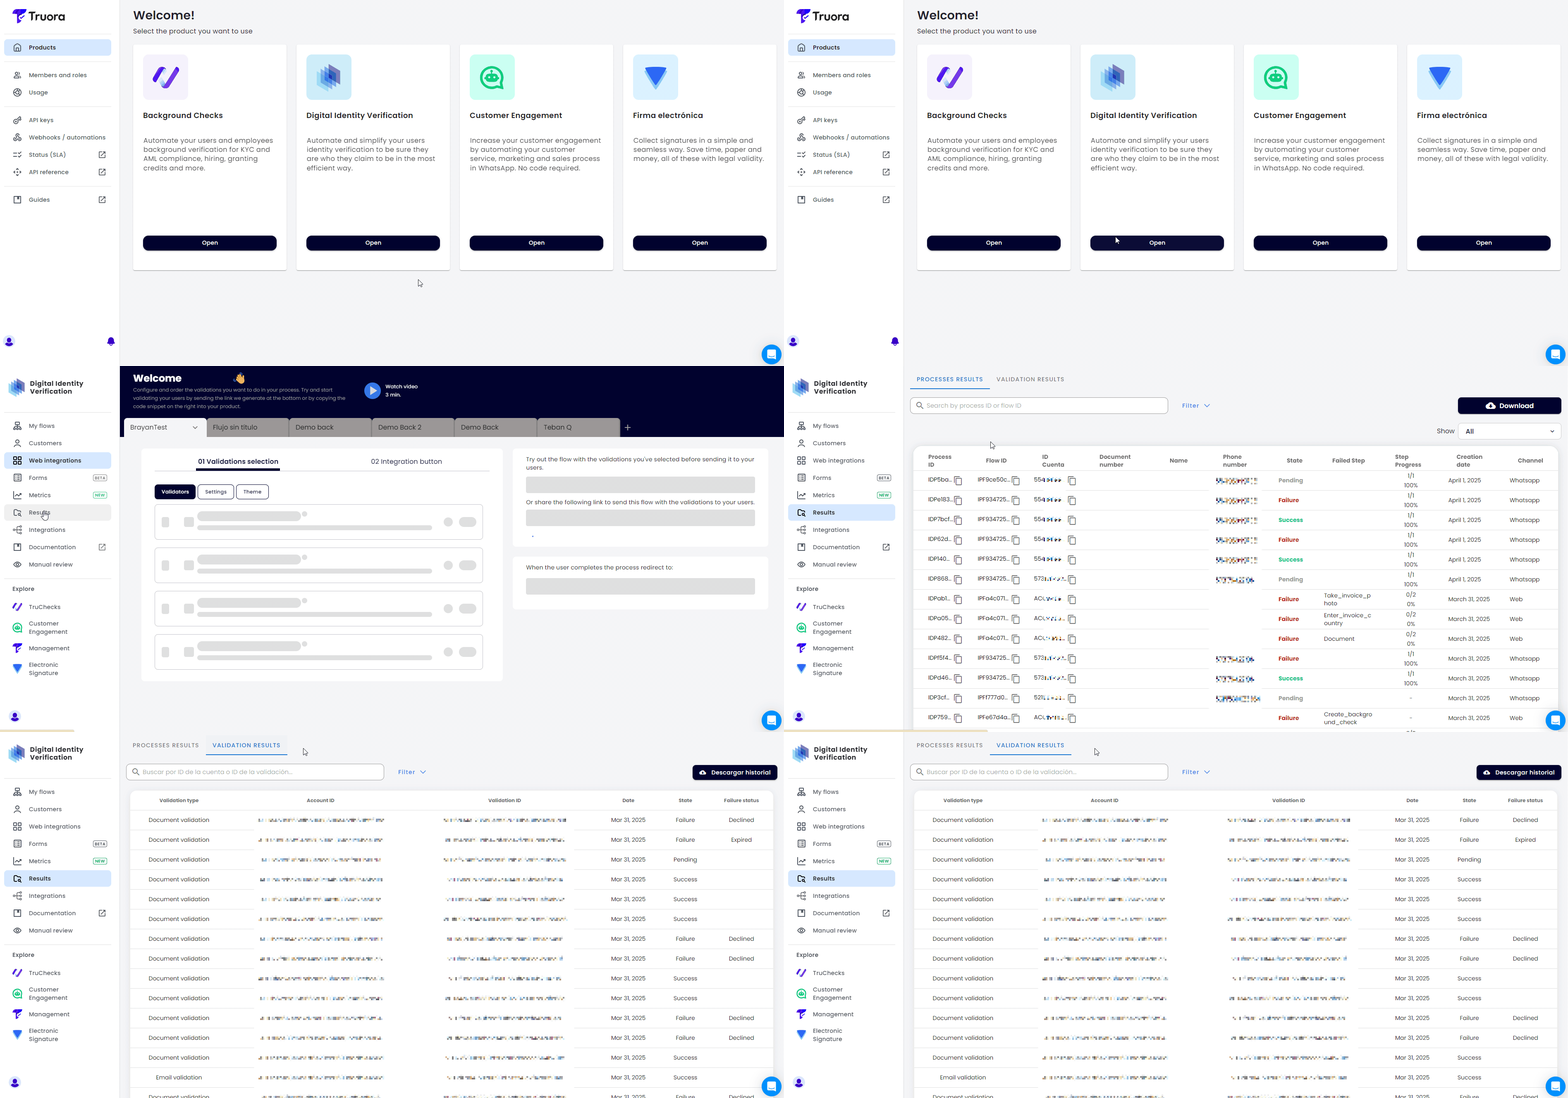 }}
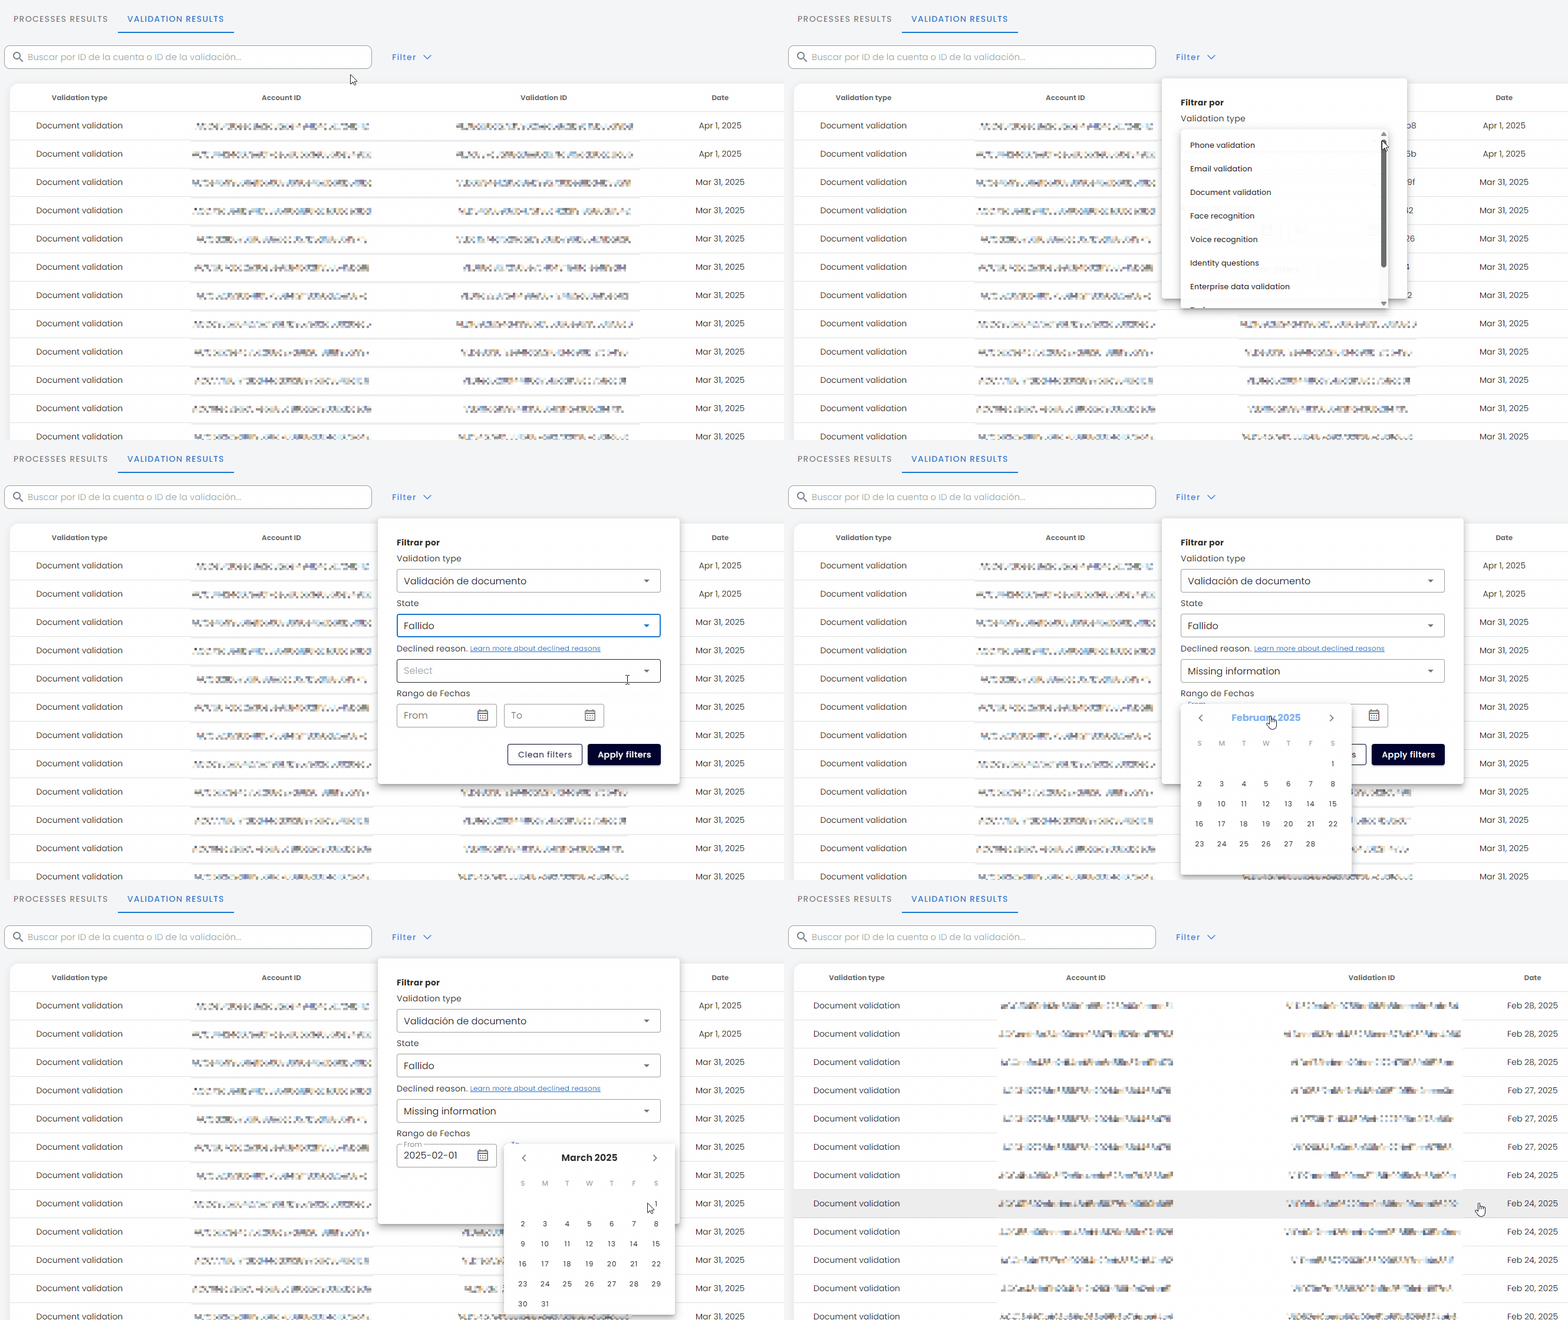
3. Use the **Search** bar to look up results by **Account ID** or **Validation ID**.
Additionally you can apply a **Filter** to refine your search by:
- **Validation type** - Filter the results for a specific validation type. (e.g., ``Document validation``).
- **State** - Filter by validation **Status**: *Success*, *Pending* or *Failure*. If **Failure** is selected, you may further filter by the {{< newtab href="/guides/declined_reasons_details/" >}}**Declined Reason**{{< /newtab >}}.
- **Date Range** - Select a date range for search.
{{
}}
3. Use the **Search** bar to look up results by **Account ID** or **Validation ID**.
Additionally you can apply a **Filter** to refine your search by:
- **Validation type** - Filter the results for a specific validation type. (e.g., ``Document validation``).
- **State** - Filter by validation **Status**: *Success*, *Pending* or *Failure*. If **Failure** is selected, you may further filter by the {{< newtab href="/guides/declined_reasons_details/" >}}**Declined Reason**{{< /newtab >}}.
- **Date Range** - Select a date range for search.
{{ }}
#### Viewing details of a specific validation
To view details about a specific validation, just click on it in the list. The details displayed will depend on the type of validation. The following is a **Document validation** result example:
{{
}}
#### Viewing details of a specific validation
To view details about a specific validation, just click on it in the list. The details displayed will depend on the type of validation. The following is a **Document validation** result example:
{{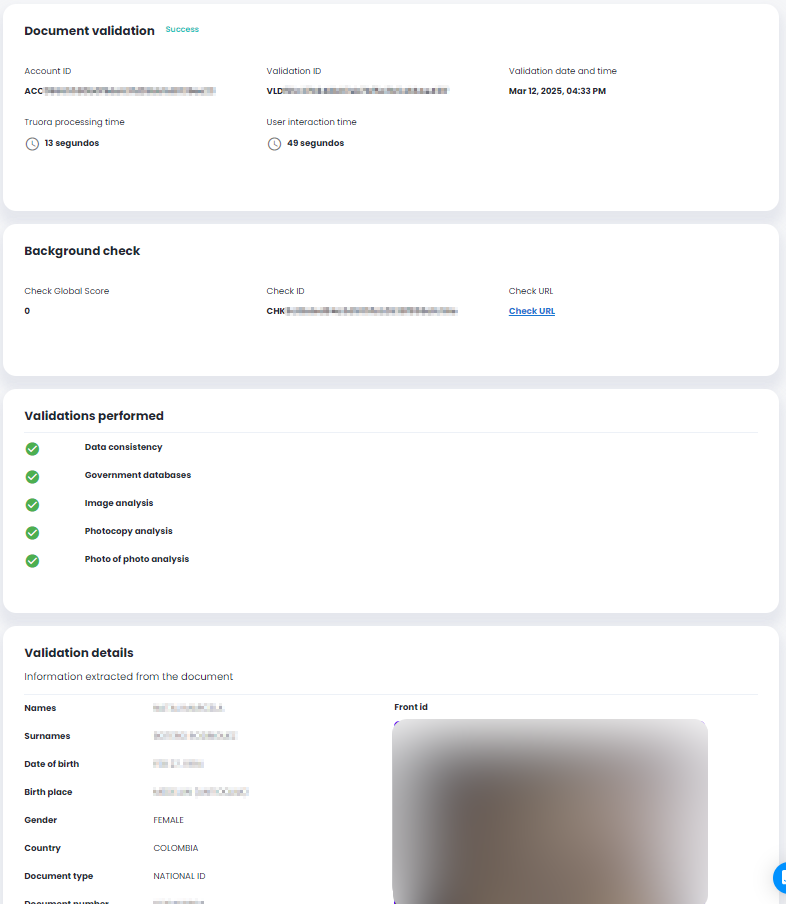 }}
- **General process details**
- **Account ID** - The account ID of the user who initiated the process.
- **Validation ID** - The unique ID of the validation carried out by the user.
- **Validation date and time** - Timestamp of when the validation was performed.
- **Truora processing time** - The time used by our system to process the validation.
- **User interaction time** - The time used by the user to perform the validation process.
- **Failure, Declination, or Expiration details**
- **Failure status** - Information on why the validation failed.
- **Declined reason** - The reason why the validation was declined.
- **Background Check** - In countries where available, a **background check** is included in **document validation** (no extra cost). It verifies identity-related datasets only. If a {{< newtab href="/guides/background_check_custom_type/" >}}Custom type{{< /newtab >}} check has been subscribed and configured (may incur costs), additional datasets are included. The result includes a **Check URL** linking to the details.
- **Validations performed** - Refers to the subvalidations that were used to get to the final validation result.
- **Validations details** - At the bottom of the view you will see the details of the validation and its outcome.
#### Downloading Validations History (CSV)
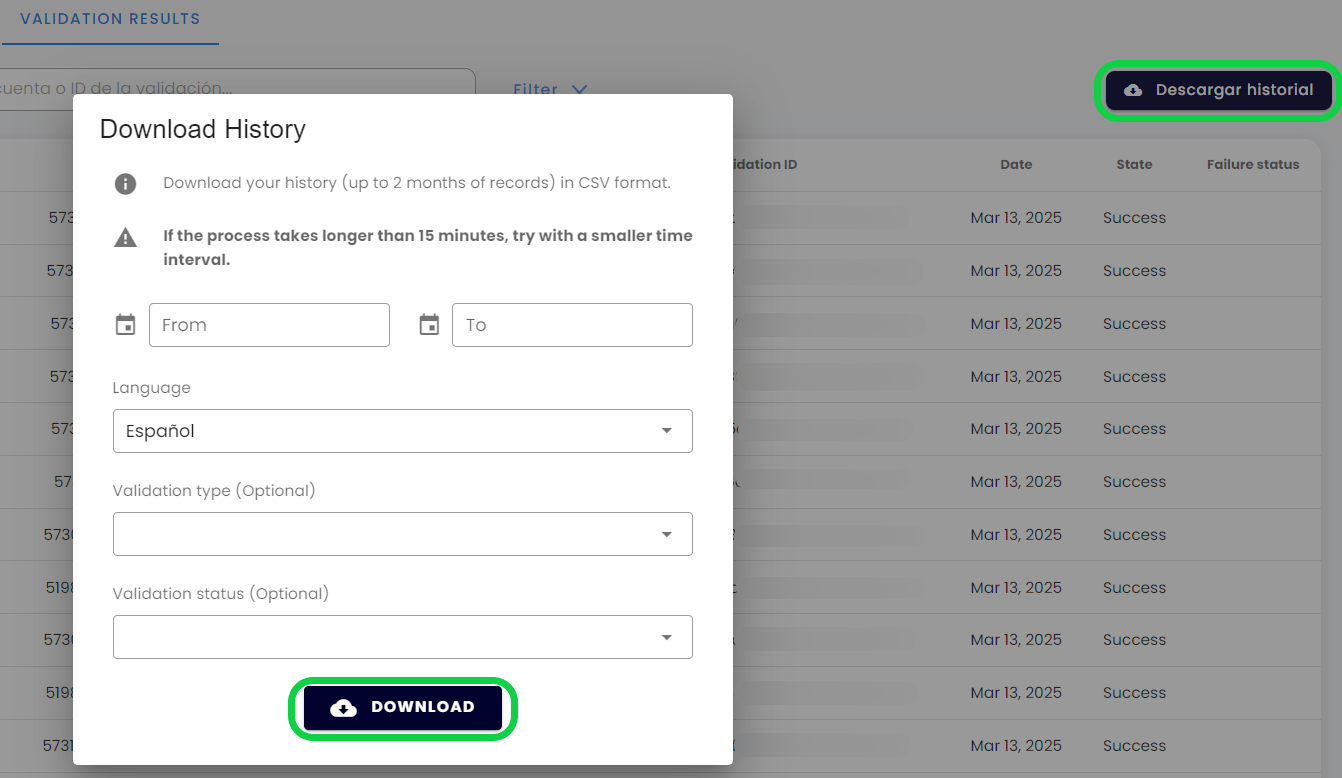
You can download a **CSV file** containing a summary of validations results within a **specific date range** (up to two months).
1. In **Results**, click on the **Download history** button.
2. **Select the time range (Required)** - Select a time range up to 2 months.
3. **Select the language (Required)** - Choose from *English*, *Spanish*, or *Portuguese*.
4. **Validation Type (Optional)** - Optionally, you can choose a validation type to filter results (e.g., *Document Validation*)
5. **Validation Status (Optional)** - Optionally, you can choose to filter results by their **Status** : *Success*, *Pending* or *Failure*.
{{
}}
- **General process details**
- **Account ID** - The account ID of the user who initiated the process.
- **Validation ID** - The unique ID of the validation carried out by the user.
- **Validation date and time** - Timestamp of when the validation was performed.
- **Truora processing time** - The time used by our system to process the validation.
- **User interaction time** - The time used by the user to perform the validation process.
- **Failure, Declination, or Expiration details**
- **Failure status** - Information on why the validation failed.
- **Declined reason** - The reason why the validation was declined.
- **Background Check** - In countries where available, a **background check** is included in **document validation** (no extra cost). It verifies identity-related datasets only. If a {{< newtab href="/guides/background_check_custom_type/" >}}Custom type{{< /newtab >}} check has been subscribed and configured (may incur costs), additional datasets are included. The result includes a **Check URL** linking to the details.
- **Validations performed** - Refers to the subvalidations that were used to get to the final validation result.
- **Validations details** - At the bottom of the view you will see the details of the validation and its outcome.
#### Downloading Validations History (CSV)
You can download a **CSV file** containing a summary of validations results within a **specific date range** (up to two months).
1. In **Results**, click on the **Download history** button.
2. **Select the time range (Required)** - Select a time range up to 2 months.
3. **Select the language (Required)** - Choose from *English*, *Spanish*, or *Portuguese*.
4. **Validation Type (Optional)** - Optionally, you can choose a validation type to filter results (e.g., *Document Validation*)
5. **Validation Status (Optional)** - Optionally, you can choose to filter results by their **Status** : *Success*, *Pending* or *Failure*.
{{ }}
### By means of Truora's API
Using {{< newtab href="/docs/#get-validation-section" >}}Truora's API{{< /newtab >}} you should:
1. Create a **GET** request to ``https://api.validations.truora.com/v1/validations/{validation_id}``
2. Replace ``{validation_id}`` in the URL with the **Validation ID** obtained in the request response when you create the validation via API, from **Truora's Dashboard**, or by setting up a rule to receive validation updates via {{< newtab href="/guides/webhook_rule/" >}}Webhooks{{< /newtab >}}.
3. Create a **Header** named ``Truora-API-Key`` and set its value to your API key.
4. To obtain details such as user inputs or user uploaded media for the validation, add the query parameter ``show_details`` set to ``true`` to the request.
5. Send the request. The ``validation_status`` begins as ``pending``. Upon completion, the validation can either be ``success`` or ``failure``.
Below is an example for a **face validation result**:
{{
}}
### By means of Truora's API
Using {{< newtab href="/docs/#get-validation-section" >}}Truora's API{{< /newtab >}} you should:
1. Create a **GET** request to ``https://api.validations.truora.com/v1/validations/{validation_id}``
2. Replace ``{validation_id}`` in the URL with the **Validation ID** obtained in the request response when you create the validation via API, from **Truora's Dashboard**, or by setting up a rule to receive validation updates via {{< newtab href="/guides/webhook_rule/" >}}Webhooks{{< /newtab >}}.
3. Create a **Header** named ``Truora-API-Key`` and set its value to your API key.
4. To obtain details such as user inputs or user uploaded media for the validation, add the query parameter ``show_details`` set to ``true`` to the request.
5. Send the request. The ``validation_status`` begins as ``pending``. Upon completion, the validation can either be ``success`` or ``failure``.
Below is an example for a **face validation result**:
{{}}
{{}}
Below is an example of the same **face validation result** as above, this time with the query parameter ``show_details=true`` included:
{{}}
{{}}