Truora’s Custom Integrations feature allows you to configure requests to external APIs and seamlessly incorporate them into your
Whatsapp flows. This functionality enables your flows to retrieve data and execute actions within your system.
In this guide, you’ll learn how to set up a Custom integration using API key authentication, which you can later utilize within Truora’s Flow builder in your Whatsapp flows. After completing this guide, we recommend proceeding to the guide on how to
Configure your flows to perform API requests.
Disclaimer: Configuring API requests requires a solid understanding of APIs and authentication methods. We recommend involving a developer or a tech-savvy individual to assist or handle this process.
Understanding custom integrations
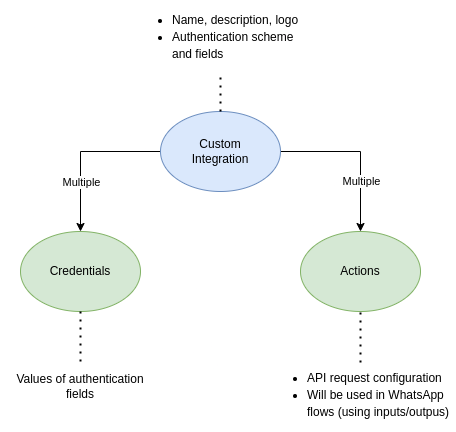
To streamline the process of configuring integrations, it’s crucial to understand the key entities involved in this guide and their relationships:
Integration: An entity that groups multiple related requests. It includes basic configuration options, such as the authentication scheme applied to all requests within it and the definition of the fields used for API authentication.
Credential: An entity that stores values for the authentication fields defined in the integration it belongs to. An integration can have multiple credentials, allowing you, for instance, to switch between different authenticated users or accounts in API requests depending on the WhatsApp flow using the integration.
Action: An entity that defines the configuration for a request to an API. Actions allow you to specify inputs and outputs—inputs enable the use of data provided by the WhatsApp user in the request, while outputs let you pass parts of the API response back to the WhatsApp flow. An integration can have multiple actions, all using the same authentication scheme.
Creating the integration
Follow these steps to learn how to create a custom integration within Truora’s platform:
In the left sidebar, click on Integrations. You will see a list of available CRM and below the Custom Integrations.
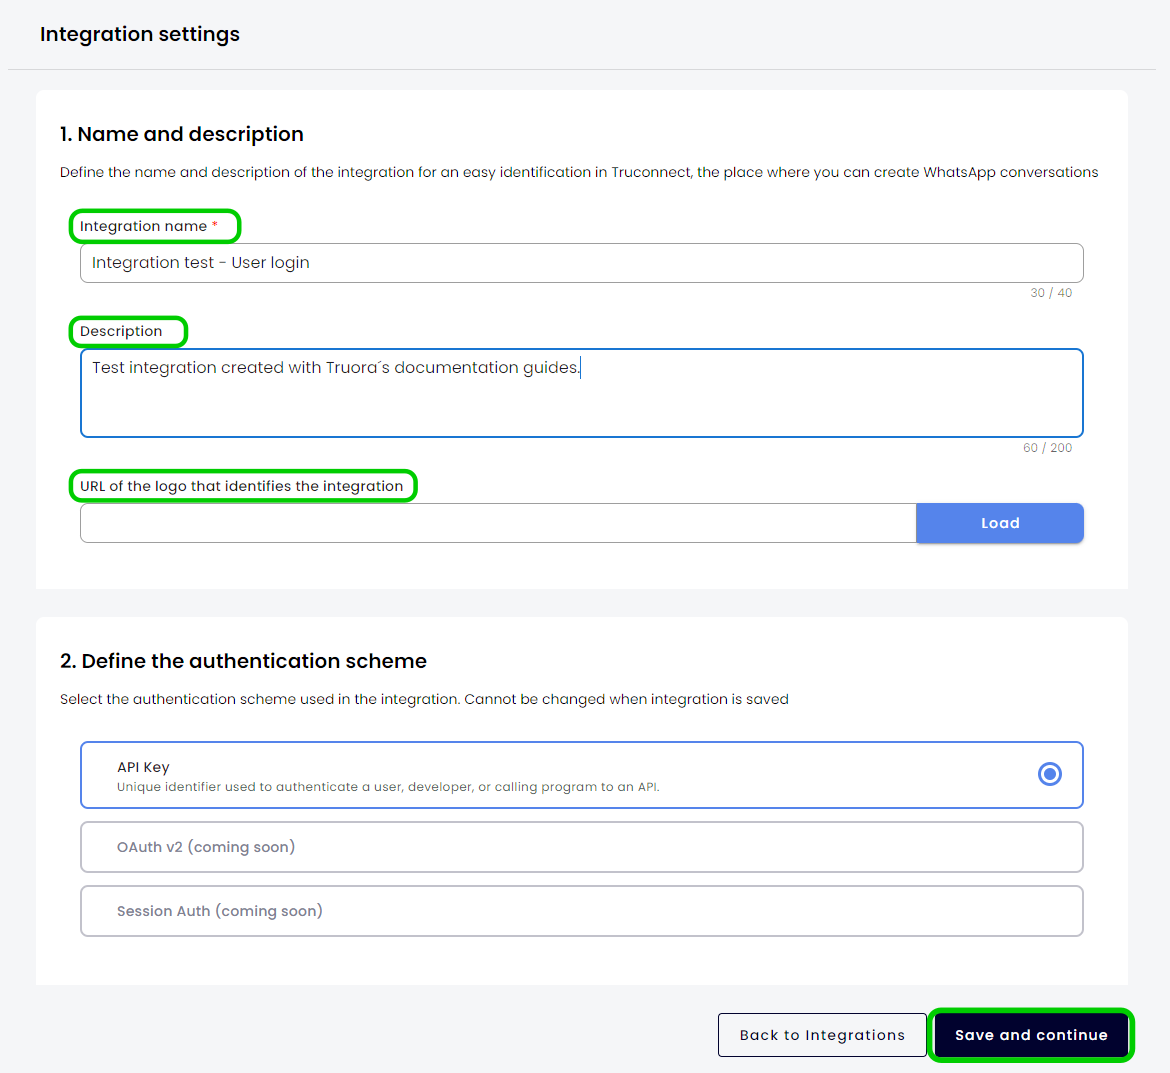
To create a new custom integration, click the New Integration button. This will redirect you to the Integration Settings view.
Fill in the Integration name (required) for your new integration and optionally add a Description and a URL of the logo that identifies the integration.
Next, select the authentication scheme for all actions that will be created for this integration. Currently, only API key authentication is supported.
By clicking Save and continue, the integration will be saved with the current settings, and the authentication section will appear.
Configuring authentication
After saving the basic information of your integration, the next step is to configure the authentication that will be used by the actions. For API key authentication, the following three steps are required:
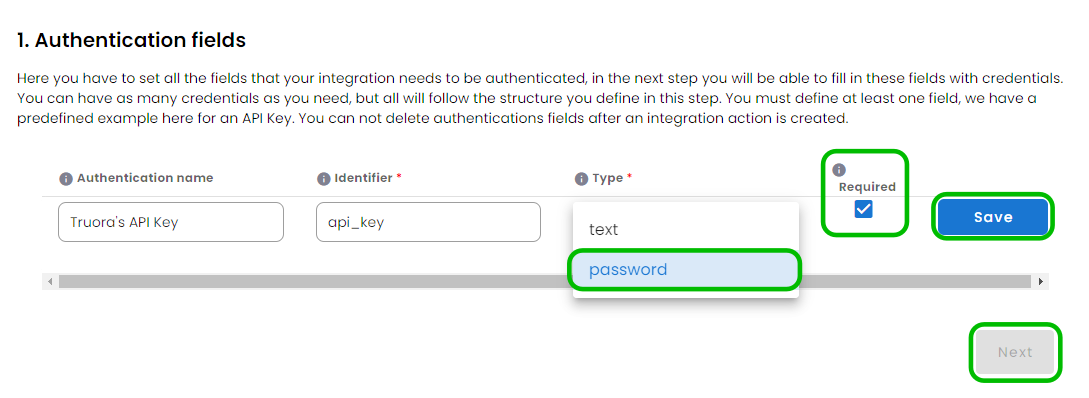
Adding Authentication fields: In this step, you’ll define the fields required by your APIs for authentication. For instance, Truora’s APIs only require an API key in the headers of each request. Therefore, for the example in this guide, only one authentication field needs to be created:
Fill in the following fields:
Authentication name: This field is optional. Enter a custom name for the authentication to easily recognize it later.
Identifier: This field is required. The Identifier will be used to reference an authentication field inside API requests. It should only contain lowercase letters, digits, and underscores (’_’). It must not start with a digit or underscore, nor end with an underscore.
Type: Select text or password for the authentication field type. Authentication fields set as password will be end-to-end encrypted in our systems.
Required: When checked, this option makes the authentication field Required when creating a credential. Optional fields (unchecked) won’t be obligatory when setting credentials.
Review all the fields and click on the Save button.
Note: At this stage, you are not setting any actual API key; you are merely defining the fields that will contain those keys. Please do not enter any credentials at this point.
Once you have saved your Authentication fields click on the Next button to open the Configure a test request component.
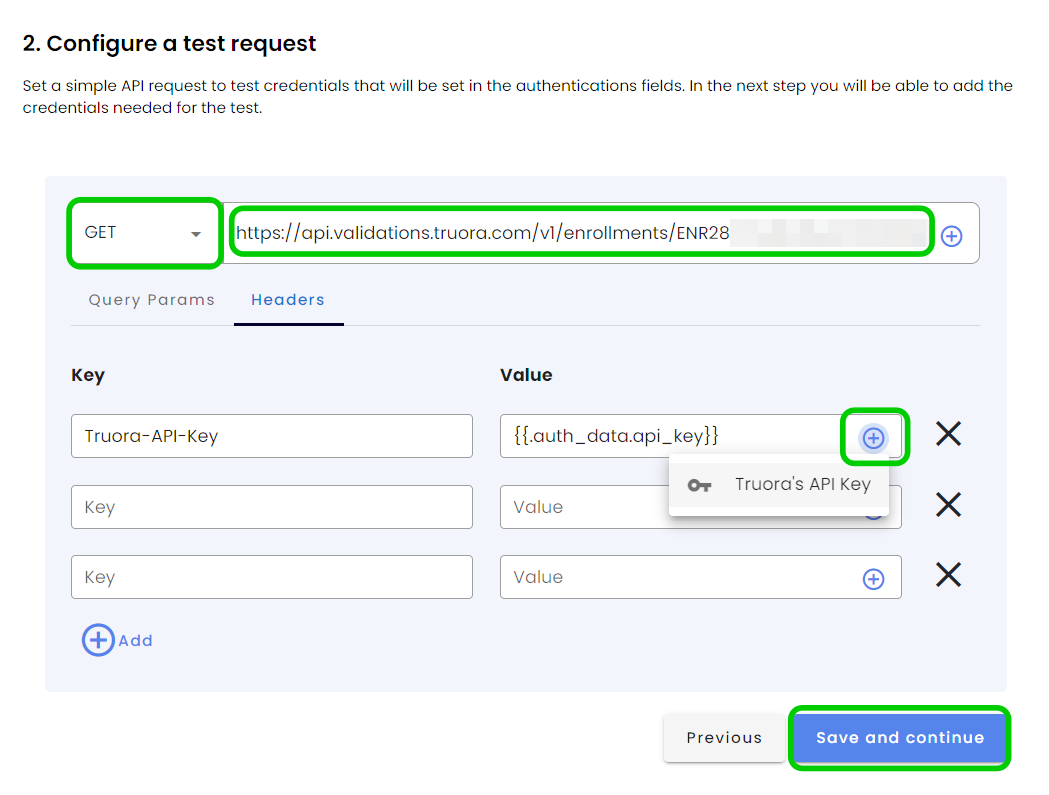
Configure a test request: At this point, you’ll need to set up a simple API request to test the credentials defined in the authentication fields. We recommend using a request that only retrieves information to avoid accidentally making changes to your system data during testing.
Fill in the test request:
Type of request: Select one of the following methods: GET, POST, PUT, DELETE, OPTIONS, CONNECT, TRACE or PATCH. We recommend using a method that only retrieves information to prevent unintended modifications to your system data.
Endpoint: Enter the API’s endpoint URL.
Query Params: If required, set the key-value pairs for the query parameters of your test request.
Headers: Enter the required key-value pairs for the headers of your test request. You can click the “+” button inside a header’s value field to add a reference to one of the authentication fields defined earlier. In the example used in this guide, a reference to the created authentication field is set in the “Truora-API-Key” header.
Click on Save and continue to proceed to set the Credentials.
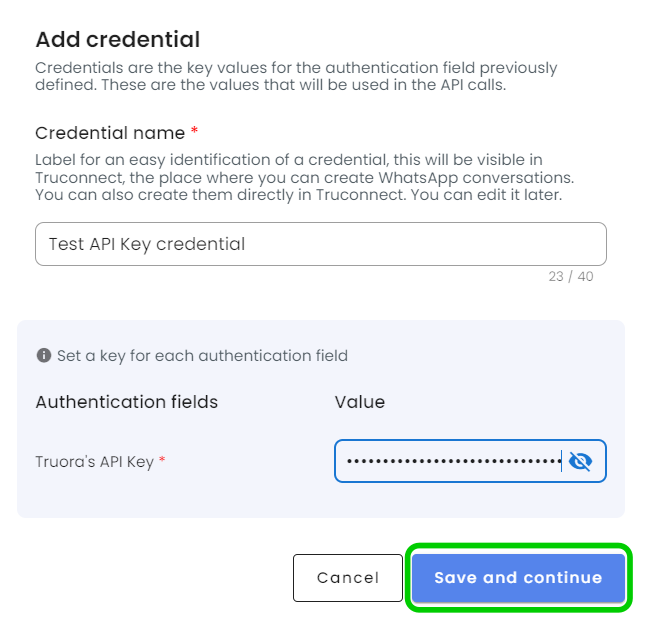
Setting Credentials and Testing: To create the credential that will contain values for your authentication fields, click the Add credentials button. A modal will appear where you can set your new credential’s name and enter actual values for each authentication field.
The Credential name you set here will help you easily recognize it later when using it in Truora’s Flow builder.
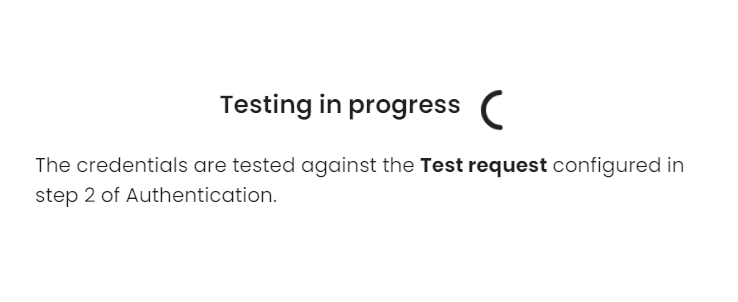
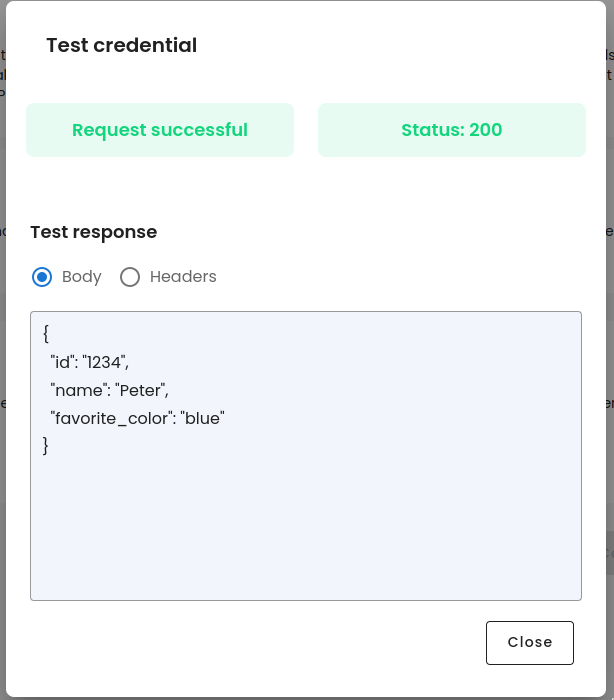
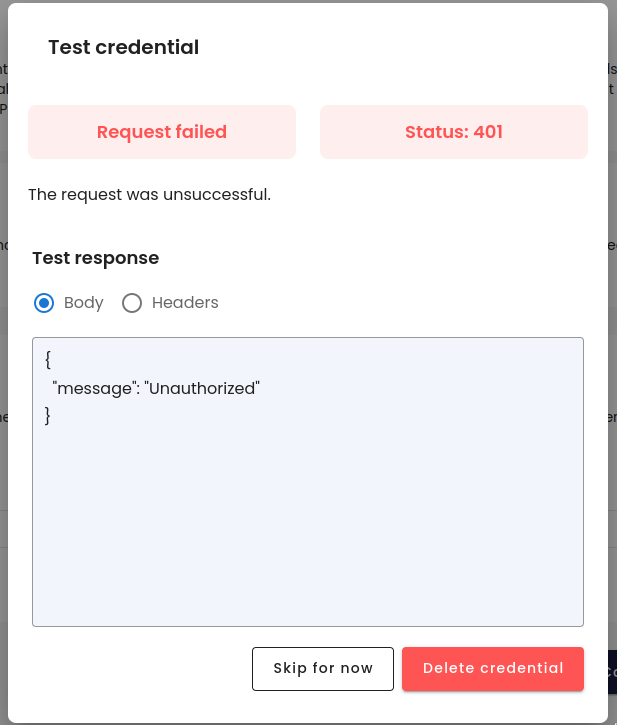
Click Save and continue, and the system will begin testing your credentials against the test request you configured in step 2. Ensure that the status code and the response body are correct:
A successful request response should look something like the following. If everything is correct, click the Close button to proceed:
If an error occurs, review your configured test request and/or create a new credential if you suspect the API key or any other parameter was entered incorrectly.
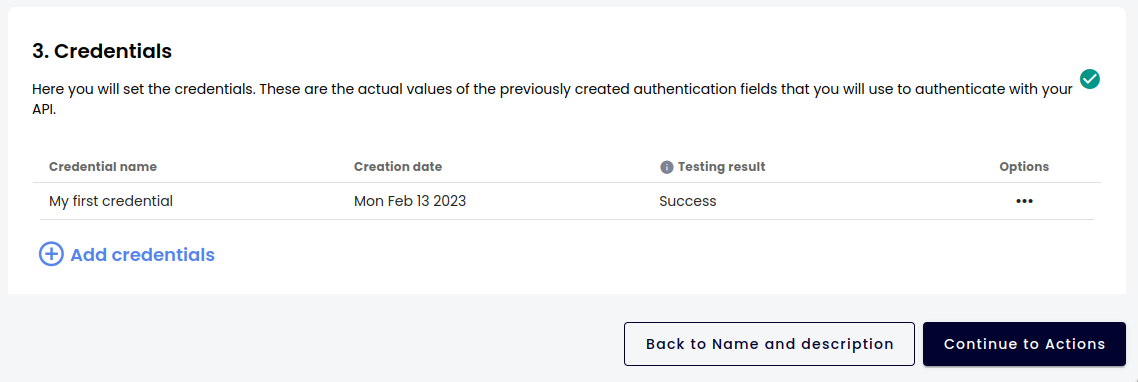
Setting additional credentials: After successfully setting and testing your credentials, a table containing your existing credentials will be displayed. Here, you can:
Add credentials: Create additional credentials. We recommend creating a credential that points to a testing account/user if you haven’t already done so.
Rename: Edit the names of existing credentials.
Test: Test any credential using the test request configured in the previous step.
Remove: Delete credentials you no longer need or those with incorrect values.
If everything is correctly set and tested, click Continue to Actions to proceed to the Actions section and start creating them.
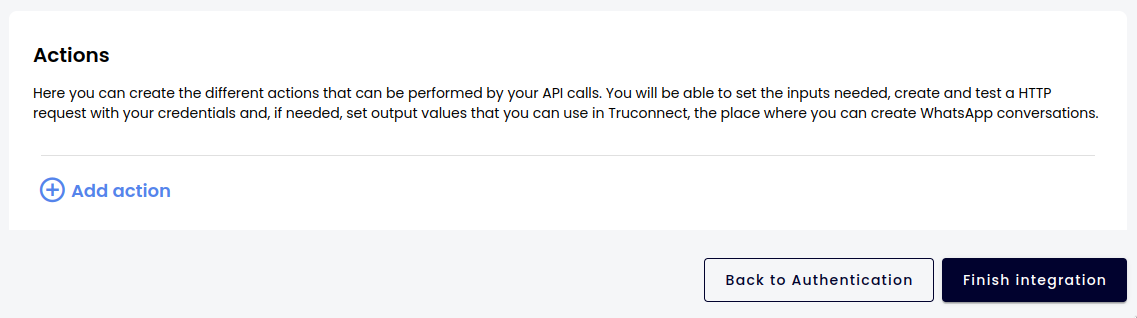
Creating actions for your integration
For this guide’s example, we’ll use Truora’s Validation API to validate a user’s email address, simulating a login process. We’ll create two actions for this:
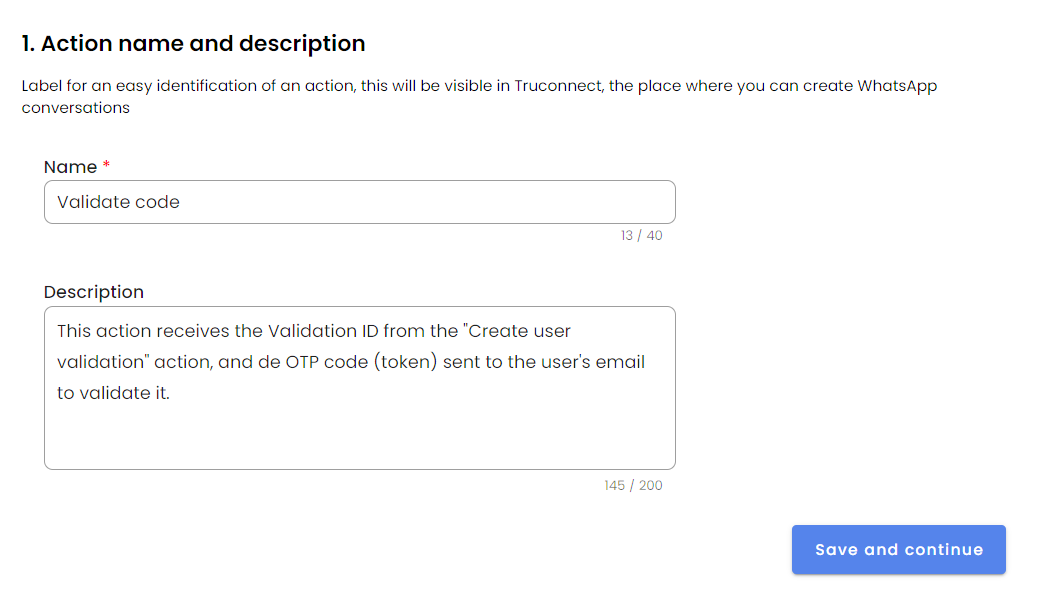
Create user validation: This action receives a username (account ID) provided by the user, makes the request to the API, which sends an OTP code to the user’s email, and returns a validation ID if the user exists. This validation ID will be the input for the next action.
Validate code: This action receives the validation ID from the first action, along with the OTP code entered by the user, and makes the request to validate the code.
To create the first action of an integration, click the Add action button. A new view will appear with a sequence of steps:
Create user validation - Example action 1
This action receives a username (account ID) provided by the user, makes the request to the API, which sends an OTP code to the user’s email, and returns a validation ID if the user exists. This validation ID will be the input for the next action.
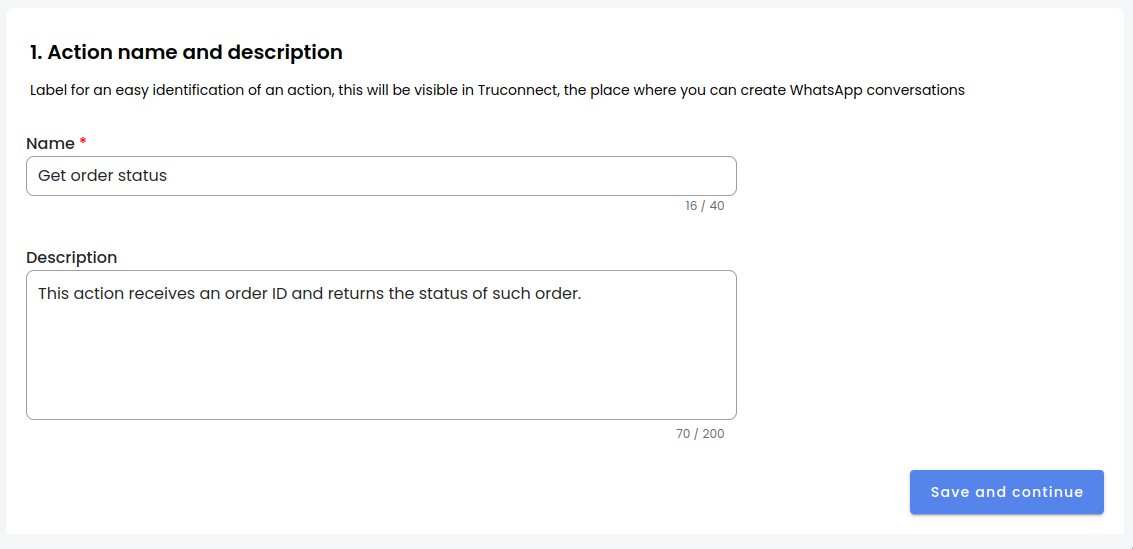
Action name and description: Set a name (required) and description (optional) to easily recognize the action when using Truora’s Flow builder. As mentioned earlier, the first action in our example is Create user validation:
Click Save and continue to proceed to define inputs.
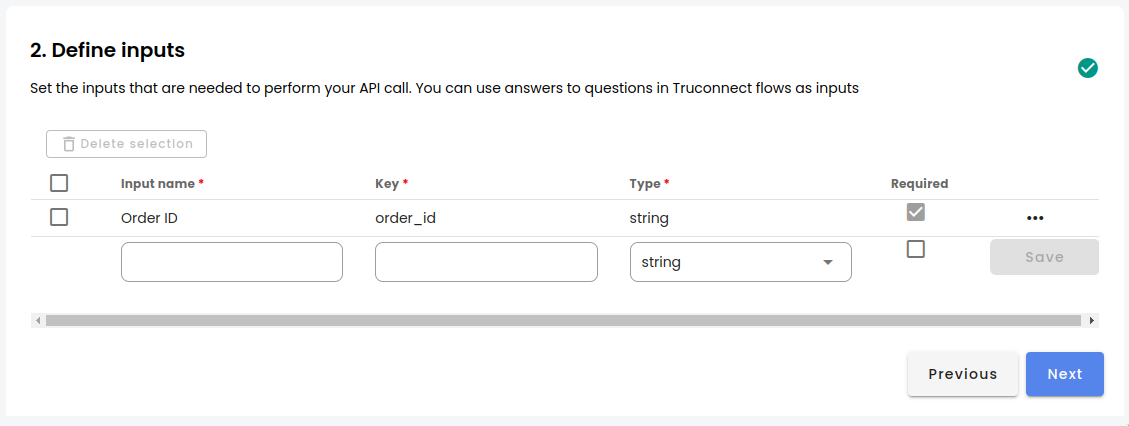
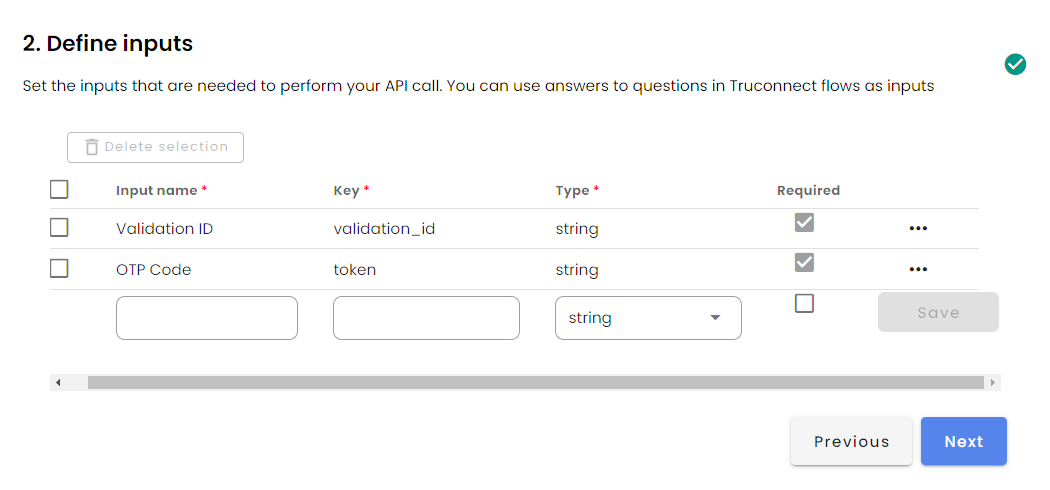
Define inputs: Define the required inputs to perform your API call. These inputs will be used to receive values from previous steps in your Whatsapp flow and insert them in your request. For this action in our example, the only required input is the Username (account_id), provided by the user in the WhatsApp flow and marked as Required.
Fill in the following fields:
Input name: This field is required. Enter a custom name for the input to easily recognize it in your WhatsApp flow.
Key: This field is required. This is the actual key used to perform your API request. Be sure to write this correctly. It should only contain lowercase letters, digits, and underscores (’_’). It must not start with a digit or underscore, nor end with an underscore.
Type: This field is required. Select the type of your input, which could be: string, integer, number, boolean or datetime.
Required: When checked, this option makes the input field required when using the action.
Review all the fields and click on the Save button.
You may also create optional inputs for any other information that may not always be provided by the user.
Once you’ve set all the inputs for your specific request, click Next to proceed to Configure your API Request.
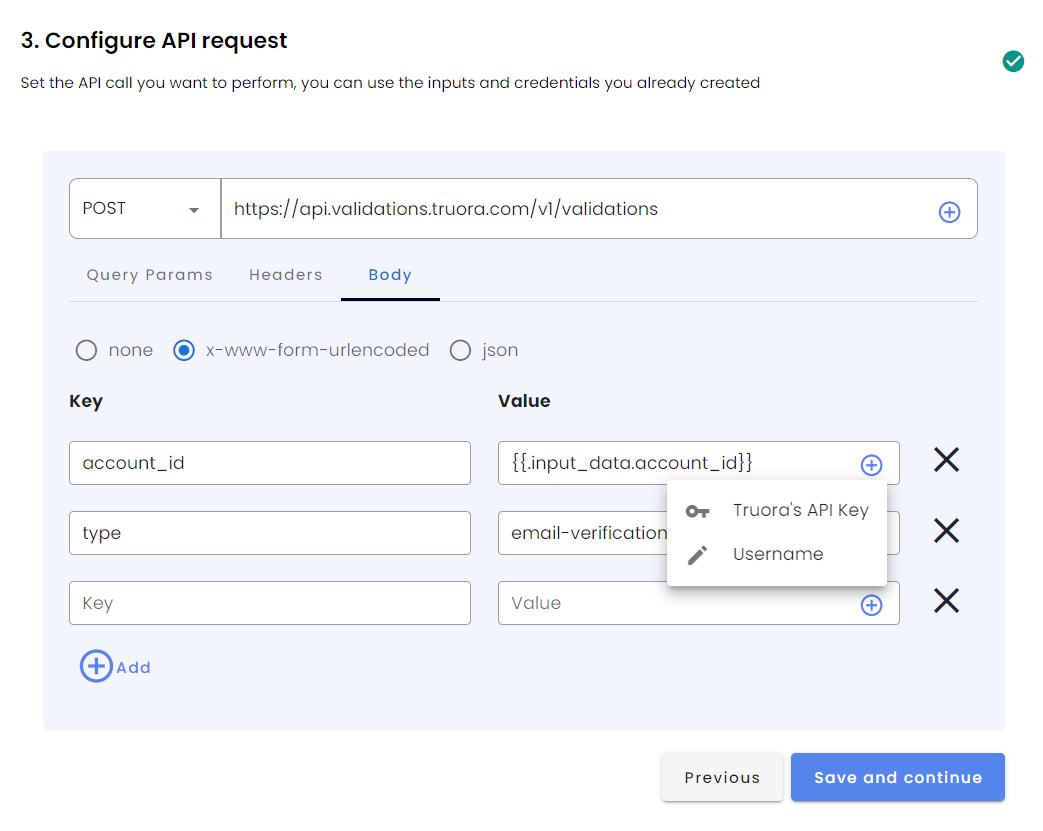
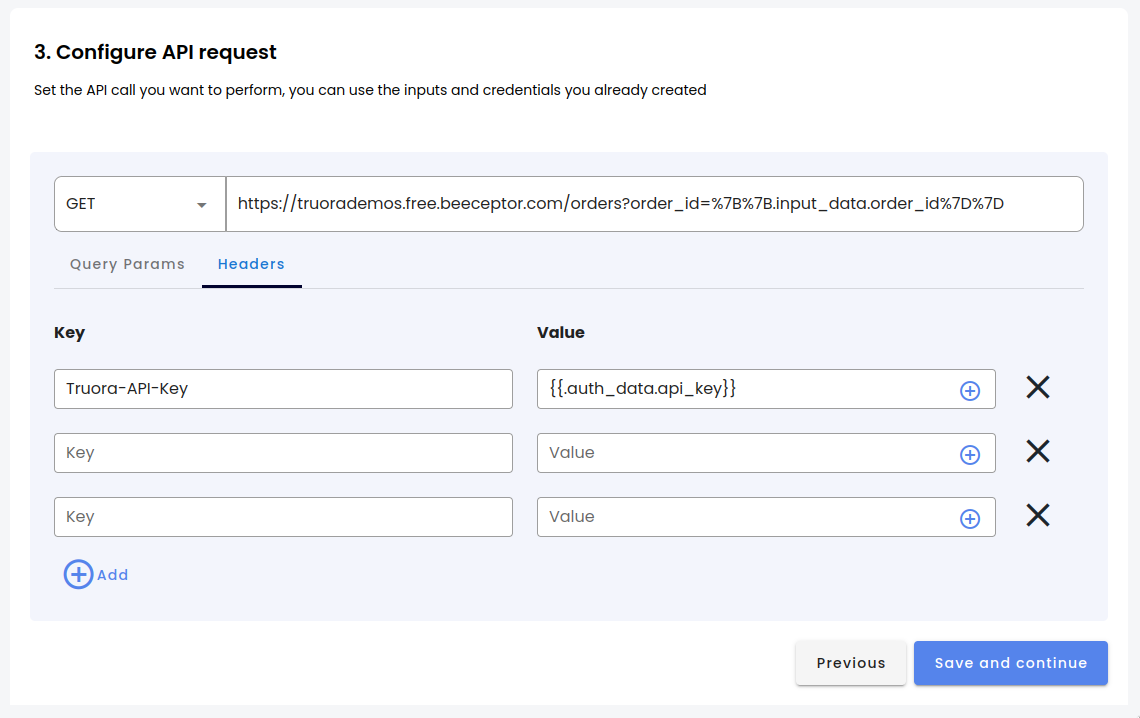
Configure API Request: Set up your API request filling the required authentication, headers and parameters.
Set request:
Type of request: Select the method: GET, POST, PUT, DELETE, OPTIONS, CONNECT, TRACE or PATCH.
Endpoint: Enter the API’s endpoint URL. You can click the “+” button inside the URL field to add a reference to one of the inputs defined earlier.
Query Params: If required, set the key-value pairs for the query parameters of your test request. You can click the “+” button inside the Value field to add a reference to one of the inputs defined earlier.
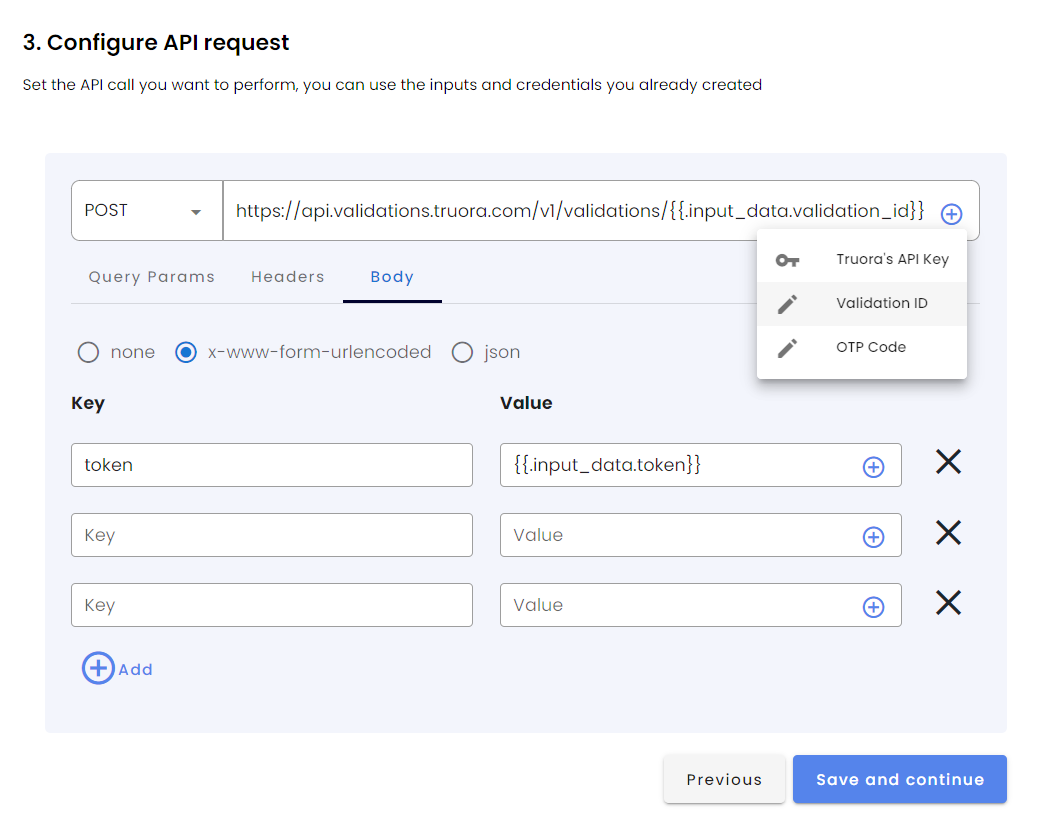
Body: If required, set the key-value pairs for the body parameters of your test request. You can click the “+” button inside the Value field to add a reference to one of the inputs defined earlier. In the example used in this guide, a body parameter containing a reference to the account_id (Username) input was added.
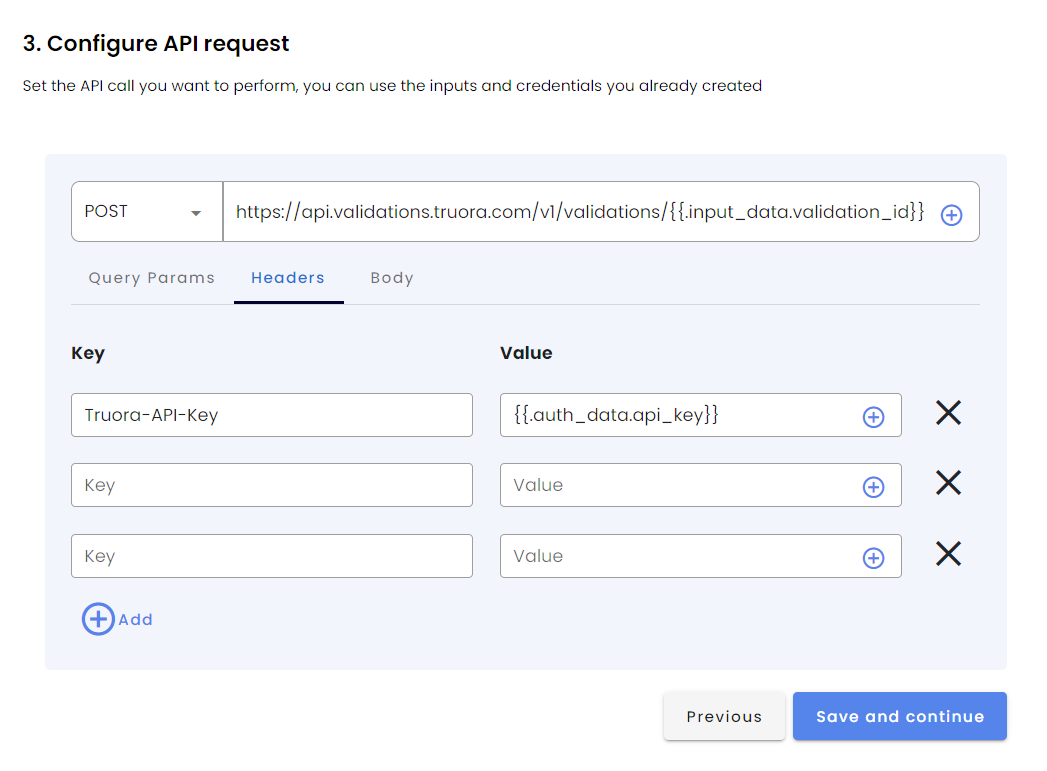
Headers: Enter the required key-value pairs for the headers of your request. Click the “+” button inside a header’s value field to add a reference to one of the authentication fields defined earlier. In the example used in this guide, a reference to the created authentication field is set in the “Truora-API-Key” header.
Once you’ve configured your API request, click Save and continue to proceed to Test your API Request.
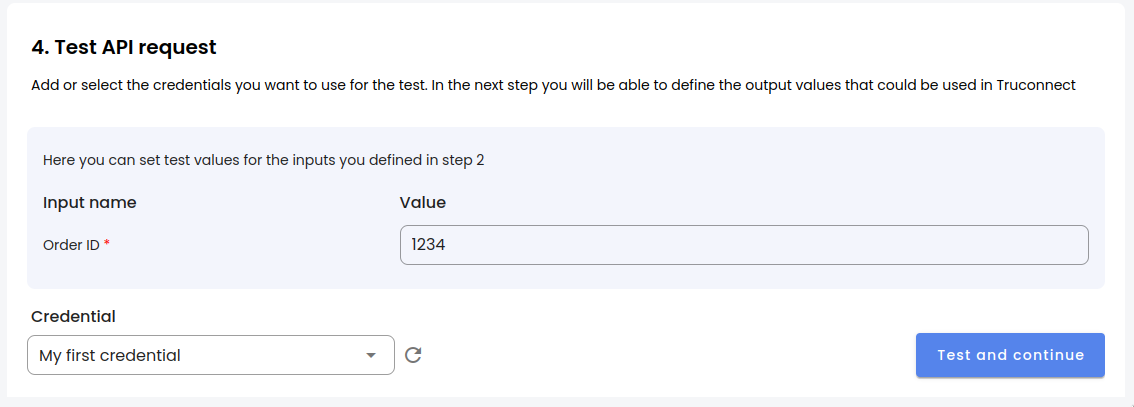
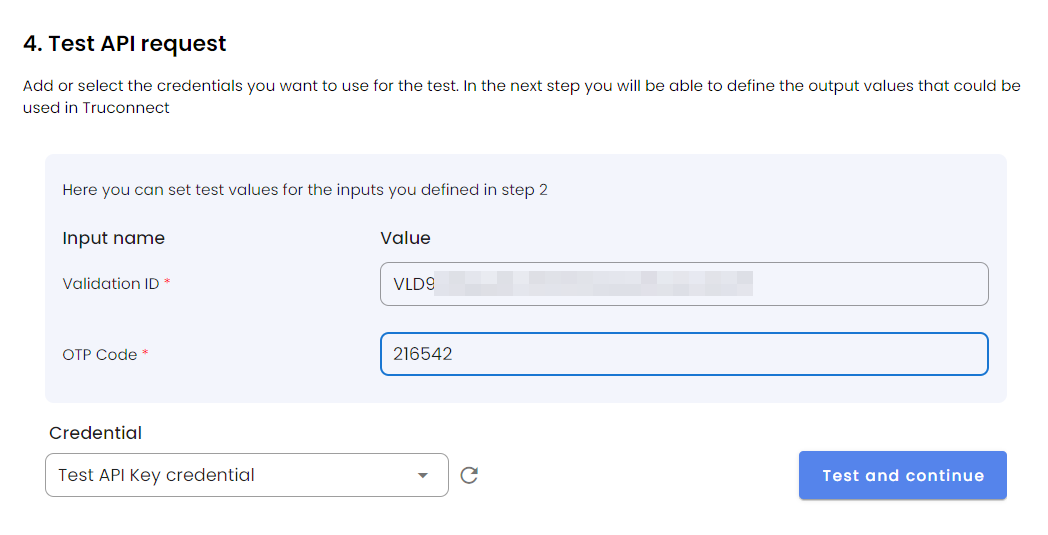
Test API request: Here you can test the created request by setting a test value for each input defined earlier and selecting a credential. We recommend using a credential pointing to a test account or user.
Click Test and continue when ready, and review the response to finally Define outputs in the next step.
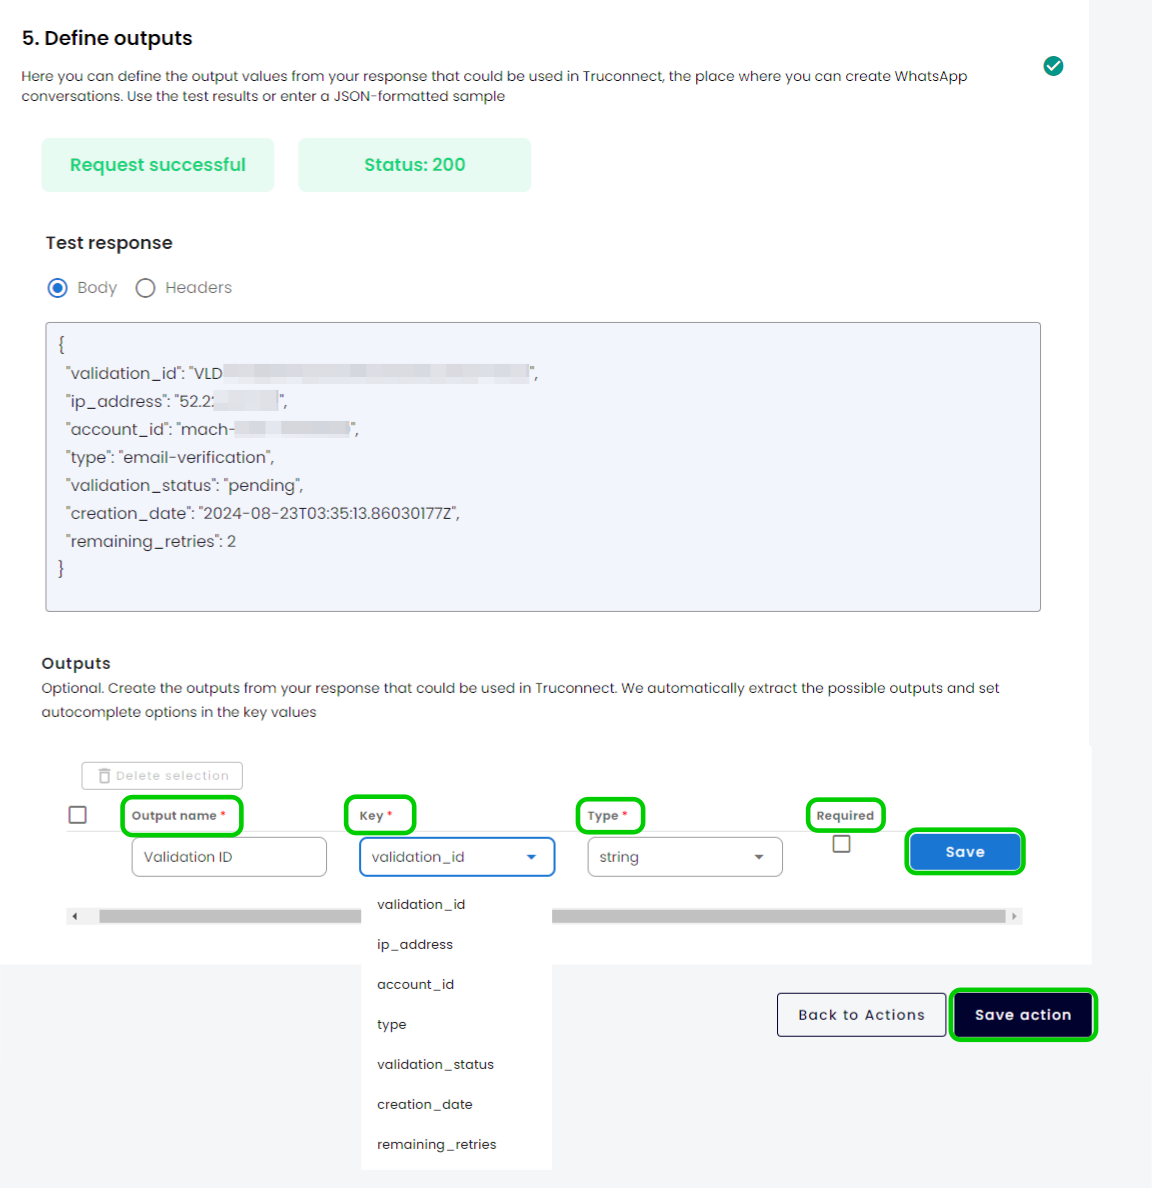
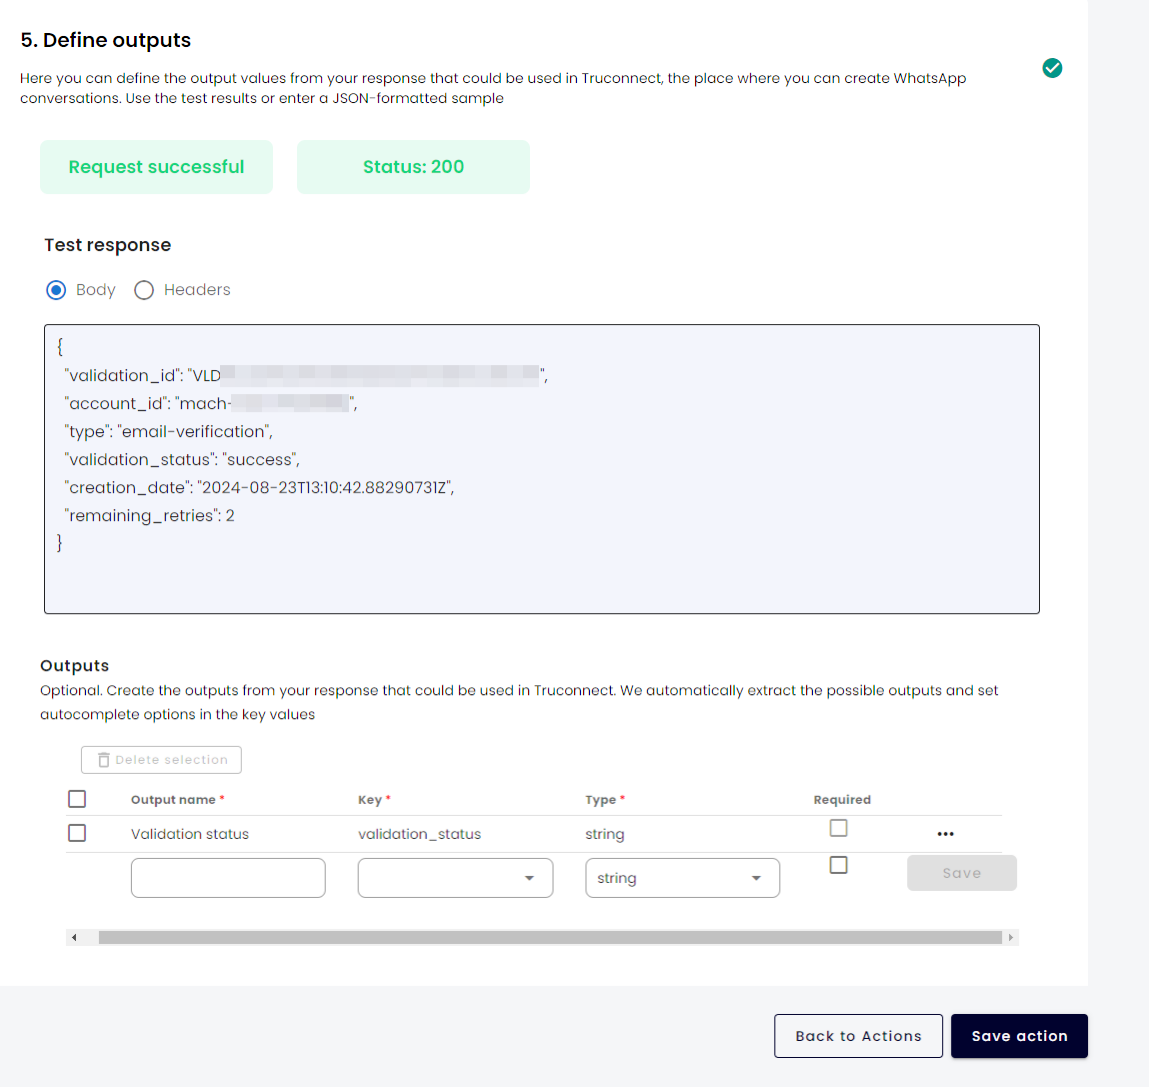
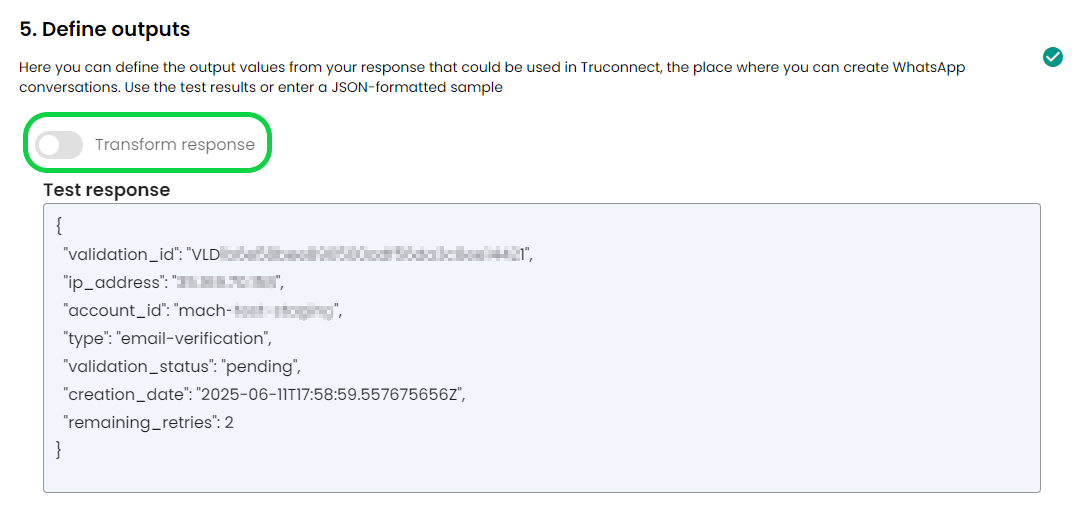
Define outputs: After ensuring the response has a correct status and body, you can select certain parts of the response to set them as outputs. These outputs may be later used in your Whatsapp flow. Our system will automatically extract the possible outputs from the response, so you just need to select them:
For the example of this guide, there are a couple of potential attributes to use, but we will only create an output for the validation_id, which is the value we need to use it in future steps inside a Whatsapp flow. You may create as many outputs as you need for your specific Whatsapp flow.
Fill in the following fields:
Output name: This field is required. Enter a custom name for the output to easily recognize it in your WhatsApp flow.
Key: This field is required. This is the key from the response of your API request. Select the output from the ones detected in your response.
Type: This field is required. Select the type of your output, which could be: string, integer, number, boolean or datetime.
Required: When checked, this option makes the output field required. If the request response doesn’t include this output, the Custom integration block within your Whatsapp flow will fail.*
Review all the fields and click on the Save button.
*Note: As shown in the previous image, the properties from the JSON response can be selected in the Key field. However, there might be cases where your API responds with additional fields. In such cases, you can manually enter the Key and set the output as not required to prevent the Custom integration block from failing.
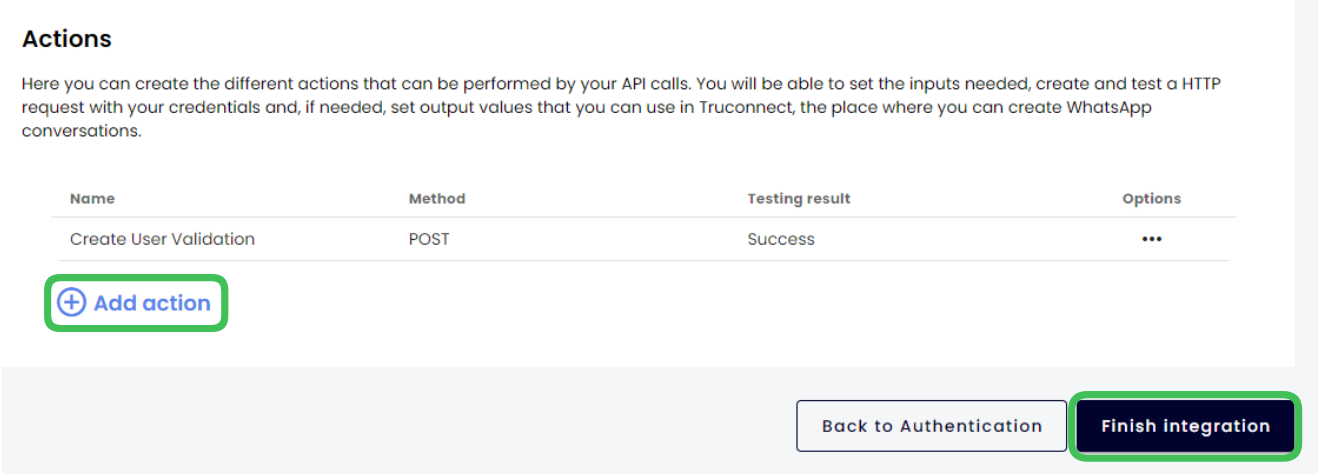
Once you’ve finished configuring all your outputs, click on Save action to be redirected to the initial actions section:
Here, you can add more actions by clicking on Add action and repeat the process.
For the purpose of this guide, remember that we need to create a second action. The next section will show images of the same process we just reviewed, specifically for the creation of the second action.
Validate code - Example action 2
In this section, we’ll present images of the process for creating the second action. Since this process closely follows the steps detailed in the previous section, Create user validation - Example action 1, we won’t go into extensive detail here.
The Validate code action we will create, receives the validation ID from the Create user validation action, along with the OTP code entered by the user, and returns a final status of the code validation.
Action name and description
Define inputs
Configure API Request
Body and URL:
Headers:
Test API request
Define outputs
Once you’ve finished configuring all your outputs, click on Save action to be redirected to the initial actions section:
Here you can:
Add more actions by clicking on Add action and repeat the process.
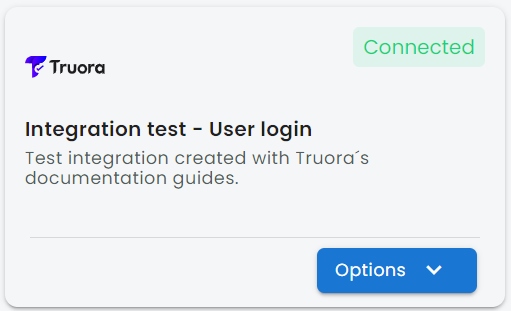
If you’ve finished creating all your actions, click on Finish integration to be redirected to the general integrations view. Your new integration should now appear there:
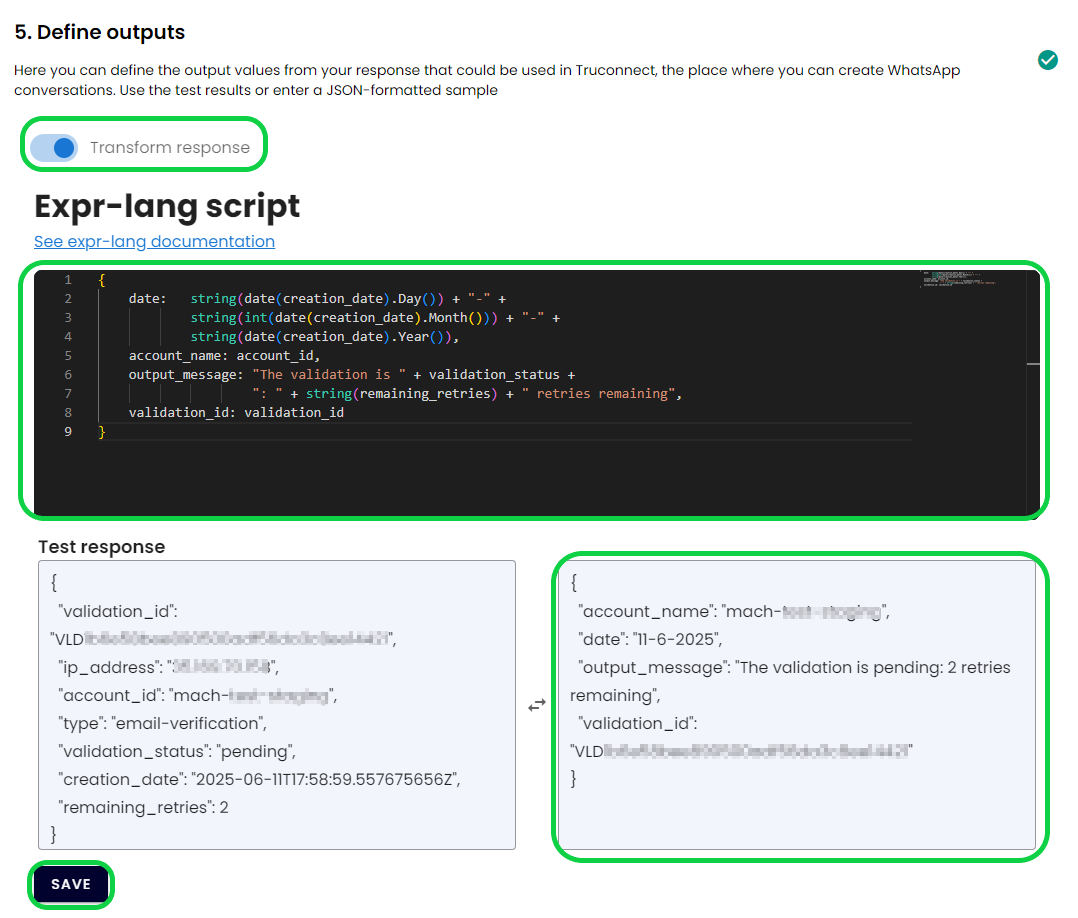
Transform Response
When creating actions for your integration, you can transform the raw API response using the Transform Response feature.
This allows you to reshape the response however your system or Flow requires. Below are just a few common use cases:
Clean up or simplify the response structure
Rename keys to match your expected variables
Format dates, numbers or other values
Build custom strings or extract only specific values
To use this feature:
While creating or editing an Action, enable the Transform Response toggle in the Define outputs step.
This will enable a built-in editor to write your transformation script using Expr-lang syntax.
The script will run on the Action’s API Test response and must return the transformed structure you want to work with.
Once your script is ready, click Save to store the transformation and then click Save Action.
Note: If you’ve already defined Outputs for the Action (to use later in your WhatsApp Flow), you’ll need to redefine them if the transformation script removes or renames the original keys.
Transform Response - Example
Here’s an example of a transformation script applied to the response of the Create user validation Action:
📘 Refer to the official
Expr-lang documentation for full language capabilities and advanced syntax.
Next steps
Once you have successfully created a Custom integration, you can use its actions within a Whatsapp flow (via our flow builder) to interact with external APIs. To learn how to implement this, using the example created in this guide, visit our guide on Configuring your flows to perform API requests.