How to Submit a Background Check Batch
With the information contained in an Excel (.xlsx) file, you can perform multiple background checks simultaneously. These checks can be of any type, including person, vehicle, company, or a custom type. Additionally, you have the option to make Continuous Checks.
Prerequisites
- Truora API-Key: You should already have your Truora API-Key. If you don’t, Set up an account and then go to Authentication to obtain your Truora API-key.
- A valid ID: From the person, vehicle, or company to run the Background Check.
- Postman: Use Postman or any other collaboration tool for API development. Although it is not required to perform the integration, it will help perform tests along the way.
1. Create Batch
The first step in submitting a background check batch is to perform a request by following these steps:
-
Create a POST request to the endpoint
https://api.account.truora.com/v1/batches -
Set the following headers
Truora-API-Key: enter the value obtained in the step of get Truora API-key.Content-Type: the value should beapplication/x-www-form-urlencoded.
-
Set the required values for the request body
type[Required]: Allowed: person | vehicle | company | custom_type_name.
This specifies the type of the batch checks. Replace custom_type_name with the name of your custom type if you are performing a batch of custom type checks. For instructions on creating a custom type, please refer to the How to Create a Custom Type for Background Check guide.service[Required]: Allowed: checks.
This specifies the service for which the batch will be processed.country[Required]: Allowed: ALL | BR | CO | CL | MX | PE | CR.
Indicate the country of origin of the documents for which the batch will be processed.columns_mapping.{input_name} [Optional]: This parameter allows you to map the columns of the Excel file (.xlsx). Replace {input_name} with the corresponding input name (e.g.,columns_mapping.national_id). The value should be the index of the column in the file, where 0 corresponds to column A, 1 to column B, and so on. If no column mapping is provided, all inputs for the selected check type will be automatically mapped. See the next step for more details.end_date[Optional]: The date when background checks will stop, used to create a batch of continuous checks. The format should beYYYY-MM-DD. For the date to be valid, it must allow at least one check to run according to the specified frequency.frequency[Optional]: The interval between background checks for creating a batch of continuous checks. It can bedaily,weekly,monthly,yearly, or a custom frequency written as a number followed by a letter (dfor days,wfor weeks,mfor months,yfor years). For example:3d(every three days),2w(every two weeks).
Note: If you want to create a batch of continuous checks it is mandatory to send both end_date and frequency body parameters.
-
This step involves mapping the columns of the Excel (.xlsx) file to define its format for correct processing later. You have two options:
-
Manually map the columns of the Excel file to the desired inputs for the Check Batch:
Depending on the check type and country of the batch, certain inputs are required. To achieve the highest accuracy, provide as many inputs as possible. The names of the available inputs can be found in the Create Check API Reference. For each column in the Excel file representing an input, you must send a body parametercolumns_mapping.{input_name}. The following image shows an example of mappingnational_idandissue_datein Postman: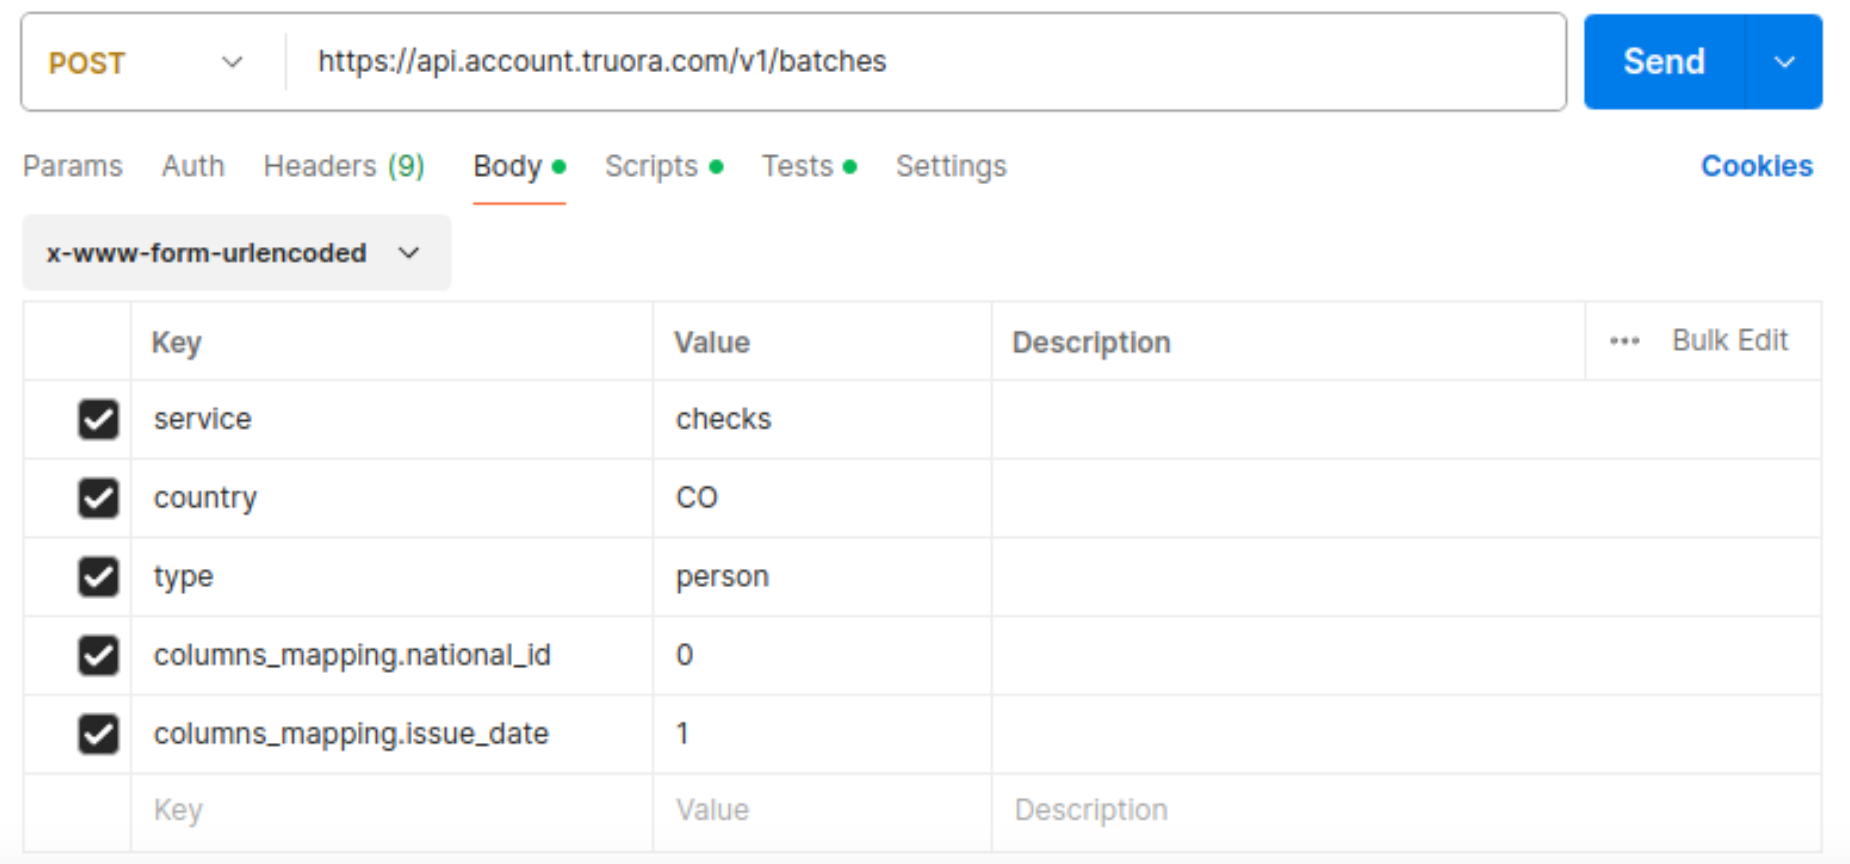
-
Allow the service to map the columns automatically:
If nocolumns_mapping.{input_name} body parameters are provided, the service will automatically map all inputs for the selected check type and return the results in the response.
-
-
Send the Create Batch request you just configured. You will receive a response similar to the following:
https://api.account.truora.com/v1/batches
Notes:
- The
batch_id,columns, andfile_upload_linkare fields that you will need to use in the subsequent steps.- The
file_upload_linkhas an expiration time of 30 minutes.
2. Fill the Excel (.xlsx) File
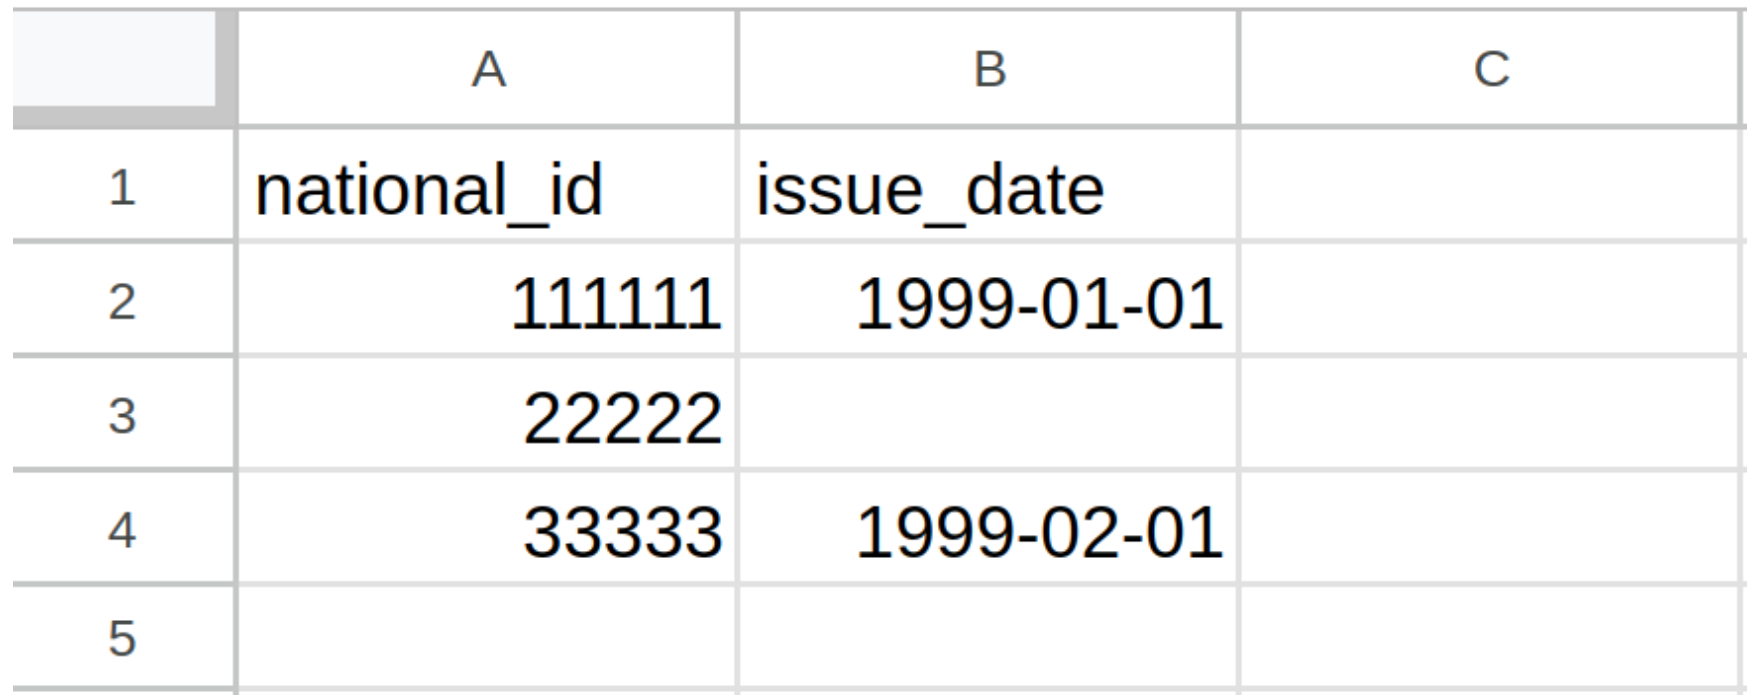
Open your Excel (.xlsx) editor and create a new file. The file must be filled according to the columns returned in the previous step, keeping the same order. Use the first row to add the input names, and add the check inputs in the subsequent rows. Below is an example of an Excel file with the columns returned earlier:
-
The first row is reserved for input names, so do not use it for check inputs.
-
It’s important to include all the columns returned in the previous step in the same order, even if some columns are not filled. For example, if the columns returned were [
national_id,foreign_id,issue_date], the Excel file should look like this: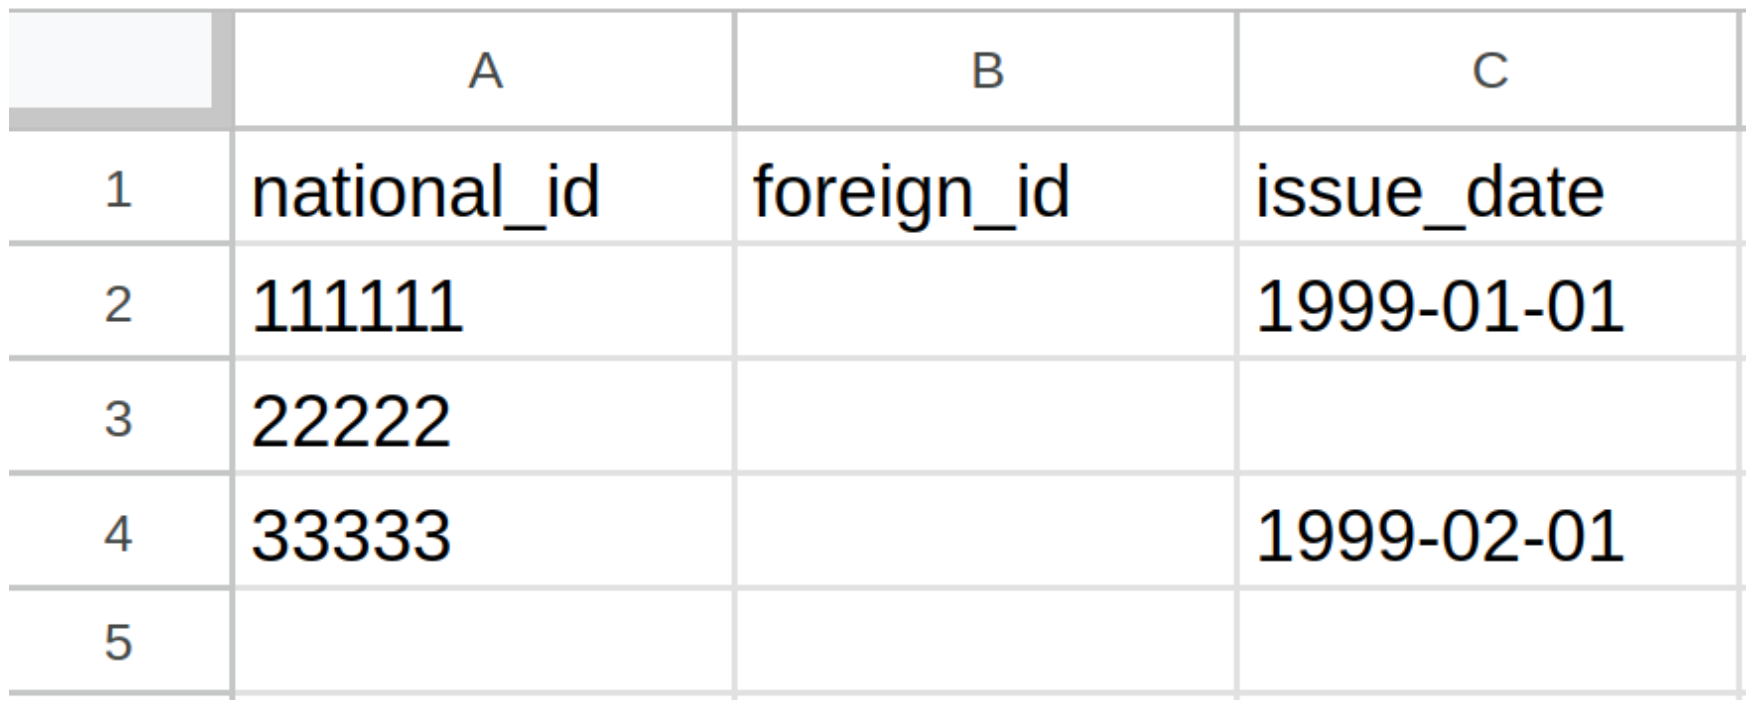
Notes:
- The
foreign_idcolumn is not filled, but it must still be included in the file since all mapped columns are expected. Omitting any columns could cause the system to process the batch incorrectly.- You only have one chance to upload the file, so ensure the information is correct before proceeding.
3. Upload Excel (.xlsx) File
Please upload files with a maximum of
1000records each. You can upload as many files as needed.
Submit the Excel (.xlsx) file via a PUT request to the URL provided in the file_upload_link from the Create Batch step,
ensuring you select the “Binary” type in the request body.
After sending the PUT request, you will receive a response similar to the following:
{{file_upload_link}}
4. Start Batch
To start processing the batch, follow these steps:
- Send a POST request to the endpoint
https://connect.truora.com/account-api/v1/batches/{{batch_id}}/start, where {{batch_id}} is the identifier returned in the Create Batch request. - Set the headers:
Truora-API-Key: Enter the value obtained in the step of get Truora API-key.
- After creating the request, send it. If everything is successful, you will receive a response similar to the following:
POST
/v1/batches/{{batch_id}}/start
5. Get Batch
The Get Batch request allows you to retrieve the current status and other information about the batch progress, such as size,
column mapping, country, and check type. The batch starts with the status not_started. Once it begins, the status changes to in_progress.
The final status can be stopped, finished, or error.
To get the batch information, follow these steps:
- Send a GET request to the endpoint
https://api.account.truora.com/v1/batches/{{batch_id}}, where {{batch_id}} is the identifier returned in the Create Batch request. - Set the headers:
Truora-API-Key: Enter the value obtained in the step of get Truora API-key.
- After creating the request, send it. If everything is successful, you will receive a response similar to the following:
GET
/v1/batches/{{batch_id}}
Request Batch Report Generation
To request the generation of a report with the batch results, follow these steps:
- Send a POST request to the endpoint
https://api.account.truora.com/v1/batches/{{batch_id}}/report, where {{batch_id}} is the identifier returned in the Create Batch request. - Set the headers:
Truora-API-Key: Enter the value obtained in the step of get Truora API-key.
- Set the required values for the request body:
format[Required]: Allowed value: xlsx. This specifies the file format for the batch report.
- After creating the request, send it. If successful, you will receive an empty response with a 201 (Created) status:
POST
/v1/batches/{{batch_id}}/report
5. Get Batch Report
To retrieve the report with the batch results generated in the previous step, follow these steps:
- Send a GET request to the endpoint
https://api.account.truora.com/v1/batches/{{batch_id}}/report, where {{batch_id}} is the identifier returned in the Create Batch request. - Set the headers:
Truora-API-Key: Enter the value obtained in the step of get Truora API-key.
- After creating the request, send it. If successful, you will receive a response similar to the following:
GET
/v1/batches/{{batch_id}}/report - Create and send a GET request to the
batch_report_urlobtained in the previous step. This will download an Excel (.xlsx) file containing the results of the batch.
Note: The first sheet of the report, called
Results, displays the checks that were executed successfully. The second sheet, calledErrors, lists any errors that occurred while attempting to create some checks.
Getting Results Automatically (Webhooks)
To receive automatic responses for individual checks, you must subscribe to webhooks. For more information, please see the Webhooks guide.