Getting started: Shared logic
This guide contains the shared logic used across all Truora Validations SDK integrations (Android, iOS, Flutter, React Native).
Prerequisites & Authentication
API Keys
The Validations SDK uses a two-key system, and you need both keys to integrate:
- Generator Key — A long-lived master key whose only grant is to create SDK keys. It lives on your backend and must never be shipped inside your mobile app.
- SDK Key (temporary) — A short-lived key created from the Generator Key for a single validation session. This is the key type the SDK actually consumes; any other key type will result in an error.
The flow is always the same: create the Generator Key once, then use it to mint a fresh SDK key per validation session.
Step 1 — Create the Generator Key
The Generator Key can only be created via the API, authenticated with an existing backend key. So this is a two-part step you do once:
- Create a backend key from the dashboard. Follow the authentication guide to generate your API key from the dashboard.
- Use that backend key to create the Generator Key by calling
/v1/api-keyswith the backend key in the request header:
Truora-API-Key:<your backend key>
/v1/api-keys
Store the resulting Generator Key securely on your backend — it must never be shipped inside your mobile app.
Step 2 — Use the Generator Key to create an SDK key
For each validation session, call the same /v1/api-keys endpoint authenticated with your Generator Key. Add the following header to the request:
Truora-API-Key:<your generator key>
Each SDK key is scoped to your application id and a single validation session, and expires automatically.
/v1/api-keys
Request parameters
application_id — Your app’s bundle identifier (e.g., com.yourcompany.yourapp on iOS, com.yourcompany.yourapp on Android). This value is embedded in the generated SDK key and the SDK validates it against the running app’s actual bundle ID at runtime. If they don’t match, the key is rejected. You can find your application ID in:
- iOS:
Bundle.main.bundleIdentifier— set in Xcode under your target’s General > Bundle Identifier. - Android: The
applicationIdin your app-levelbuild.gradlefile. - Flutter: The
applicationId(Android) andPRODUCT_BUNDLE_IDENTIFIER(iOS) in the platform-specific project files. - React Native: Same as the native iOS/Android values above.
account_id — A unique identifier for the end user on your platform (e.g., an internal user ID, UUID, or database primary key). This value ties the SDK key to a specific user session. If the same user needs to perform another validation, use the same account_id. Constraints:
- Maximum 200 characters.
- Allowed characters: alphanumeric (
a-z,A-Z,0-9),.,_,-,!,*.
Important: The
account_idmust be assigned by your backend — never use a value provided by the end user (such as an email or phone number). Using user-controlled input as the account identifier can lead to security vulnerabilities and UX issues like session collisions between users.
How to provide the API Key to the SDK
There are two options for supplying the SDK key to your mobile application:
- Retrieve from a backend (Recommended): Your backend generates SDK keys on demand using the Generator Key, and sends them to the mobile app. This is the most secure approach since the Generator Key never leaves your server.
- Encrypted storage: Store a pre-generated SDK key in the device’s encrypted storage (e.g., Keychain on iOS, EncryptedSharedPreferences on Android). The key must be retrieved and cached synchronously, or fetched asynchronously before SDK initialization is called.
Backend integration (Recommended)
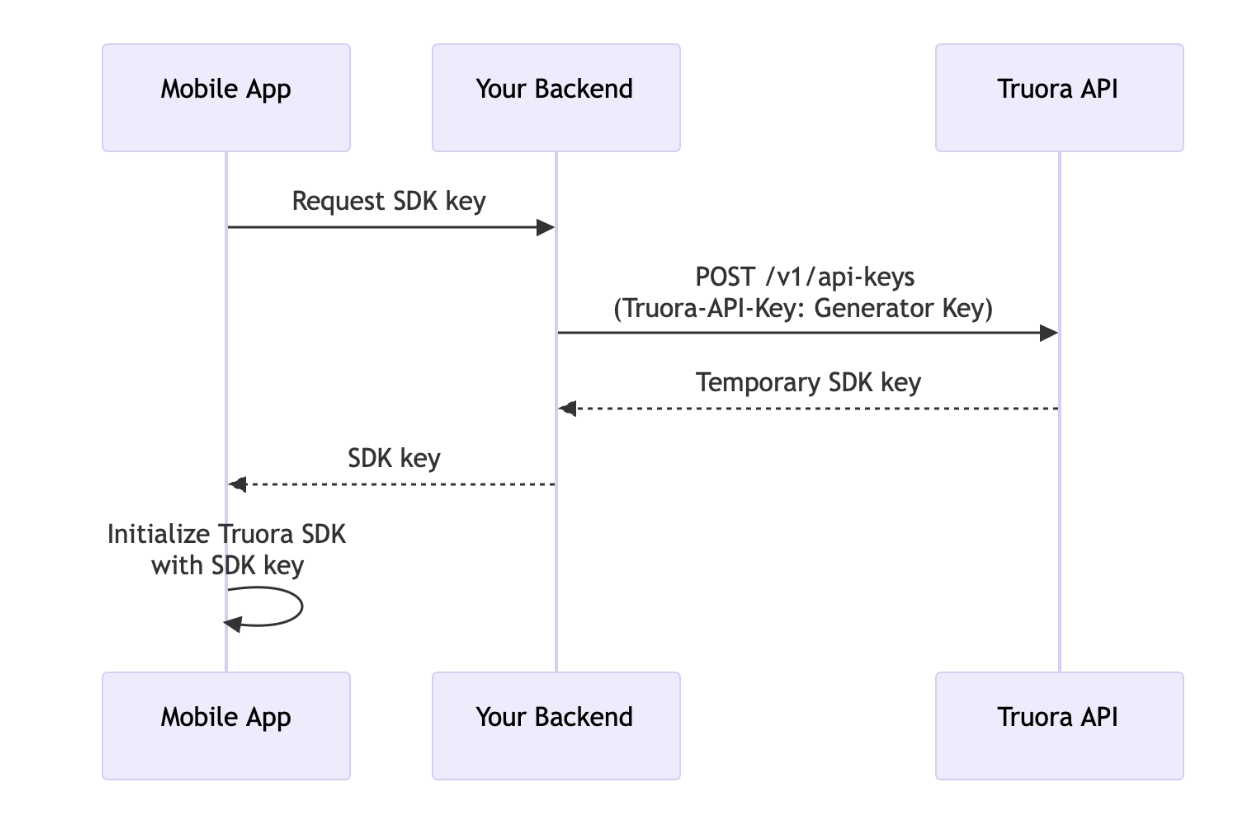
When using the recommended backend approach, the communication flow is:
- The mobile app requests an SDK key from your backend
- Your backend calls the Truora API using the Generator Key
- Truora returns a temporary SDK key
- Your backend forwards the SDK key to the mobile app
- The mobile app initializes the Truora SDK with this temporary key
Note: Platform-specific examples for each option are available in each platform’s dedicated documentation.
UI Customization
Customize the validation UI to match your brand:
UI Configuration Parameters:
| Parameter | Type | Default | Description |
|---|---|---|---|
| primaryColor | String | Truora blue | Primary brand color |
| onPrimaryColor | String | White | Text/icons color on primary elements |
| secondaryColor | String | Black | Secondary accent color |
| onSecondaryColor | String | White | Text/icons color on secondary elements |
| surfaceColor | String | White | Background color |
| onSurfaceColor | String | Black | Text/icons color on surface elements |
| surfaceVariantColor | String | Truora teal | Secondary background color |
| onSurfaceVariantColor | String | White | Text/icons color on surface variant elements |
| errorColor | String | Red | Error state color |
| logoUrl | String | Truora logo | URL to remote logo image |
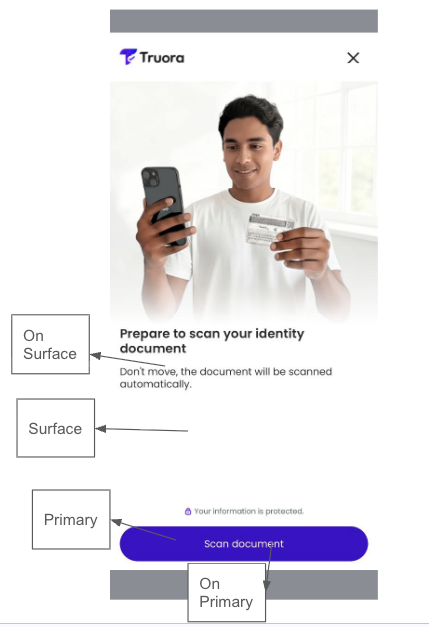
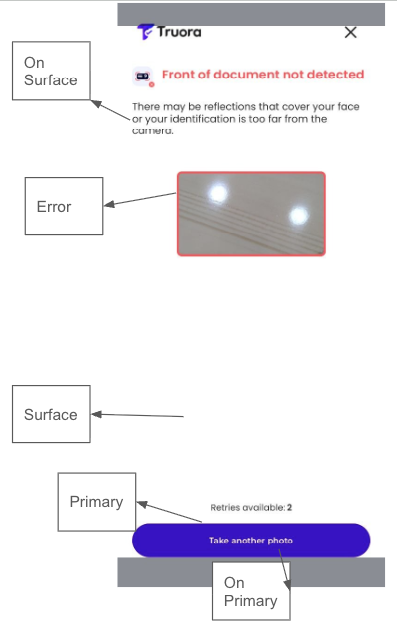
Default theme color showcase
Using the default Truora colors this is how some of our screens would look like:

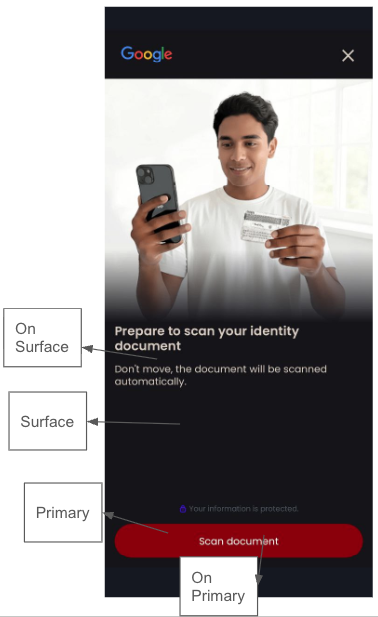
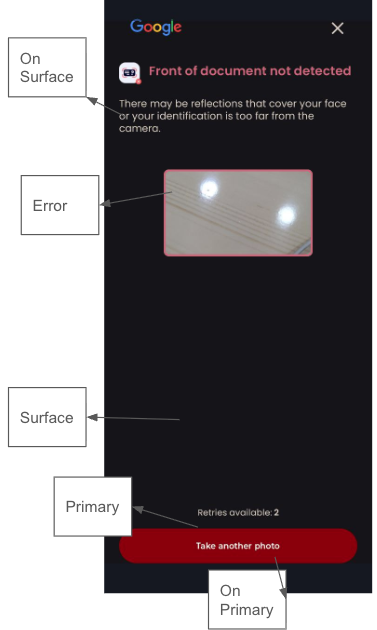
Custom theme color showcase
Following a custom theme with the “Google” logo and the colorset:
We would get the following color customization: