Verify Identity Steps via API
Our web integration is the recommended approach, providing a faster, more reliable, and easier solution for identity verification. It removes the complexity of handling API calls manually and ensures seamless compatibility with our platform.
This guide is intended only for advanced users who require full control over their front-end and are comfortable managing complex API requests. If you’re unsure, we strongly recommend starting with our web integration as your first option.
This guide explains how to use Truora’s API to verify each step in an identity verification process, primarily through the Verify Identity endpoint along with other supporting endpoints. This API allows you to provide the required inputs for each step in the processes of your flows, enabling you to build a custom front-end when Truora’s ready-to-use solution does not meet your specific needs.
Prerequisites
- Truora Account: If you don’t already have one, learn how to Set up a Truora account.
- Truora API-Key: This key grants access to our services. If you don’t have one already go to Create Truora API-Key.
- A created Web Flows: Understand and have at least one flow already built. Learn how to Create a Web Flow in Truora.
- Basic Understanding of Validators: Familiarity with Digital Identity Validators is helpful. If needed, refer to the Validations Workflow section in the DI - Validators API documentation.
Disclaimer:
- This guide involves making API requests, handling authentication, and interpreting JSON responses. To follow along effectively, we recommend involving a developer or someone with technical expertise.
Need Help?
- The examples in this guide cover typical use cases. If you require assistance with a specific integration scenario, please contact our Support Team.
The Example Flow
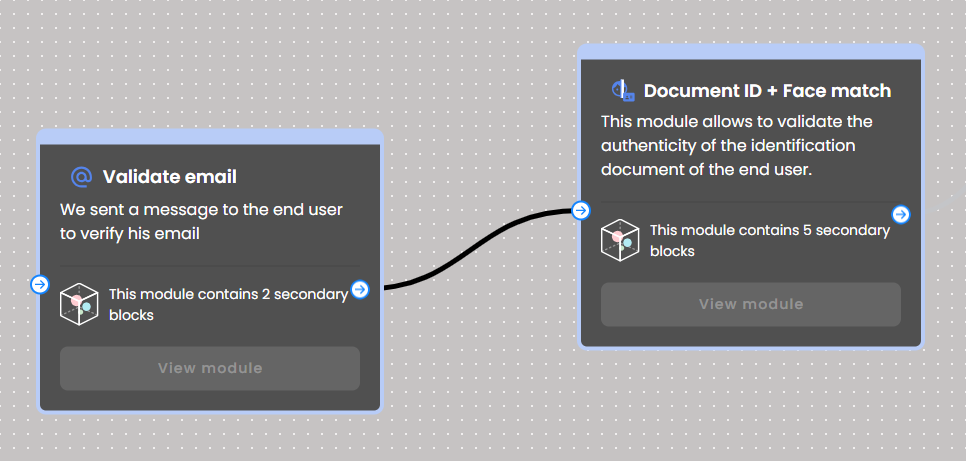
The following is a simple Web Flow that includes an Email Validator and a Document + Face Validator block. This flow serves as the example used throughout this guide for all verification steps.
Create Identity endpoint
To create and start a verification process for a user, use the Create Identity endpoint. Before making this request, you must:
- Have a flow already created.
- Generate a temporary
api_keylinked to the correspondingflow_id.
Follow the Web Integration Token Guide to complete this setup.
Important: A unique
api_keymust be generated for each identity verification process, even if performed by the same user.
Request setup:
- Create a POST request to the endpoint
https://api.identity.truora.com/v1/processes/ - Set the Header
Truora-API-Key: Enter the value of the generated token (api_key) of the instructions above.
Send the request. The response will include a process_id, which is required for subsequent API calls, and the key details of each step, including step_id, verification_id, type, expected_inputs, and files_upload_urls.
If everything is set correctly, you should receive a response similar to the following:
/v1/processes/
Extract the process_id from the response for the next steps.
Read Identity endpoint
The Read Identity endpoint provides step details and progression tracking for a specific process. The response includes the steps section, allowing you to:
- Determine the number of steps in the process, each identified by a unique
step_id. - Retrieve key details for verifying each step, including
step_id,verification_id,type,expected_inputs, andfiles_upload_urls.- The
expected_inputsobject specifies the required data to verify the step.
- The
- Track step progression by checking
current_step_dataandverification_output.- After making a Verify Identity request for a step, poll the Read Identity endpoint to confirm the process has moved to the next step before proceeding with its verification.
Retrieving process steps
- Create a GET request to the endpoint
https://api.identity.truora.com/v1/processes/{process_id}.- Replace the Path Parameter
process_idwith the ID obtained from the Create Identity request.
- Replace the Path Parameter
- Set the Headers
Truora-API-Key: Enter your permanent Truora API Key (not the temporaryapi_keyfrom the previous step).
Upon sending the request, you’ll receive a response similar to this:
/v1/processes/{process_id}
The response corresponds to the process created with the Example Flow. The following table outlines the step_id, type, expected_inputs, and files_upload_urls for each step in this example process:
Example process steps table
| Step ID | Type | Expected Inputs | Files Upload URL |
|---|---|---|---|
| IPSb322XXXX | enter_email | Yes - See response | null |
| IPSc95bXXXX | enter_email_verification_code | Yes - See response | null |
| IPSc4cdXXXX | enter_document_type | Yes - See response | null |
| IPSb105XXXX | take_document_photo | null | document_front, document_back |
| IPS01abXXXX | record_face_photo_liveness | null | null |
| IPSe55fXXXX | record_face_video_liveness | null | null |
| IPS31b9XXXX | enter_face_verification_liveness | null | face_video |
Verify Identity endpoint
The Verify Identity endpoint processes each step in the identity verification process. It creates and performs validations based on the information supplied in the request body.
To make the request:
- Create a POST request to the endpoint
https://api.identity.truora.com/v1/processes/{process_id}.- Replace the Path Parameter
process_idwith the ID obtained from the Create Identity request.
- Replace the Path Parameter
- Set the Headers
Truora-API-Key: Enter your permanent Truora API Key (not the temporaryapi_key).
- Set the Body
- Use raw JSON and include the required information for the step being verified.
In the following sections, we’ll go through the validation of each step in our example process, detailing the required request body for each.
Verify Identity - Email Validation
As per the Example process steps table, email validation consists of two steps:
- enter_email: Requires the user’s email.
- enter_email_verification_code: Requires the OTP code sent to the user’s email.
1. Enter email
Based on the expected_inputs of this step, set the request body accordingly, providing the step_id, verification_id, the step type, and:
- Where the
nameis “email”, set thevalueto the user’s e-mail address, which was set to “john.doe@demo.com” for our example.
The request body should look similar to the following:
Send the Verify Identity request. Upon receiving a 200 - Request successful response, poll the Read Identity endpoint to confirm that the process has moved to the next step.
In the relevant portion of the response:
- Check the
current_step_datato verify that the current step has moved toenter_email_verification_code. - Check that the
current_stepis set to 1. - Check the
stepsobject to verify that theenter_emailstep has averification_outputwith astatusofsuccess, and includes thevalidation_type,validation_idandemailinoutputs.
/v1/processes/{process_id}
2. Enter email verification code
Based on the expected_inputs of this step, set the request body accordingly, providing the step_id, verification_id, the step type, and:
- Where the
nameis “token”, set thevalueto the OTP received in the user’s e-mail, which was set to “654321” for our example.
The request body should look similar to the following:
Send the Verify Identity request. Upon receiving a 200 - Request successful response, poll the Read Identity endpoint to confirm that the process has moved to the next step.
In the relevant portion of the response:
- Check the
current_step_datato verify that the current step has moved toenter_document_type. - Check that the
current_stepis now 2. - Check the
stepsobject to confirm that theenter_email_verification_codestep has averification_outputwith astatusofsuccessand contains thevalidation_typeandvalidation_idinoutputs.
/v1/processes/{process_id}
Verify Identity - Document Validation
As per the Example process steps table, document validation consists of two steps:
- enter_document_type: Requires the user’s document type and document country. Generates the URLs for the document pictures to be uploaded in the next step.
- take_document_photo: Requires the photo of the user’s document to be uploaded to the URLs generated in the previous step.
1. Enter Document Type
Based on the expected_inputs of this step, set the request body accordingly, providing the step_id, verification_id, the step type, and:
- Where the
nameis “country”, set thevalueto the two letters of one of the allowed countries (e.g.COfor Colombia). - Where the
nameis “document_type”, set thevalueto one of the allowed document types (e.g.national-idfor National Identification).
You can find a full list of Supported Document Types and Countries.
The request body should look similar to the following:
Send the Verify Identity request. Upon receiving a 200 - Request successful response, poll the Read Identity endpoint to confirm that the process has moved to the next step.
In the relevant portion of the response:
- Check the
current_step_datato verify that the current step has moved totake_document_photo. - Check that the
current_stepis now 3. - Check the
stepsobject to confirm that theenter_document_typestep has averification_outputwith astatusofsuccessincluding thevalidation_idand the URLs for thefront_document_photoandback_document_photoinoutputs.
Important: Extract the
front_document_photoandback_document_photoURLs. You’ll need them next to upload the document photos.
/v1/processes/{process_id}
2. Take document photo
This step requires submitting document images via a PUT request to the URLs generated in the previous step: document_front and document_back. Ensure the request body is set to Binary to send the image files correctly.
- PUT
{{document_front}} - PUT
{{document_back}}
Send each of these requests. Once each document photo is successfully uploaded, the response should return 200 - Request successful:
{{document_front}}
{{document_back}}
After both images are successfully uploaded, keep polling the Read Identity endpoint endpoint to confirm the process has moved to the next step.
In the relevant portion of the response:
- Check the
current_step_datato verify that the current step has moved torecord_face_photo_liveness. - Check that the
current_stepis now 4. - Check the
stepsobject to confirm that thetake_document_photostep has averification_outputwith astatusofsuccess,attachment_statusisvalidand includes thevalidation_idandaccount_idinoutputs.
/v1/processes/{process_id}
Verify Identity - Face Validation
As outlined in the Example process steps table, face validation consists of three steps:
- record_face_photo_liveness: No expected inputs. This step creates an enrollment for the account_id with the face extracted from the document.
- record_face_video_liveness: No expected inputs. This step creates a validation using the enrollment from the previous step.
- enter_face_verification_liveness: Requires the user’s face video and performs the validation by comparing the enrolled face from the document with the uploaded video of the face.
1. Record face photo liveness
For this step verification, set the request body by including the step_id, verification_id and the step type. The request body should look similar to the following:
Send the Verify Identity request. Upon receiving a 200 - Request successful response, poll the Read Identity endpoint to confirm that the process has moved to the next step.
In the relevant portion of the response:
- Check the
current_step_datato verify that the current step has moved torecord_face_video_liveness. - Check that the
current_stepis now 5. - Check the
stepsobject to confirm that therecord_face_photo_livenessstep has averification_outputwith astatusofsuccessand includes the generatedenrollment_idinoutputs.
/v1/processes/{process_id}
2. Record face video liveness
For this step verification, set the request body by including the step_id, verification_id and the step type. The request body should look similar to the following:
Send the Verify Identity request. Upon receiving a 200 - Request successful response, poll the Read Identity endpoint to confirm that the process has moved to the next step.
In the relevant portion of the response:
- Check the
current_step_datato verify that the current step has moved toenter_face_verification_liveness. - Check that the
current_stepis now 6. - Check the
stepsobject to confirm that therecord_face_video_livenessstep has averification_outputwith astatusofsuccessand contains thevalidation_id,validation_typeand the URL for theface_videogenerated inoutputs.
Important: Extract the
face_videoURL, as you will need it in the next step to upload the user’s face video.
/v1/processes/{process_id}
3. Enter face verification liveness
This step requires submitting the user’s face video through a PUT request to face_video URL obtained in the previous step. The request body should be set to Binary to correctly upload the video file:
- PUT
{{face_video}}
Send the request. Upon successfully uploading the video, the response should return 200 - Request successful:
{{face_video}}
Once successfully uploading the video, set the request body by including the step_id, verification_id and the step type. The request body should look similar to the following:
Send the Verify Identity request. After receiving a 200 - Request successful response, keep polling the Read Identity endpoint to confirm the step verification. This step validates the document face against the uploaded video for face recognition.
In the relevant portion of the response:
- Check that the is no longer a
current_step_data. - Check that the
current_stepis now 7. - Check the
stepsobject to confirm that theenter_face_verification_livenessstep has averification_outputwith astatusofsuccess, along with thevalidation_id,validation_typeandaccount_idset inoutputs.
/v1/processes/{process_id}
Final Confirmation: Since there are no more steps left, the status of the successful process should be success.
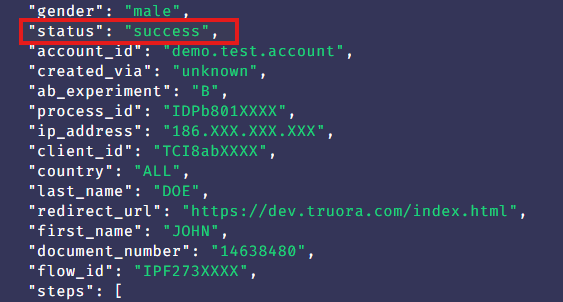
Keep in mind that the
statusof a process always begins aspending, and updates to eithersuccessorfailurewhen the process completes.
Get Process Result
- You can get the process results with a query to the Truora’s API or from the dashboard. For more information, please see Guide to Get Results.
- To get process result automatically, you must subscribe webhooks. For more information, please visit the Webhooks guide.