WhatsApp Integration Guide
WhatsApp can be used as a channel to reach users using Digital Identity Flows you have created. Using a WhatsApp Business Account (WABA), you would be able to send and receive messages through the Whatsapp Business API for your business processes and interactions with your users, each input needed for the Verification Flow is requested and users are guided through each step until completion.
Additionally, you can also send single WhatsApp messages to your users which can be used for sending notifications, one time passwords and more.
For complete detail of the API endpoints and parameters, refer to the Digital Identity API documentation.
Postman collection
In order to ease the process, you can import this Postman collection:
Preparing your Whatsapp Business Account
Our team will guide you through the WABA creation process. It will belong to your company but will be managed by us to ease the configuration process. For additional information on setting up your WhatsApp business channel follow this guide.
Start a Flow with Inbound messages.
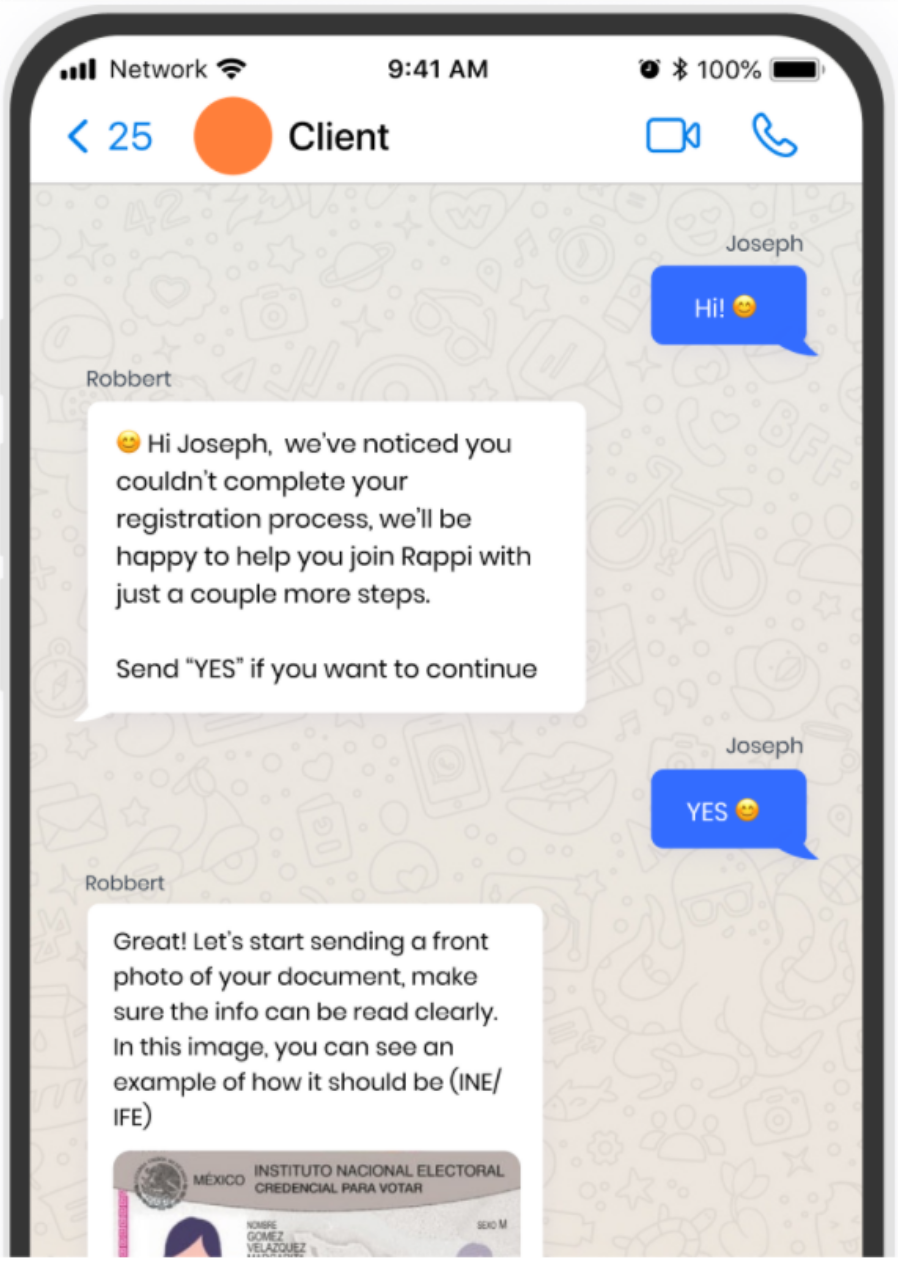
An inbound message is any message that the user sends to the WABA. A user can start a Verification Flow by sending a specific inbound message you have configured for a WABA. This can be done by creating a link that you can set in your landing page, media campaigns or app buttons. Once the user opens the link, a WhatsApp chat with your WABA will open with the message you have configured, starting the verification process. Try it out here.
To set up your Flow with inbound messages, follow these steps:
- Create a flow API or Dashboard with the steps you want the user to follow . If you already have a Flow created, copy the
FlowIDthat identifies the Flow. - Create the Inbound Flow
- Create a POST request to
https://api.connect.truora.com/v1/whatsapp/inbounds - Create a Header named
Truora-API-Keyand set its value to your API key. - Set the value for
Content-Type headerasapplication/x-www-form-urlencoded. - Create the following keys in the
application/x-www-form-urlencodedrequest body and set their respective values as follows:waba_provider: This value isgupshup.waba_phone_number: phone number of the WABA that will be interacting with the users. Must include the country code.flow_id: identifier of the Verification Flow previously created.inbound_message: unique message the users will be sending to the WABA in order to begin the Verification Flow.
- Create a POST request to
- After creating the inbound message, you will be able to build a production link that you can share with your end-users
to redirect them to the WhatsApp verification flow.
- To build the inbound message link, replace
waba_lineandtextinhttps://api.whatsapp.com/send?phone={waba_line}&text={text}withwaba_phone_numberandinbound_message, respectively. Obtained as a response in the API request to create the inbound message. Examplehttps://api.whatsapp.com/send/?phone=57317770000&text=Testing message. - You could if you want to create a short link like for example
bip.ty/2TXCxthat starts the WhatsApp conversation using a link shortener. On the Internet, you can find different types of paid and free services.
- To build the inbound message link, replace
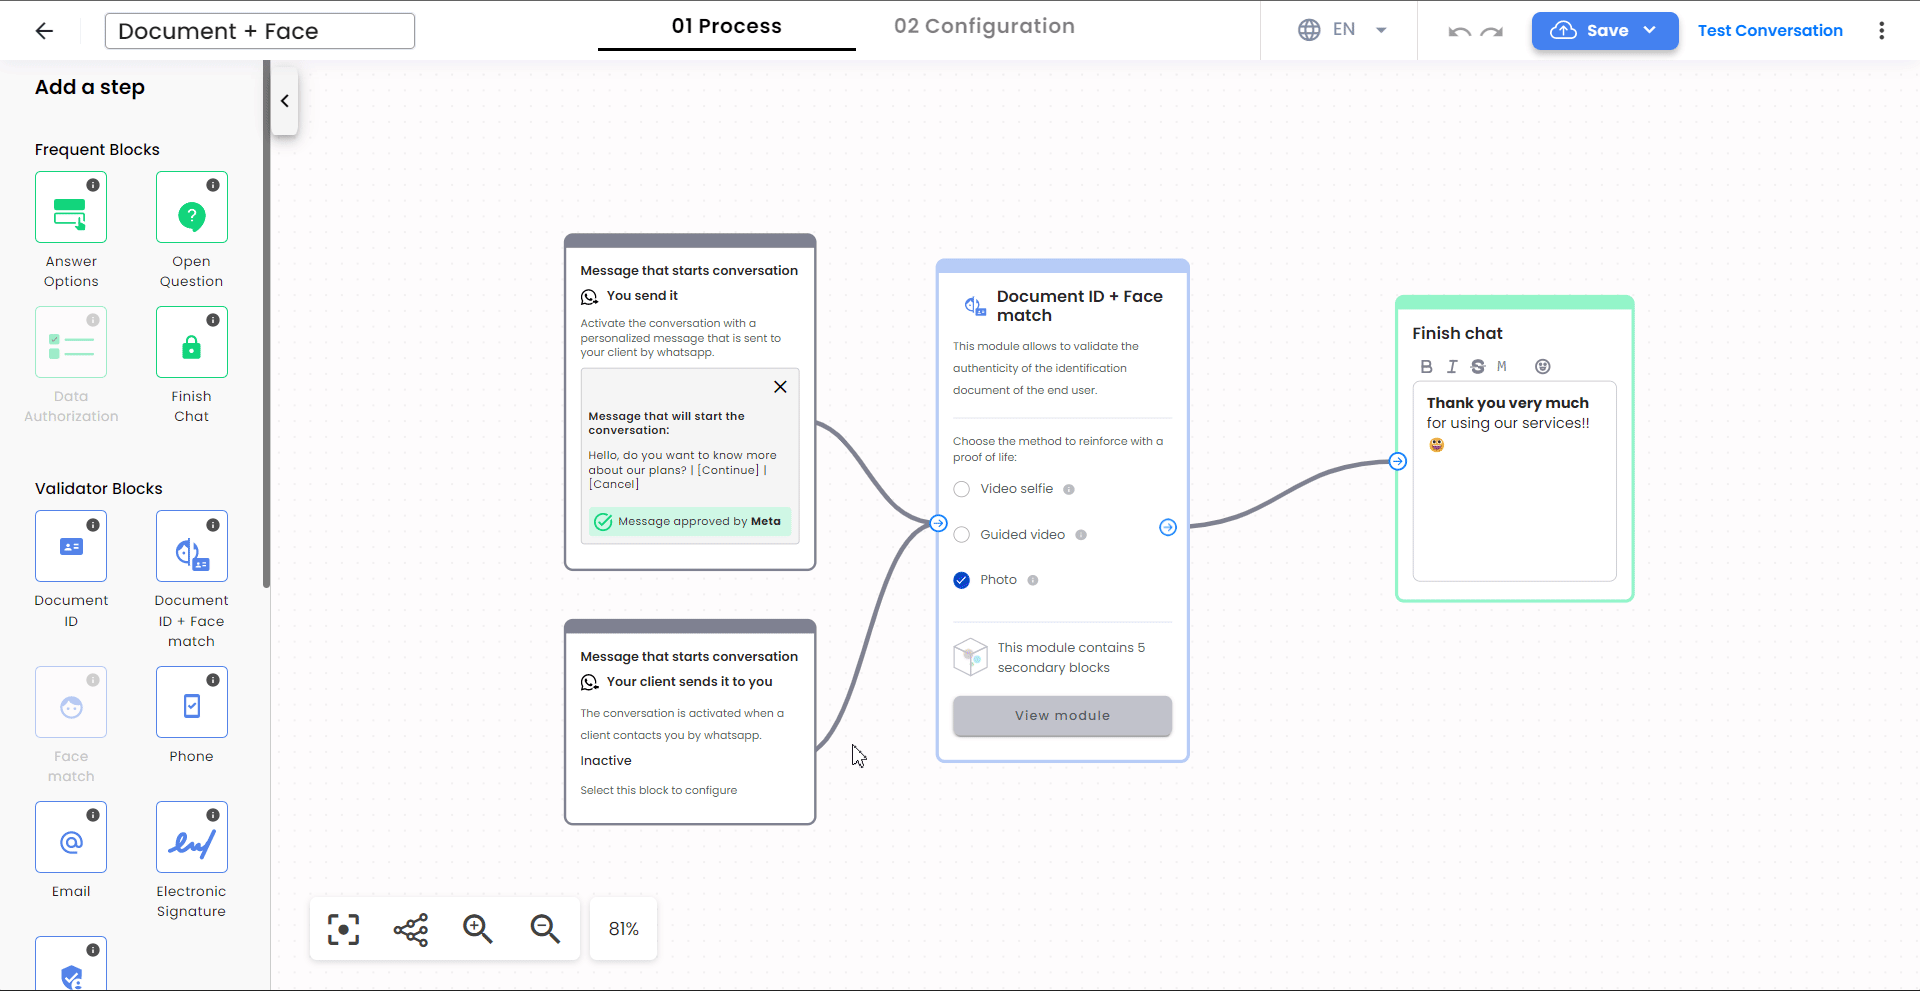
Create an Inbound message in flow builder
The Intbound message could be create when you are creating a flow will start with this message.
- Select the Your client sends it to you box.
- In the Custom message section, choose the number associated with the Chatbot phone.
- Write the message that your client will send to activate the conversation.
- Click in Save Message
- Once saved, you have the option to either clear or edit the message if needed.
- Finally, click on Save and publish to complete the process.
To obtain the link for testing the conversation, follow these steps:
- Click on Test Conversation.
- Select Your client sends it to you.
- Click on Continue.
- Then, click on Copy link.
Reach your users with Outbound Messages for starting flows or sending notifications
Outbound Messages are messages sent directly to the users without any previous interaction with your business WABA. For this to be possible, two things are required.
- An explicit permission needs to be granted by the user to your business, allowing you to contact them through Whatsapp for business purposes. This is called an opt-in. For more guidance on how to obtain it, visit this link.
- The Outbound Message you use to start the interaction with the users needs to be approved by WhatsApp, making sure you comply with the minimum requirements and guidelines to prevent user spam, fraud and other policies.
To create and submit an Outbound message via the API for approval, complete the following steps. For information on Outbound messages creates and send from the platform visit Outbound Message Guide
- Create a POST request to
https://api.connect.truora.com/v1/whatsapp/outbounds - Create a Header named
Truora-API-Keyand set its value to your API key. - Set the value for
Content-Type headerasapplication/x-www-form-urlencoded. - Create the following keys in the request body and set their respective values as follows:
waba_phone_number: Phone number with country code of the WABA line that will send the message.is_notification: Set totrueif the Outbound Message is a single notification message orfalseif it will be used for starting a Verification Flow.content: The message to be sent to the user. Example:Hello, ¿Are you ready to start the process?. If the message will include variables, they should be specified between double brackets like{{.<variable_name>}}. Example:Hello {{.name}}, ¿Are you ready to start the process?category: Topic category of the Outbound Message, must be one ofMARKETING,AUTHENTICATION,UTILITY.MARKETINGis for marketing campaigns and,AUTHENTICATIONfor authentication processes,UTILITYis for any other topic of the Outbound.template_type: Type of content for the Outbound Message. Must be one ofTEXT,VIDEO,IMAGE,DOCUMENT.language_code: Code of the language the message is in. Examples:es,pt-BR,en.outbound_name: Contains a TEXT specifying the name of the outbound for its future reference.media_url: Required if thetemplate_typeis notTEXT. Specifies the URL for the media content.continue_process_message: Required ifis_notificationis set tofalse. Contains a TEXT specifying a continue message that will appear as a button to the user. Example:Continue.cancel_process_message: Required if is_notification is set to false. Contains a TEXT specifying a cancel message that will appear as a button to the user. Example:Cancel- If the Outbound Message has variables like
hello {{.name}} {{.lastname}}, it is Required to send a key with an example of them, one for each variable the message has. The key should bevar.<variable_name>and the value should be the example text. Example: for the first variablevar.name: Jhonand for the second variablevar.lastname: Doe. call_to_action.phone.message: You can generate a button to redirect a phone call. The value of this input is the text that will appear on the button. For exampleCall us.call_to_action.phone.number: The phone number to which you want to redirect your end user. Example:+573181230000.call_to_action.url.message: You can generate a button to redirect a web page. The value of this input is the text that will appear on the button. For exampleFollow us.call_to_action.url.url: The URL of the website to which you want to redirect your end user. Example:https://my-page.com.
Please submit the request for the outbound message to be created and go through the approval process by WhatsApp. This approval process is only done once per message, once approved it can be used for different end-users.
Copy the outbound_id string from the response to verify the status of the process with the request:
- Create a GET request to
https://api.connect.truora.com/v1/whatsapp/outbounds/{outbound_id} - Replace
{outbound_id}in the URL with theoutbound_idobtained from the previous request. - Create a Header named
Truora-API-Keyand set its value to your API key. - Send the request. Once the
statusof the message isAPPROVED, it is ready to be sent to WhatsApp users. If thestatusisPENDING, the message is still in the review process by WhatsApp, wait some time and try again. If thestatusisREJECTED, the message doesn’t comply with WhatsApp requirements and guidelines, so you need to change the message content, create a new Outbound Message and try again.
Once you have the user opt-in and the Outbound Message approved for outbounds, send a request to our API to send the message to the users.
- Create a POST request to
https://api.connect.truora.com/v1/whatsapp/outbounds/send - Create a Header named
Truora-API-Keyand set its value to your API key. - Set the value for
Content-Type headerasapplication/x-www-form-urlencoded. - Create the following keys in the request body and set their respective values as follows:
phone_number: Phone number without the country code of the user that will receive the message.country_code: Country code of the phone number. Here you can find a complete list of country codes.outbound_id: ID of the Outbound Message created in previous steps. The Outbound Message status needs to beAPPROVED.user_authorized: Indicates whether the person who owns the phone number provided has authorized the process by giving the opt-in directly to you. Must be true in order to continue.flow_id: Required if the Outbound Message was created with theis_notificationfield infalse. Contains the identifier of the Verification Flow that will start when the user accepts the message.- If the Outbound Message has variables like
hello {{.name}} {{.lastname}}, it is Required to send a key-value, one for each variable the message has. The key should bevar.<variable_name>and the value should be the desired value of the variable. Example: for the first variablevar.name: Rogerand for the second variablevar.lastname: Federer.
- Send the request. If all previous steps were followed properly, the user should now receive the Outbound Message you configured, which will notify them with the message content and, if needed, start a Verification Flow.
Configuring a Reengagement Message
Users can always drop-off in the middle of a conversation. Configuring the identity flow to send a re engagement message after a period of inactivity from your users will increase the probability of the user to finish the conversation with the bot.
A re-engagement message is used to encourage the user to finish the process when they leave the WhatsApp conversation hanging without giving a response to a question. This message is sent after a waiting time of minimum 30 minutes and maximum 23 hours.

In the message we send two options: “yes” and “no”. The user will be able to decide if they want to continue with the process or not. In case they want to continue, they will start from the last question they left unanswered. If the user doesn’t answer the re-engagement message, the conversation will be finished when it expires.
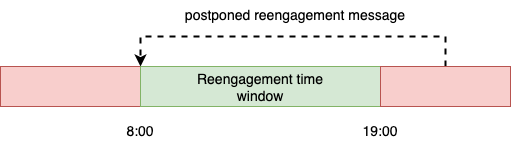
Reengagement schedule
To avoid contacting users in the middle of the night, there is a time window for the re-engagement messages to be sent. If the message is scheduled out of this window we will postpone it until the next starting business time. The default business time starts at 8:00 and ends at 19:00.
To set up your flow with reengagement messages, make sure you include the following configuration in your identity flow (check out how to create an identity flow here).
enable_follow_up: enables the reengagement feature. Must be true for the bot to send the reengagement message. If this field is not set, the reengagement feature will be disabled.follow_up_delay: delay in minutes to send the reengagement message. For example: 45. If this field is not set, the reengagement waiting time will be 2 hours.follow_up_message: reengagement message. For example: “You have an active process in progress, would you like to continue?”. If this field is not set, the message will be: “Tienes un proceso activo en curso”.start_business_hours: start of the range of business time in UTC. If this field is not set, the start business hour will be2021-01-01T13:00:00.000Z.end_business_hours: end of the range of business time in UTC. If this field is not set, the end business hour will be2021-01-01T00:00:00.000Z.
Receive results of the users that went through the Flow
Results are reported using the same hooks configured for the Digital Identity product. For more information, check the Setting up Hooks guide. The information in the hook contains the results of the validations made to the user, such as Face Validation, and also the responses to custom questions you have set up in the Flow. Be aware that hooks will be sent for all the Identity Verification processes made through all platforms (web and WhatsApp). If you want to receive only for a specific platform, you might want to use different FlowIDs for each one, and manually filter them once they arrive.
If you want to receive hooks only for processes finished successfully, you need to create the rule and listen only to the succeeded event. Otherwise, you can listen to both, succeeded and failed, if you want to keep the information to use in some kind of user re-engagement process in the future.