Test your WhatsApp - HubSpot integration
In this guide, we’ll demonstrate how to test the integration between WhatsApp and HubSpot using Truora’s platform. You’ll learn how to configure WhatsApp flows that connect users to HubSpot, and how to set up HubSpot to send outbound messages created in Truora, which can also trigger WhatsApp flows.
Prerequisites
- Truora Account: You must have access to your Truora account.
- Create a Truora API Key: For the Test sending outbound messages section of this guide, you´ll need a Truora API Key. If you don’t have one already, follow this guide to create yours.
- HubSpot Integration: Ensure you’ve already set up your integration with HubSpot. If not, please refer to the guide on How to integrate HubSpot with Truora.
- Activated WhatsApp line: If you don’t have one already, follow this guide to acquire and activate WhatsApp lines in Truora. You’ll need this to test your WhatsApp flows.
- Create a WhatsApp Flow: Have at least one flow already built. Learn how to Create a WhatsApp Flow in Truora.
- Create an Outbound Message: For the Test sending outbound messages section, you’ll need an Outbound Message of type Flow. Follow the Outbound Messages guide, if you don’t have one yet.
- Understand Inbound Messages: Familiarize yourself with Inbound Messages and their processes.
WhatsApp Flow for Integration Testing
This guide focuses on testing rather than building WhatsApp flows. However, we’ll provide an overview of the example flow used for this guide and highlight key settings needed to integrate HubSpot within your flows.
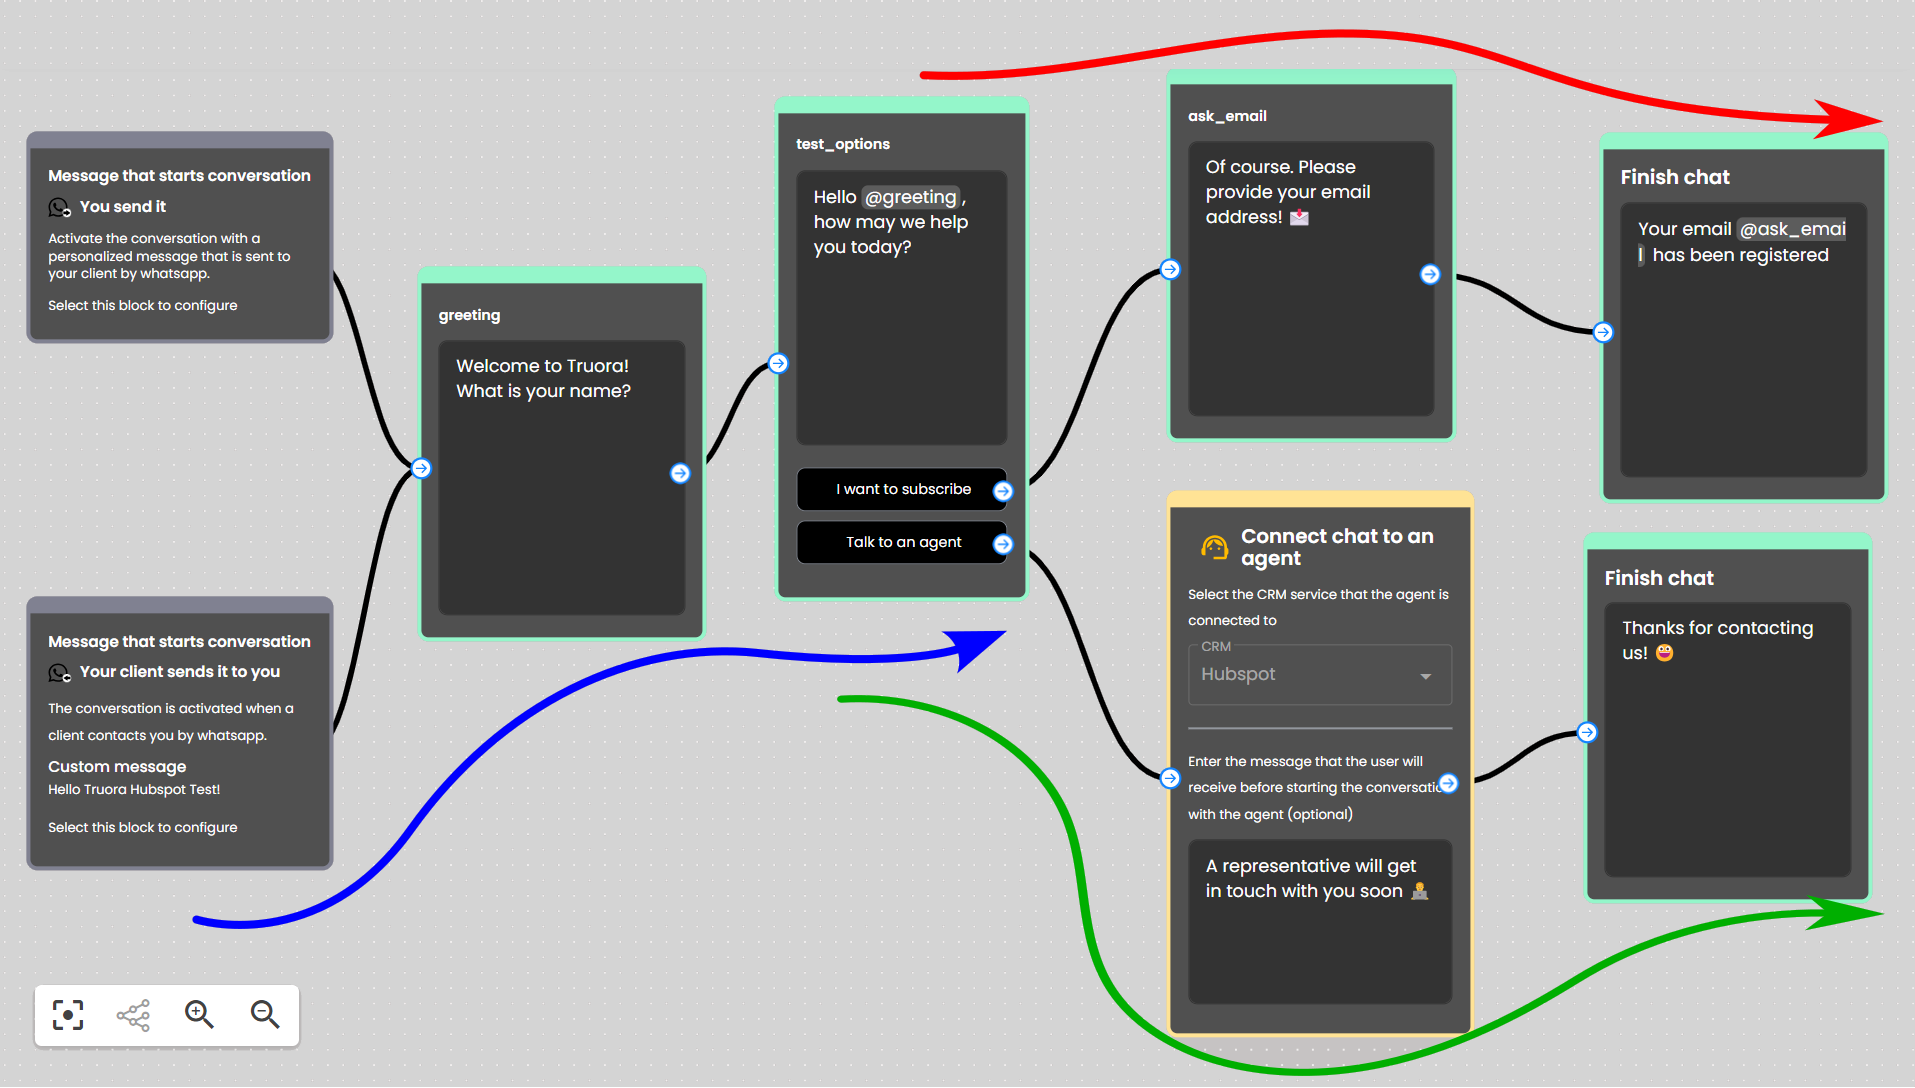
Please note that the flow has a general path and then branches into two paths based on the user’s response. Refer to the Example Flow image for visual reference.
General Flow Path (Blue):
- Your client sends it to you block: The user initiates the conversation by sending a specific Inbound Message. For this example we set “Hello Truora Hubspot Test!” in our WABA line.
- Open Question block (greeting): The user is asked to provide their name.
- Answer Options block (test_options): The user selects between I want to subscribe or Talk to an agent options.
I want to subscribe (Red Path):
- Open Question block (ask_email): The user is asked to provide their email address.
- Finish chat block: The conversation ends with a message to the user, “Your email <ask_email> has been registered”
Talk to an agent (Green Path):
-
Connect chat to an agent block (HubSpot): The user receives a message, “A representative will get in touch with you soon” and the conversation is redirected to HubSpot.
- When inserting this block in your flows:
- Click on the CRM options and select HubSpot. This option will only appear if you’ve previously set up your integration with HubSpot.
- In the message box, if needed, edit the default message the user will receive before the assigned agent responds.
- When inserting this block in your flows:

- Finish chat block: Once the conversation is closed in HubSpot, the user receives a message: “Thanks for contacting us!”
The Example Flow
Below is the basic WhatsApp flow created for this guide’s example (click to enlarge):
Testing the Whatsapp Flow Integration with HubSpot
In this section, we’ll test the flow by selecting the path to connect with an agent on the HubSpot platform:
Steps to Test the Integration:
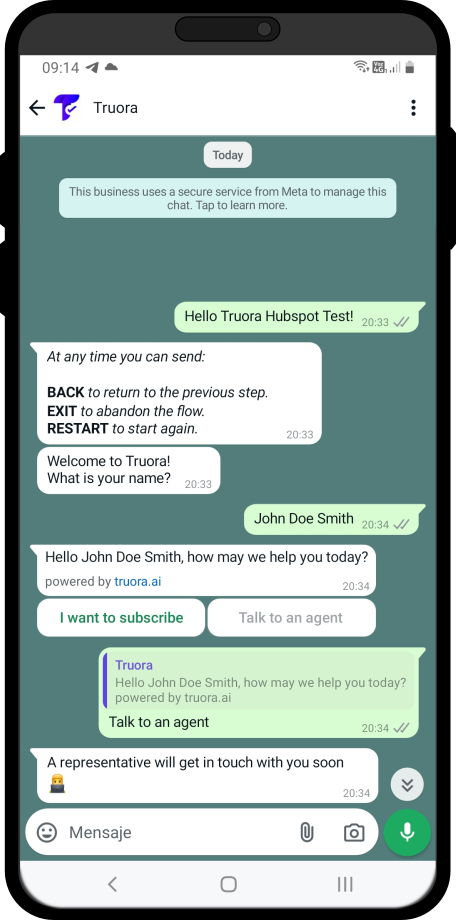
- Send the triggering message: From an ordinary WhatsApp account, we’ll send the message that triggers the conversation, “Hello Truora Hubspot Test!”, to the WABA line configured in the flow.
- Select to talk to an agent: The bot will first ask the user’s name via the Open Question (greeting) block, followed by a choice between I want to subscribe or Talk to an agent using the Answer Options block:
- For this test, we answered “John Doe Smith” to the Open Question (greeting) and then selected Talk to an agent to activate the HubSpot path via the Connect chat to an agent block.
- HubSpot - WhatsApp Interaction: The conversation is redirected to an agent in HubSpot, where it continues. Here’s how the interaction looks (click to enlarge):
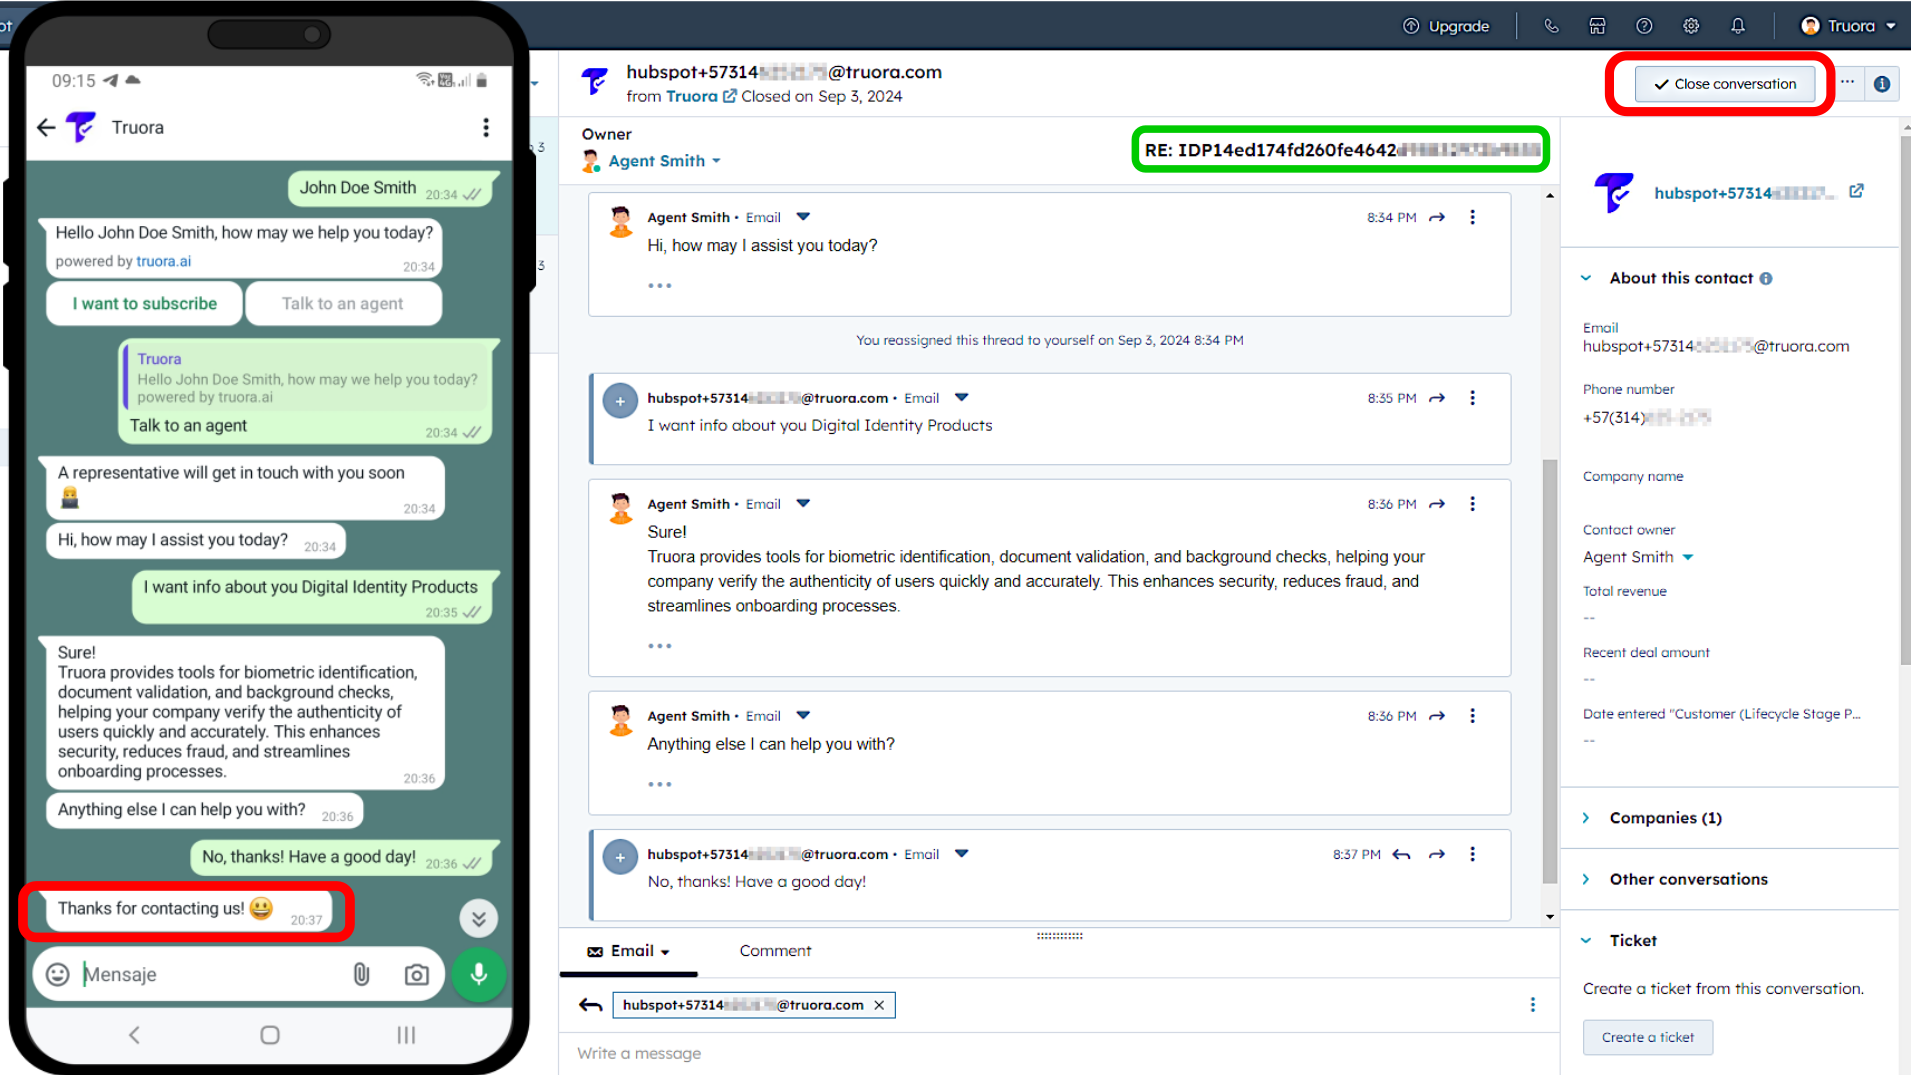
Please Note:
- Once the conversation is redirected to HubSpot, a new conversation will appear in your HubSpot inbox, identified with a prefix starting with IDP.
- You can view the entire message exchange between the agent and the user in HubSpot. The chat will remain active in HubSpot until the conversation is closed.
- After closing the conversation in HubSpot using the Close conversation button, the flow will resume in Truora. In this specific case, the flow will activate the Finish Chat block, sending the message “Thanks for contacting us!” to the user.
Access user responses as WhatsApp properties
While interacting with the user, responses to the chatbot are stored in HubSpot as Contact Properties.
To access these properties:
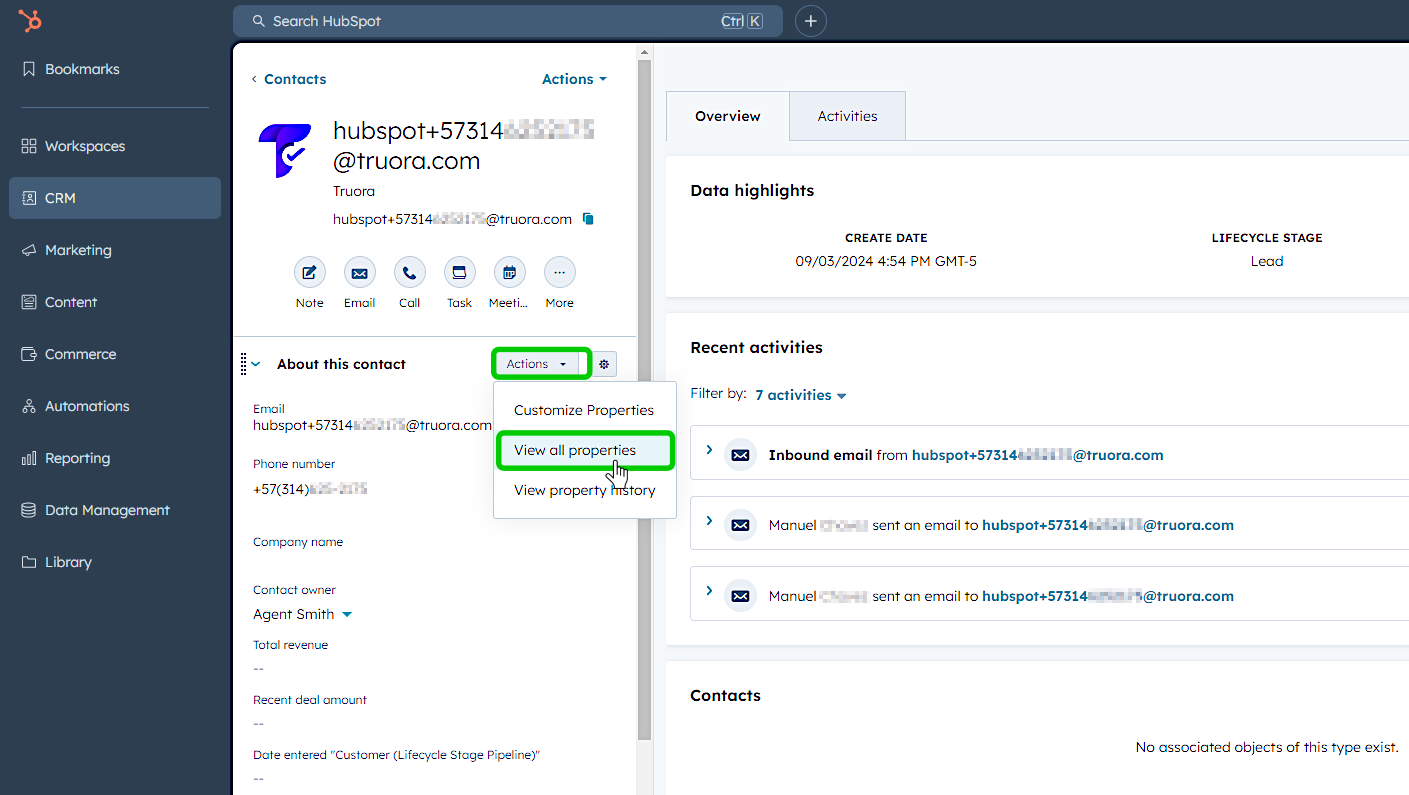
- Navigate to the Contacts section in HubSpot.
- Click on Actions > View all properties:
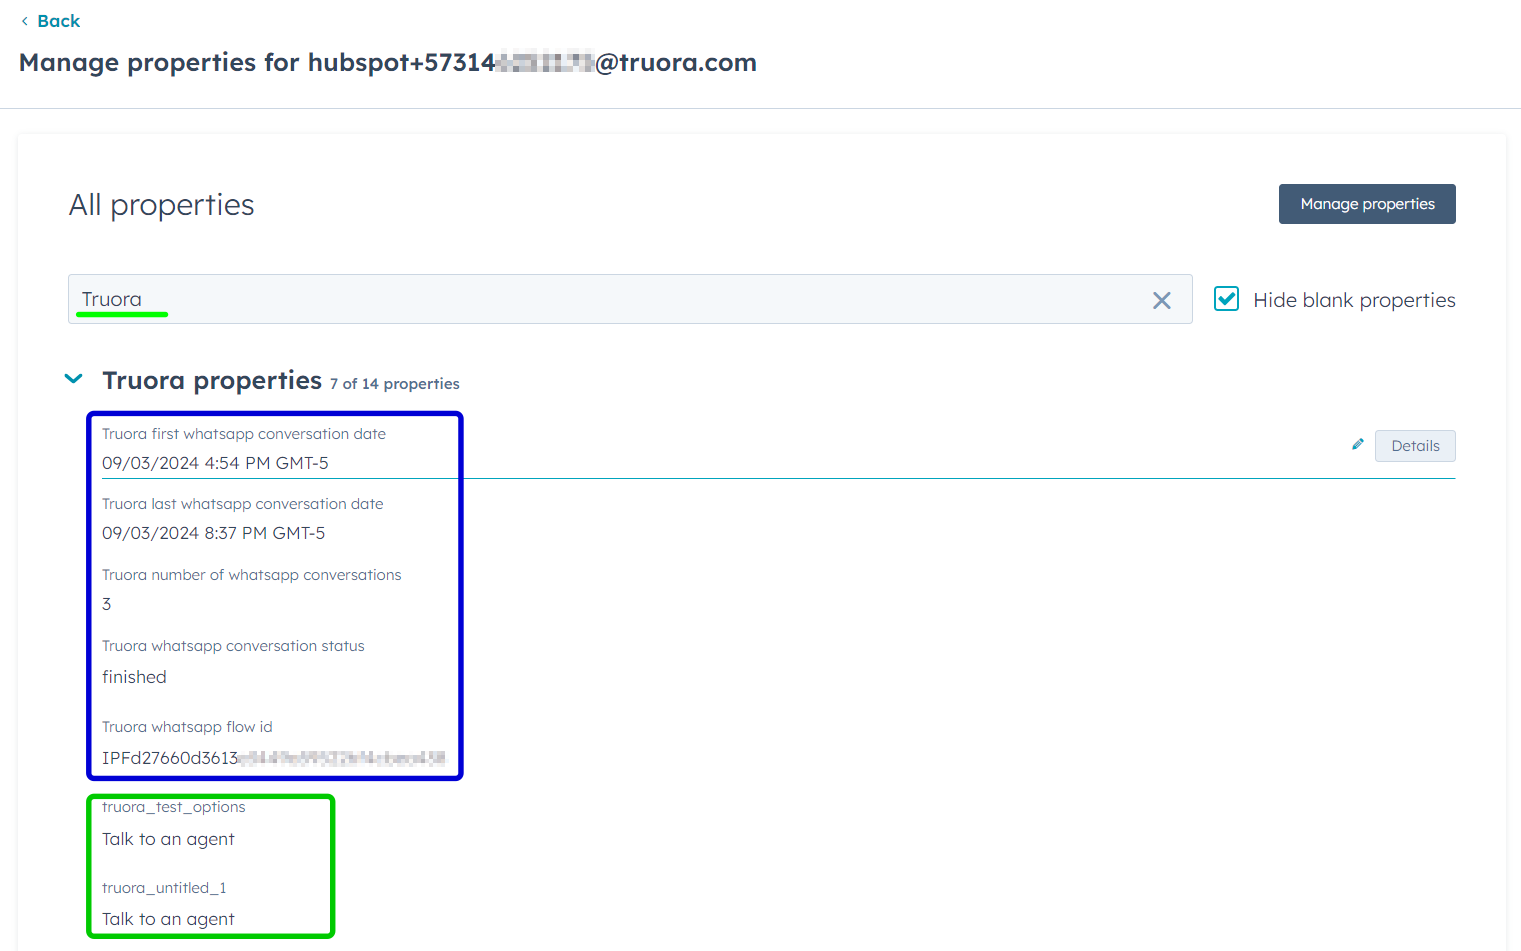
- In the search bar, type “Truora” to locate Truora Properties. You will find two types of properties:
-
Default properties (Blue): General information about the interactions you’ve had with the contact through WhatsApp.
-
User responses (Green): The user’s responses to chatbot interactions (excluding those with an agent).
Test sending outbound messages with HubSpot
Outbound Messages are sent directly to users without prior interaction on your WhatsApp Business Account (WABA) line. These messages can be configured with a Conversation Type set to Flow, which triggers a conversation flow once the outbound message is sent and the user agrees to continue.
For instructions on creating and setting up an Outbound Message in Truora, refer to the Outbound Messages Guide.
Here’s how to test this type of message with HubSpot:
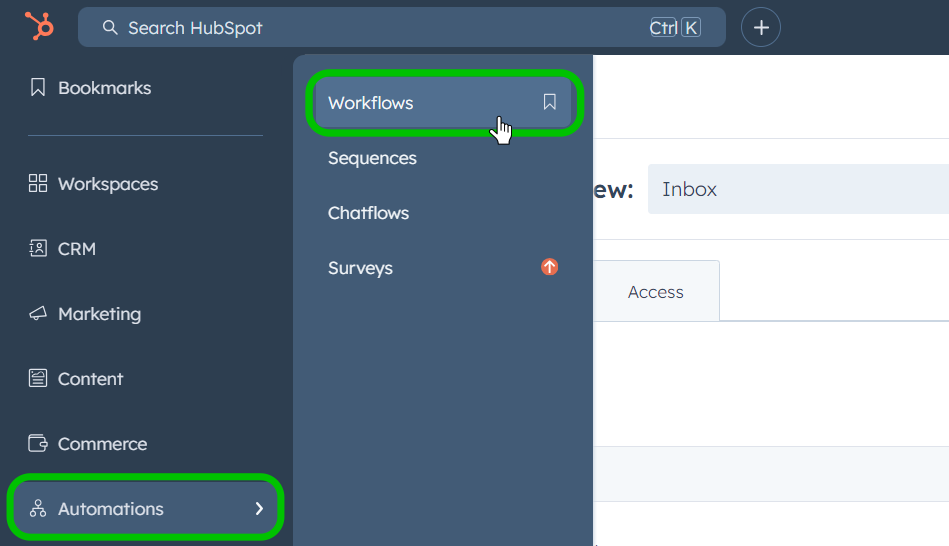
1. Access the Workflows section
In the left sidebar, navigate to Automations > Workflows to set up a workflow.
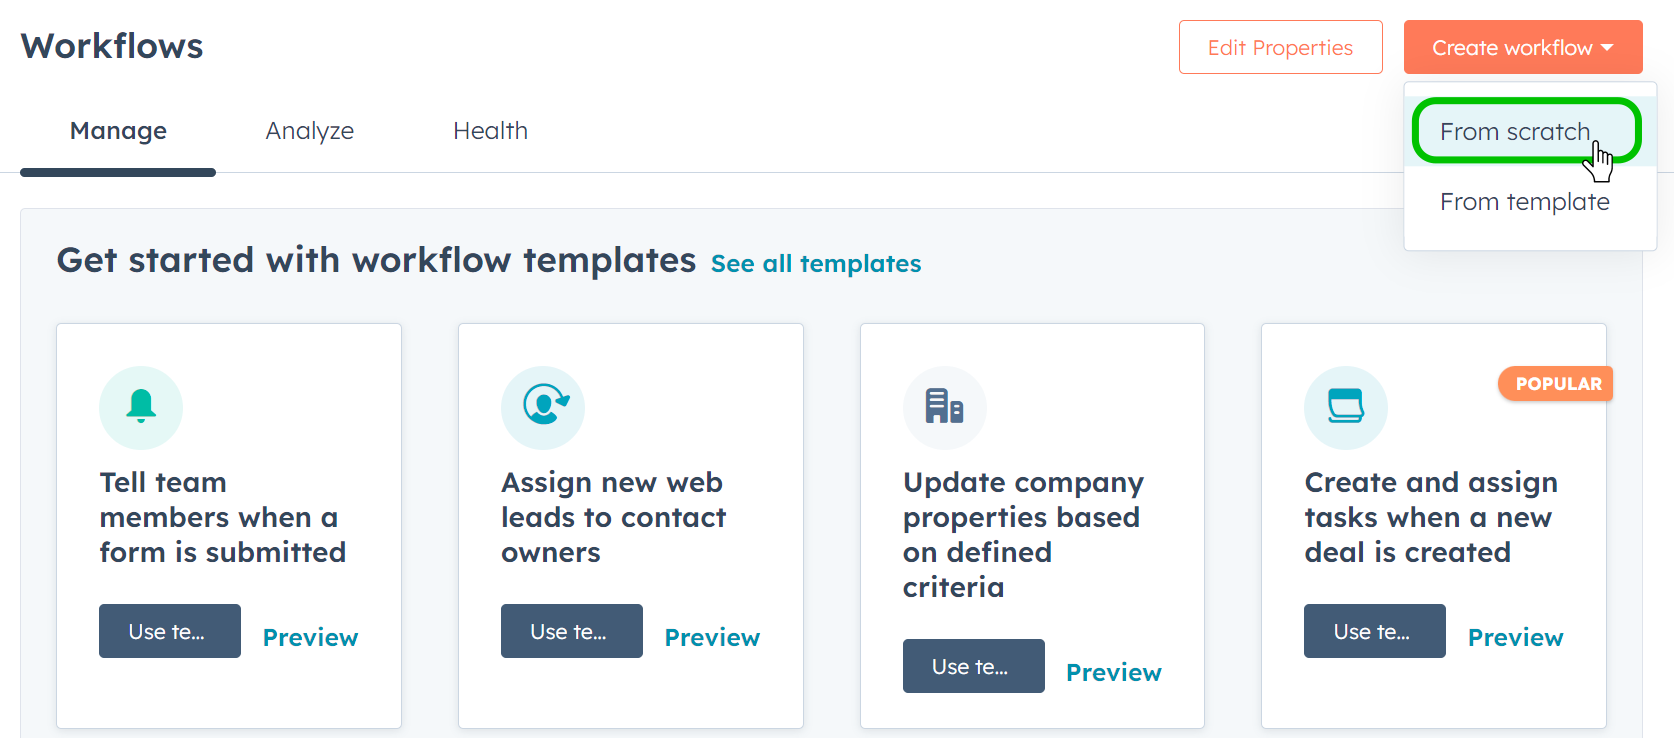
2. Create Workflow
Select Create workflow and then choose From scratch.
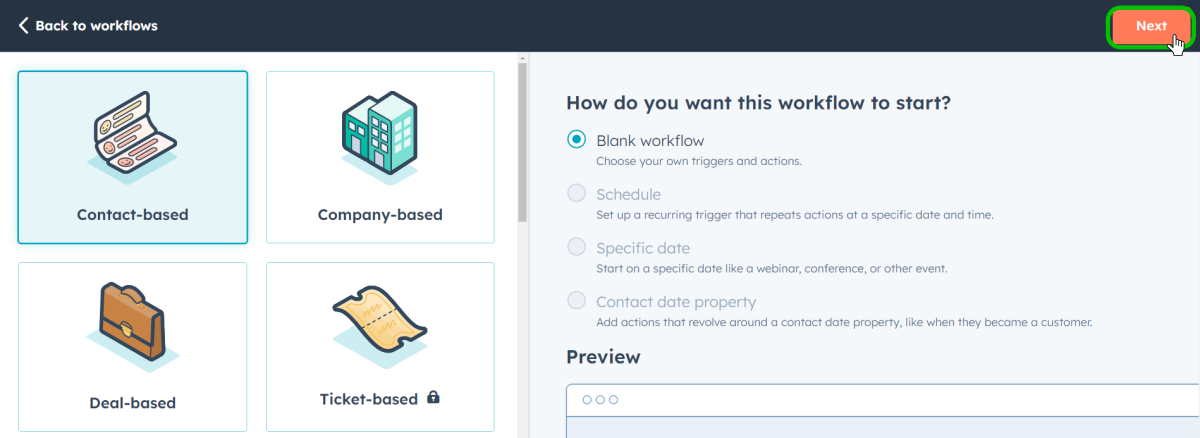
3. Select a Blank Workflow
Choose Contact-based and then Blank workflow, and click Next.
4. Select “Send WhatsApp message by Truora”
Click the Plus(+) icon, scroll to Whatsapp integration by Truora, and select Send WhatsApp message by Truora.
5. Fill in the required fields
To flawlessly perform the following steps, and fill the required fields, you must meet the prerequisites listed at the beginning of this guide.
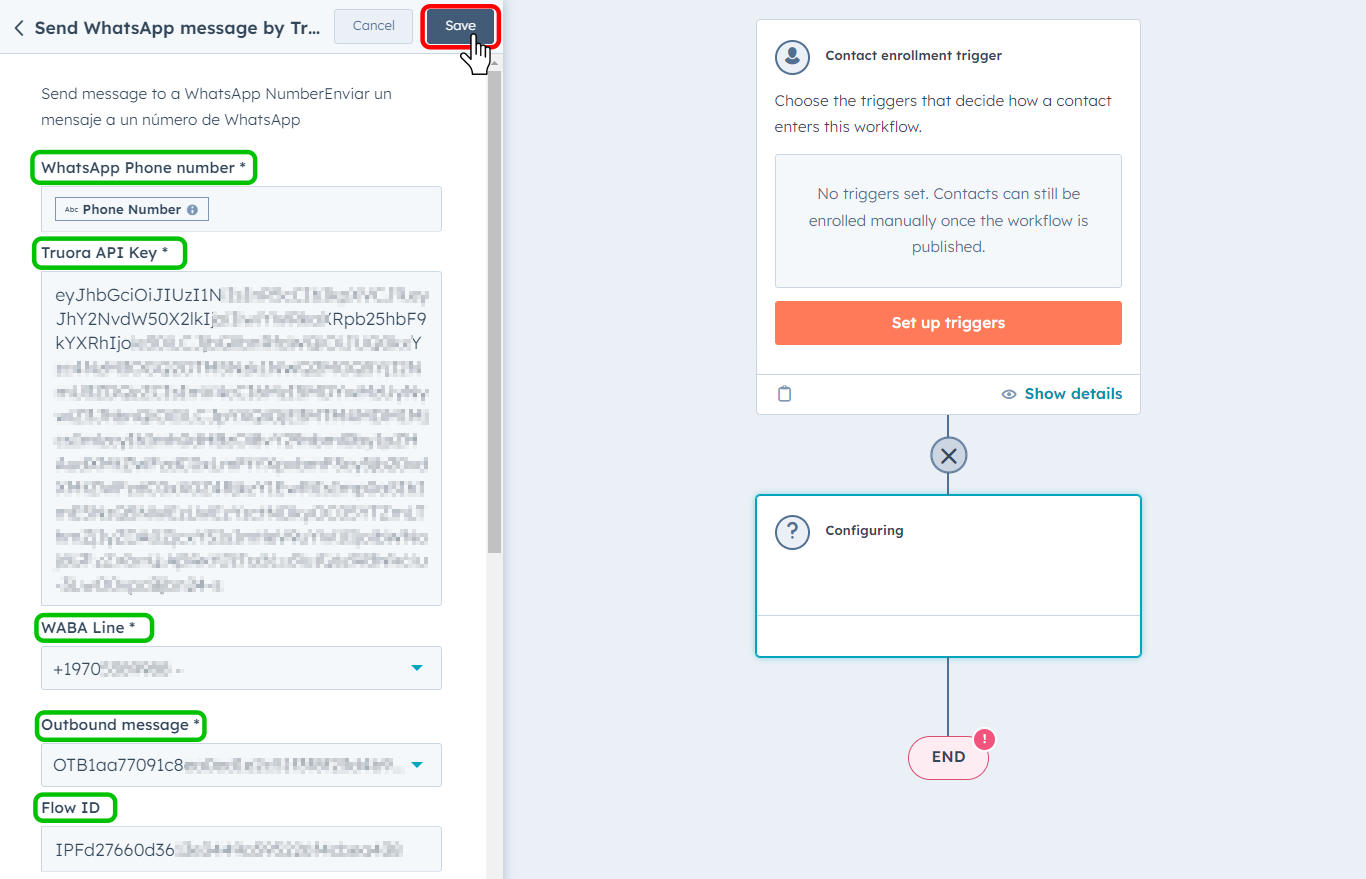
The following fields are required and then click Save:
- Whatsapp Phone number: Select the Contact Property in HubSpot that contains the WhatsApp phone number of your user. Common choices are Phone Number, Mobile Phone Number, or WhatsApp Phone Number. Verify which property applies to your contacts.
- Truora API Key: Enter the Truora API Key from your Truora account. Once entered, your available WABA lines will be listed in the next field.
- WABA line: Choose the WABA line from your Truora account that will be used to send the message to your users. Once selected, the available Outbound messages associated with this WABA line will appear in the next field.
- Outbound message: Select the Outbound message you’ve configured in your Truora account. You can also search by keywords or by Outbound ID.
- To get the Outbound ID of your previously created Outbound message, go to the Outbound Messages section in Truora’s Customer Engagement product and click the copy button next to the desired Outbound:
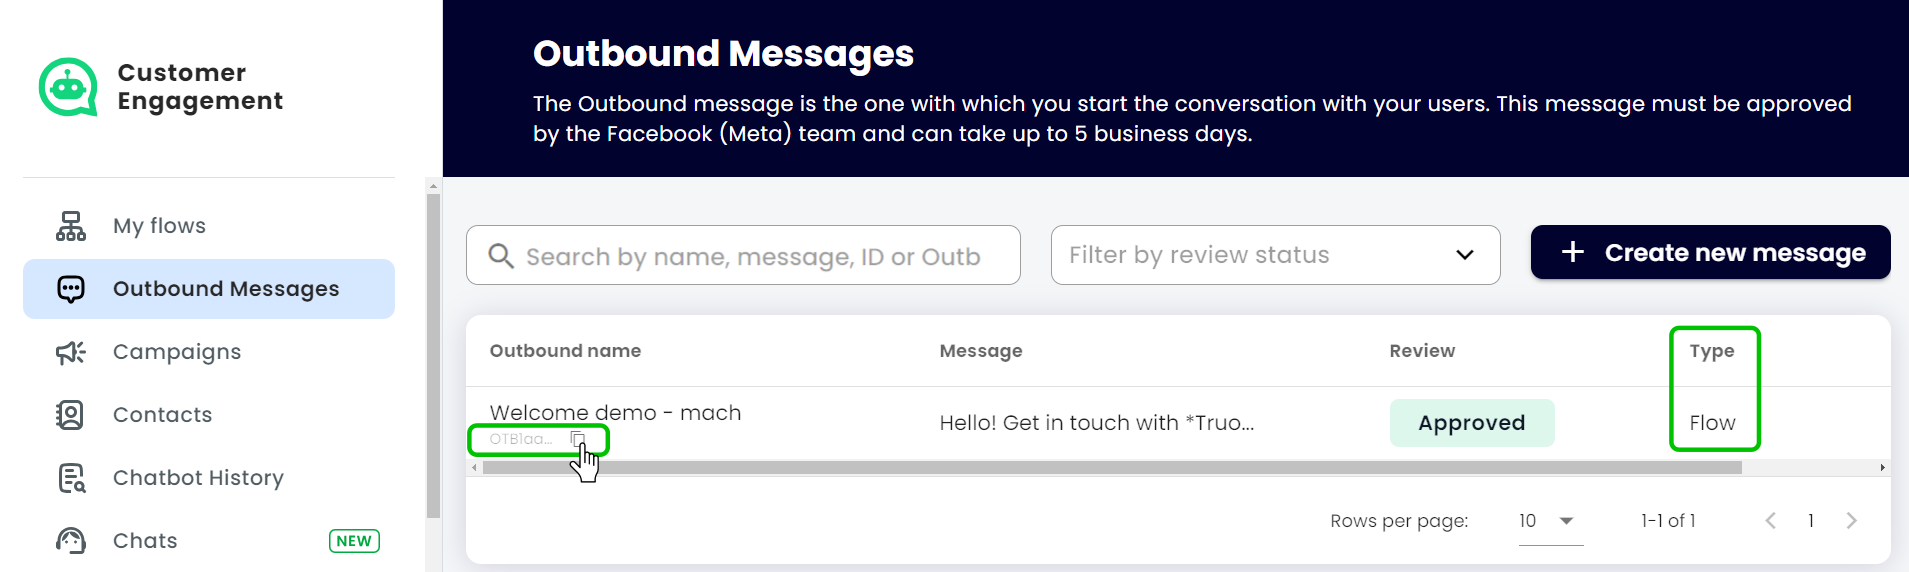
- To get the Outbound ID of your previously created Outbound message, go to the Outbound Messages section in Truora’s Customer Engagement product and click the copy button next to the desired Outbound:
Note: The Conversation Type of your Outbound message must be set to Flow to allow it triggering a flow.
- Flow ID: Enter the Flow ID of the flow you want to trigger after the user responds to the Outbound message. This Flow ID will be associated with the Outbound ID specified earlier.
- To get the Flow ID of one of your previously created Flows, go to the My flows section in Truora’s Customer Engagement product and click the copy button for the desired flow:
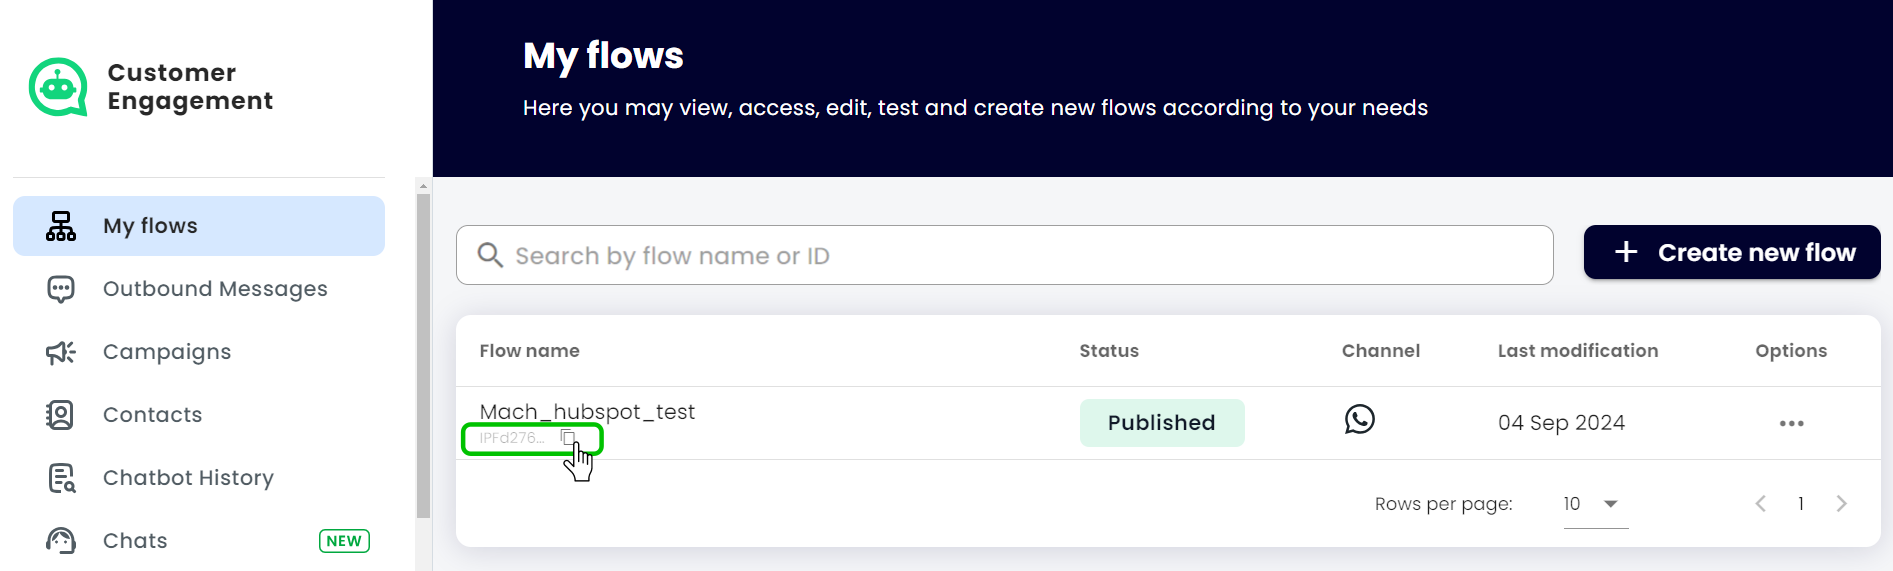
- To get the Flow ID of one of your previously created Flows, go to the My flows section in Truora’s Customer Engagement product and click the copy button for the desired flow:
6. Enroll a Contact and Test Workflow
- Click Review and Publish, then select Manually add contacts.
- Select Choose individual contacts, find the contact you want to enroll, and select it.
- Click Save existing, then Skip to turn on.
- Finally, click Turn on workflow. The workflow will execute, and the selected contact will receive the Outbound message you configured.
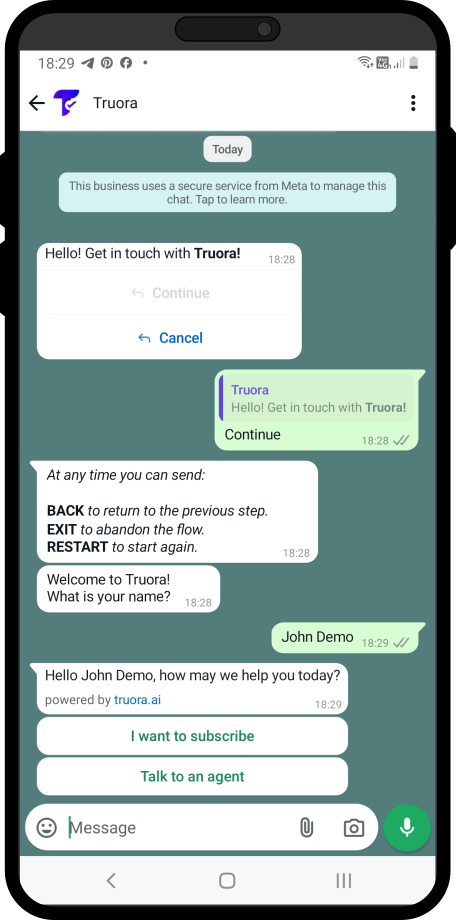
For the example used in this guide, we set the Flow ID and the same Contact of the first example.
The image below shows the message received by the contact. By responding to the Outbound Message with “Continue”", the same flow used in this guide was triggered: