WhatsApp Flows - Forms
WhatsApp Flows (Forms) allow you to integrate structured forms within a WhatsApp conversation, making data collection faster and more precise, which reduces errors. This approach minimizes typing mistakes common in traditional chat-based interactions, enhancing the user experience and preventing long, overwhelming flows in the Flow Builder.
You can collect various data types and organize questions into sections for a smoother experience. Responses are stored in variables, enabling integration with other flow blocks, such as Electronic Signature, Open Question, Finish Chat, or any other block that supports variable insertion.
In this guide, you’ll learn how to create a WhatsApp Form and integrate it into a WhatsApp Flow.
Prerequisites
To flawlessly perform the steps of this guide, ensure the following prerequisites are met:
- Truora Account: If you don’t already have one, learn how to Set up a Truora account.
- Activated WhatsApp line: Follow this guide to acquire and activate WhatsApp lines in Truora.
- Know how to create a WhatsApp Flow: Learn how to Create a WhatsApp Flow in Truora.
- Familiarize with Variables: Having a basic understanding of Flows Variables. If you haven’t already, check out our Using Variables guide.
Create a new form
-
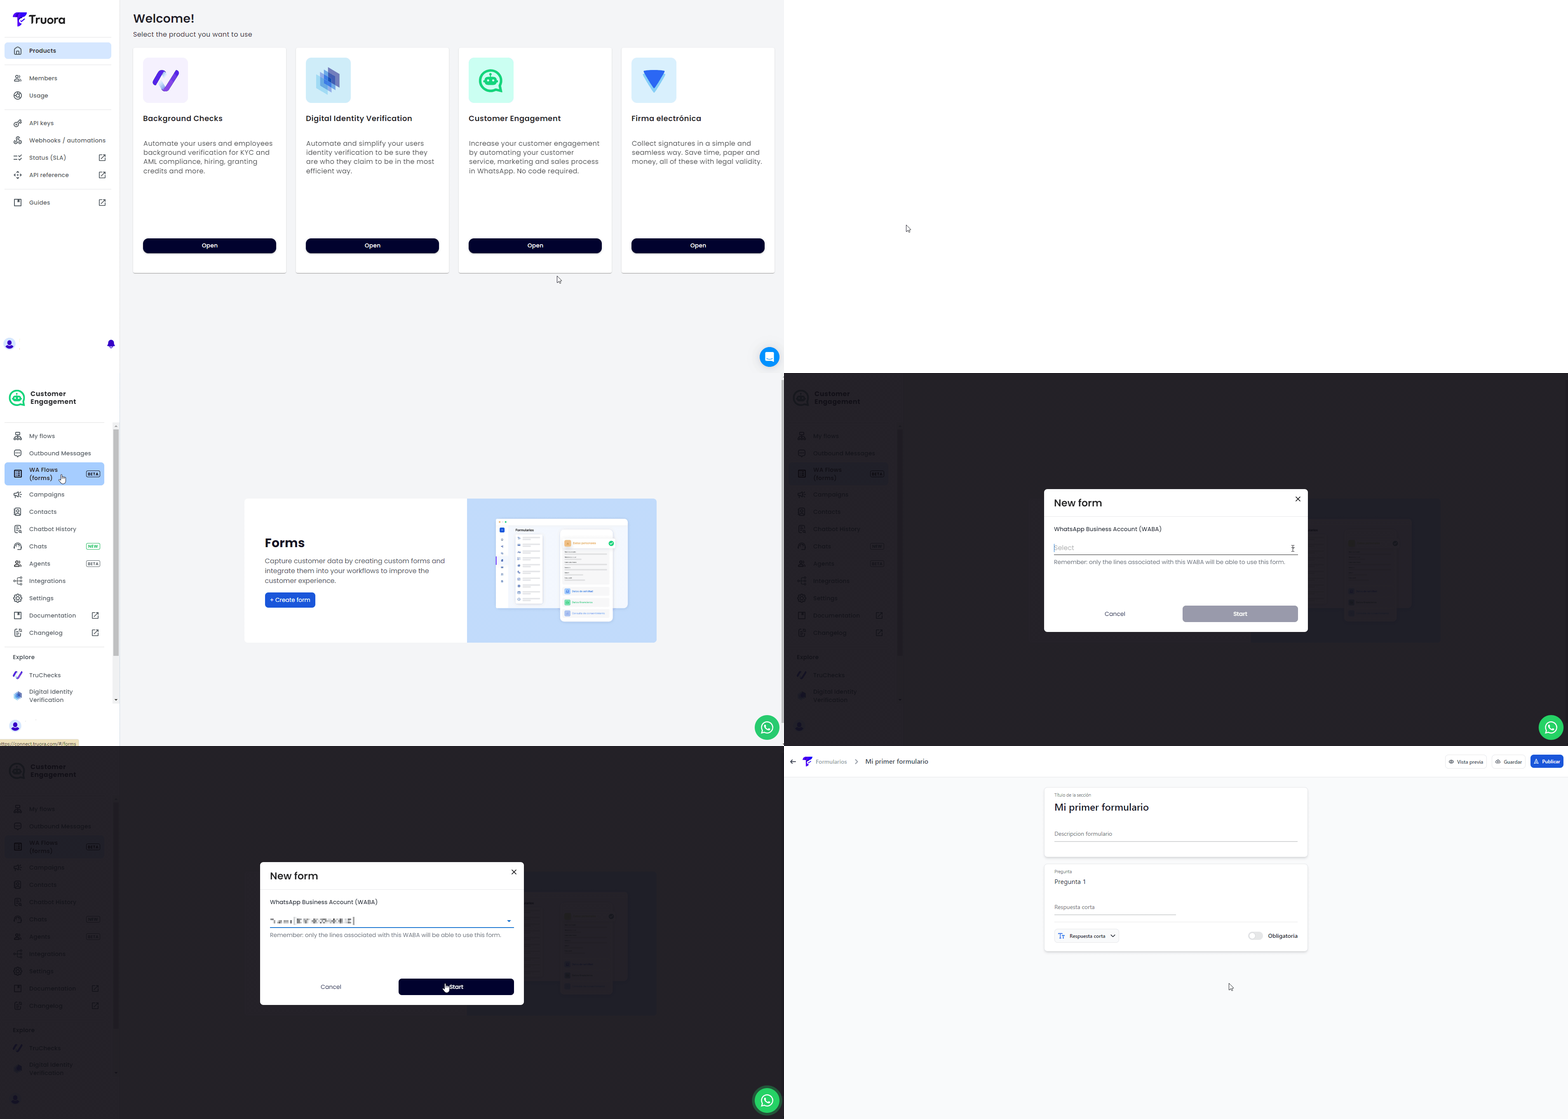
Log in to Truora dashboard, and click Open under the Customer Engagement section.
-
Select the WhatsApp Flows (Forms) tab.
- If it is your first form, click on + Create form.
- Otherwise, click + New form in the forms list screen to create a new one.
-
Select your WABA and click Start. Only the lines associated with this WABA will be able to use the form.
-
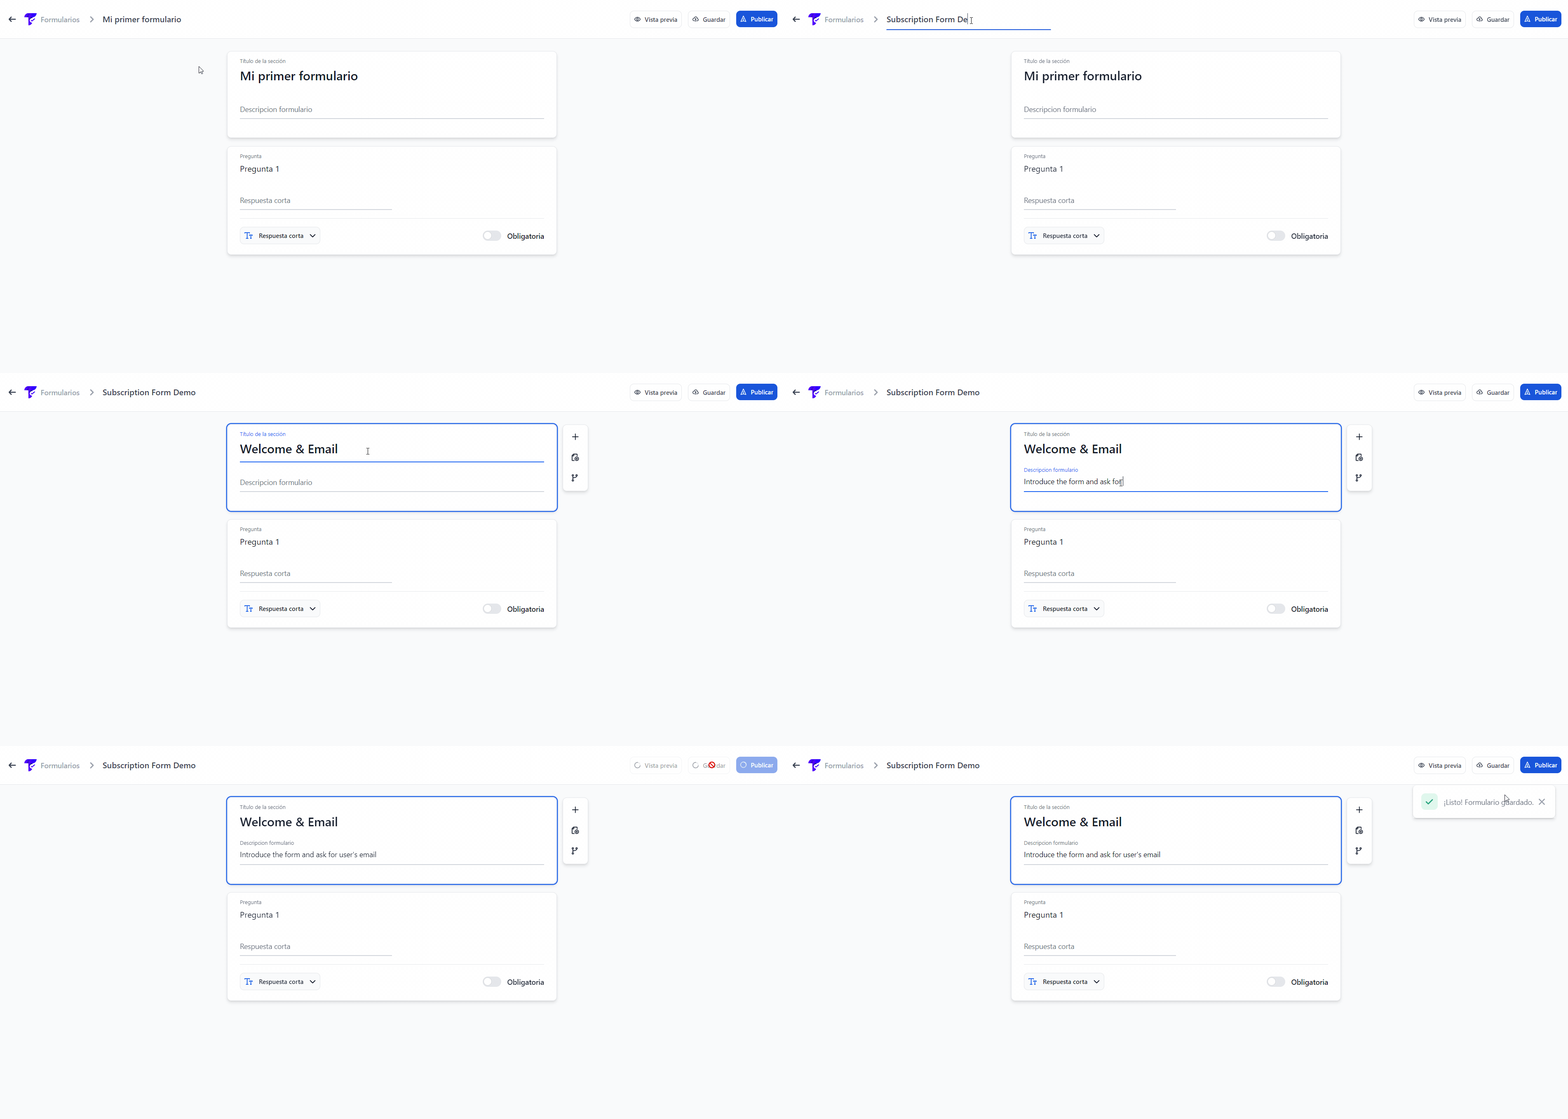
Enter a name for your Form in the top navigation bar.
-
Add a Title and a Description for the first section.
-
Click Save in the navbar to create the form.
Edit, Add, Duplicate and Delete Questions
Edit existing question
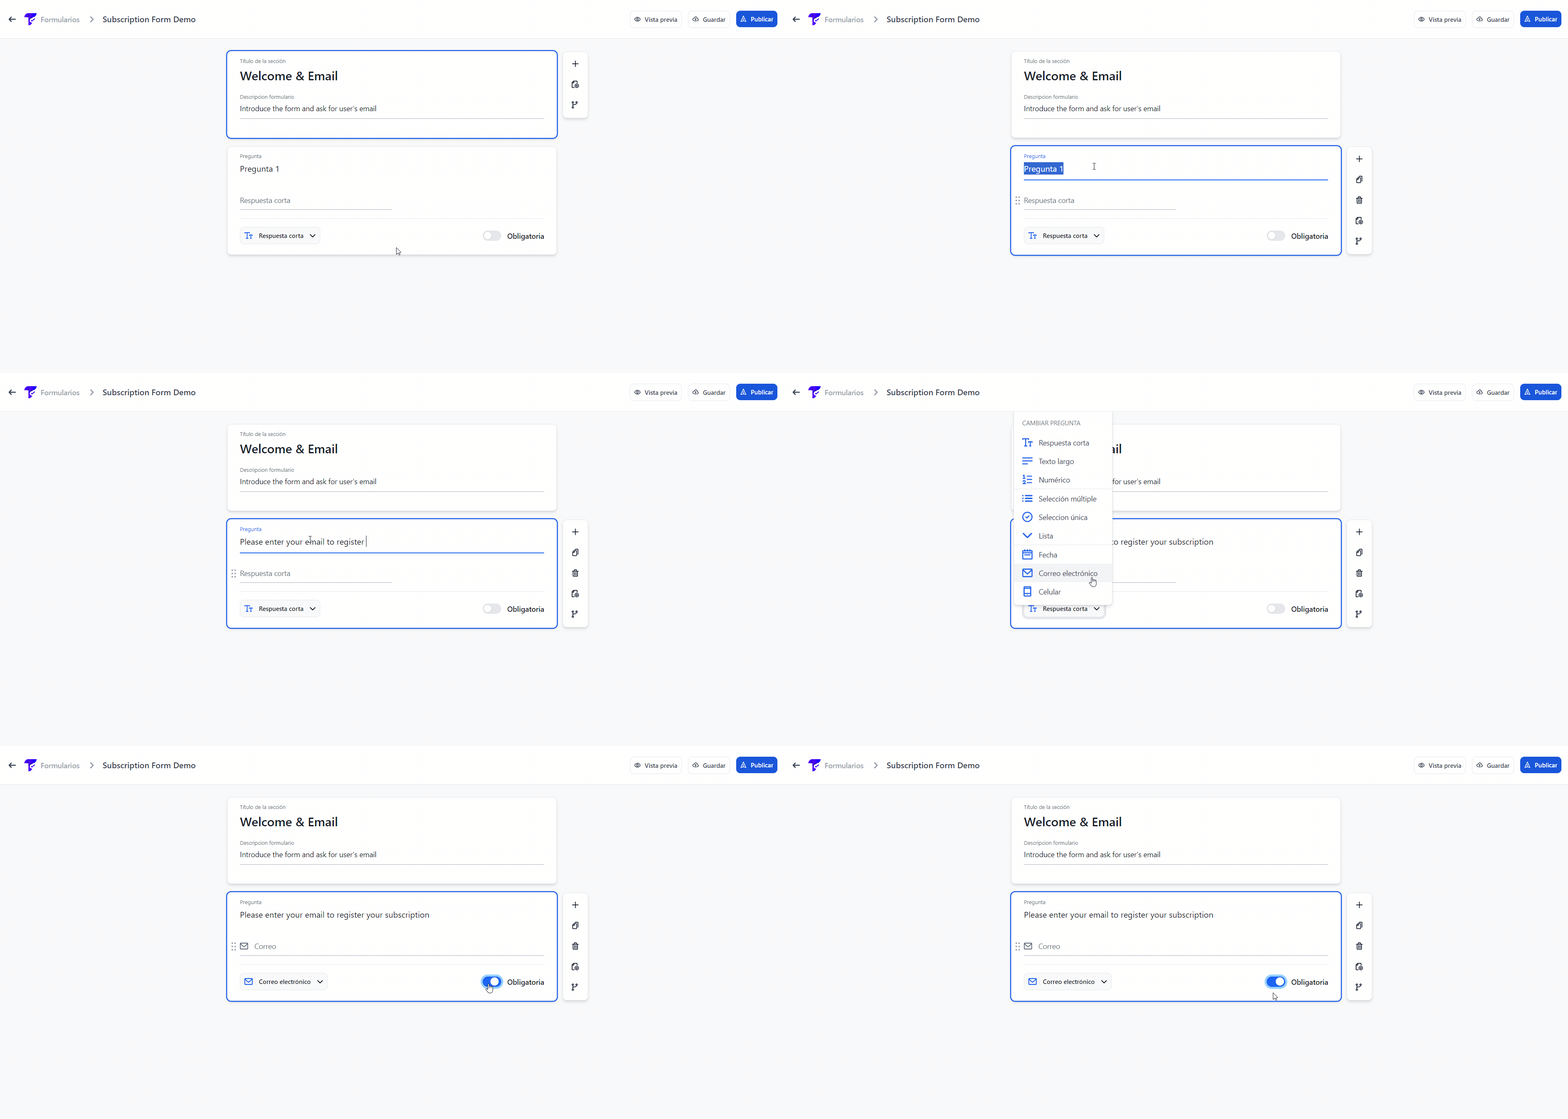
A default question is created when you create a form. Modify its text, and customize its settings using these options at the bottom of the question card:
- Required Toggle - Defines whether the question is mandatory.
- Input Type Dropdown – Selects the input type for the response.
The following is a breakdown of the available input types:
| Question type | Description |
|---|---|
| Short answer | Limits responses to 250 characters. |
| Long text | Limits responses to 1000 characters. |
| Numeric | Accepts only numbers between f-2147483647 and 2147483647. |
| Multiple choice | Displays checkboxes for multiple selections. |
| Unique selection | Displays radio buttons for a single selection. |
| List | Provides a dropdown menu for selection. |
| Date | Uses a date picker. |
| Requires a valid email format. | |
| Phone | Requires a valid phone number. |
Dynamic lists
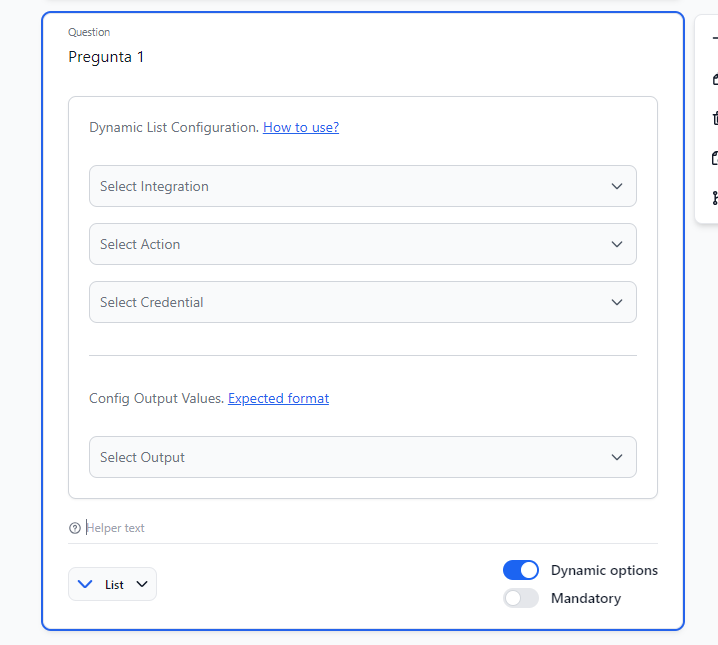
For input types that have options like Multiple choice, Unique selection, and List, you can configure dynamic lists. To enable dynamic lists, first activate the “Dynamic options” switch in the question settings. This will display the integration configuration options. Dynamic lists allow you to populate the options automatically from an external data source through an integration.
To set up a dynamic list, you must first create an integration. Learn how to create and configure integrations in the Custom integrations Guide.
When configuring a dynamic list, you’ll need to:
- Select the integration you want to use
- Choose the specific action from that integration
- Select the credential that will be used to authenticate the requests
Important: The integration action must have an output with a JSON array with objects containing id and title properties. For example:
[
  {"id": "1", "title": "Option 1"},
  {"id": "2", "title": "Option 2"},
  {"id": "3", "title": "Option 3"}
]
The dynamic list component only accepts this specific format. Any other format will not be processed by the component.
Adding a new question
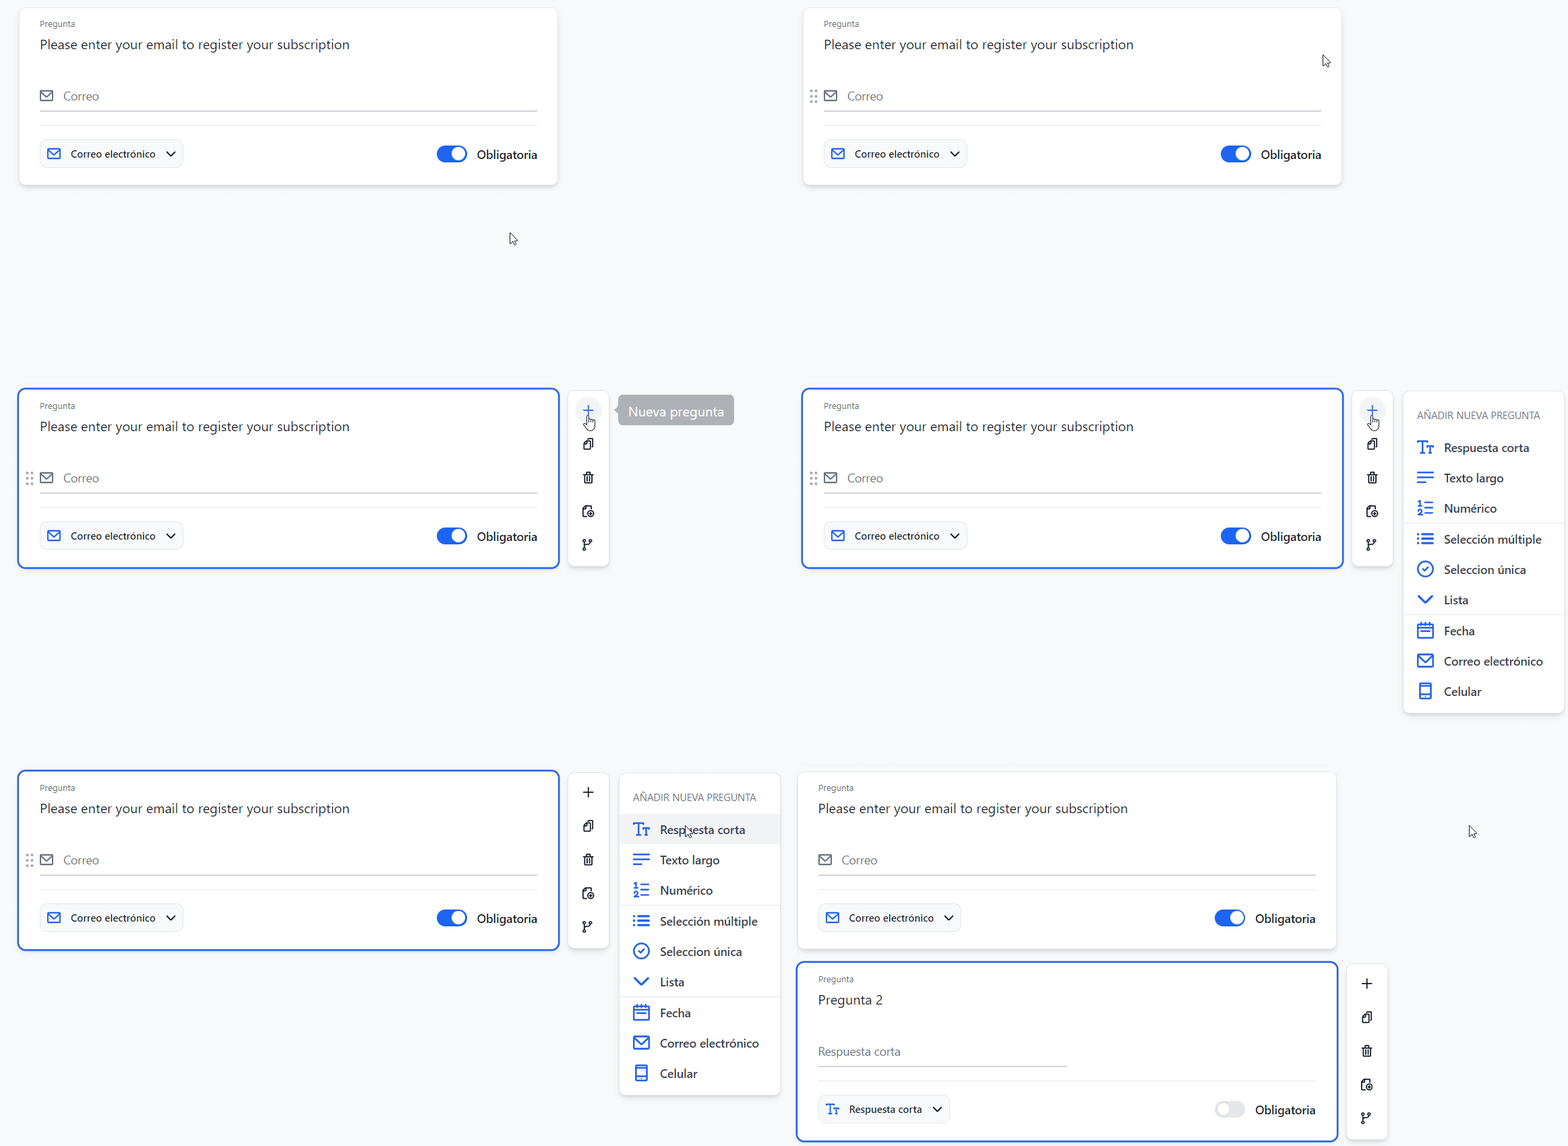
Click + New question in the question card tools, select a question type, and a new question card will be added.
Duplicate a question
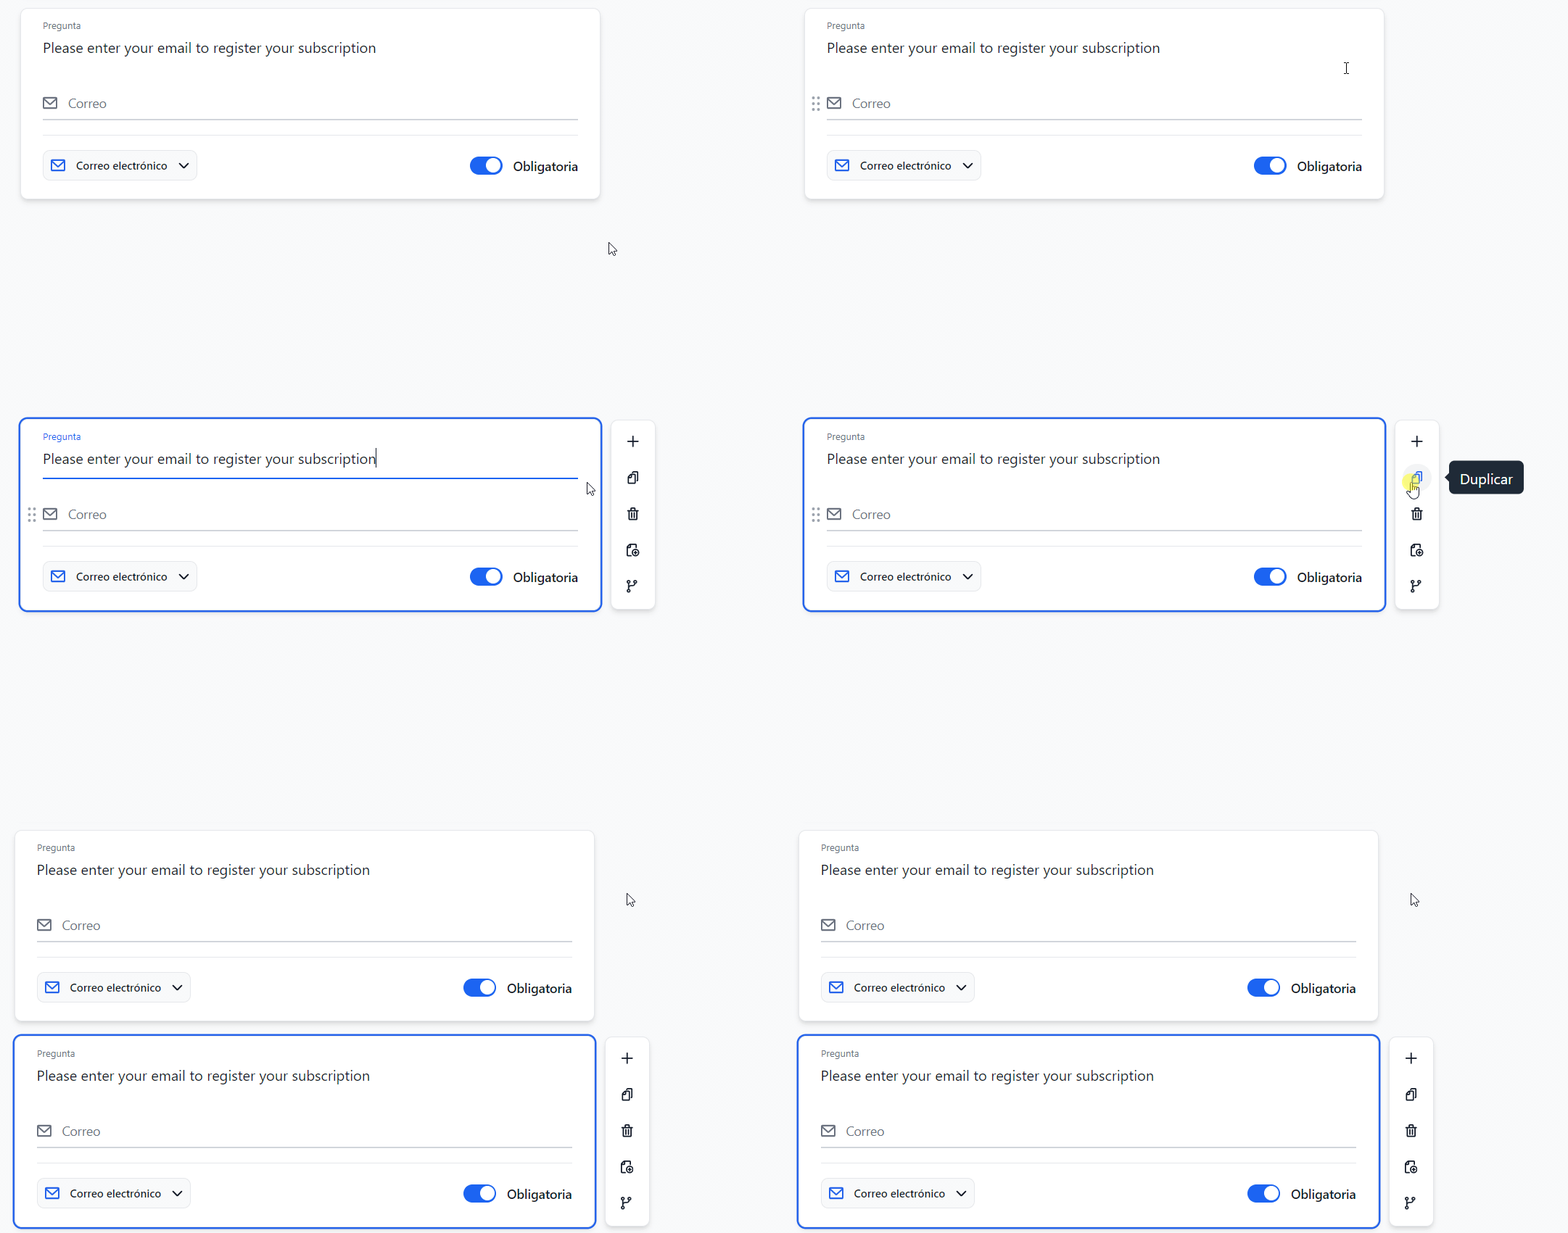
To create an identical question, click the Duplicate button. A new question card will be generated with the same content.
Delete a question
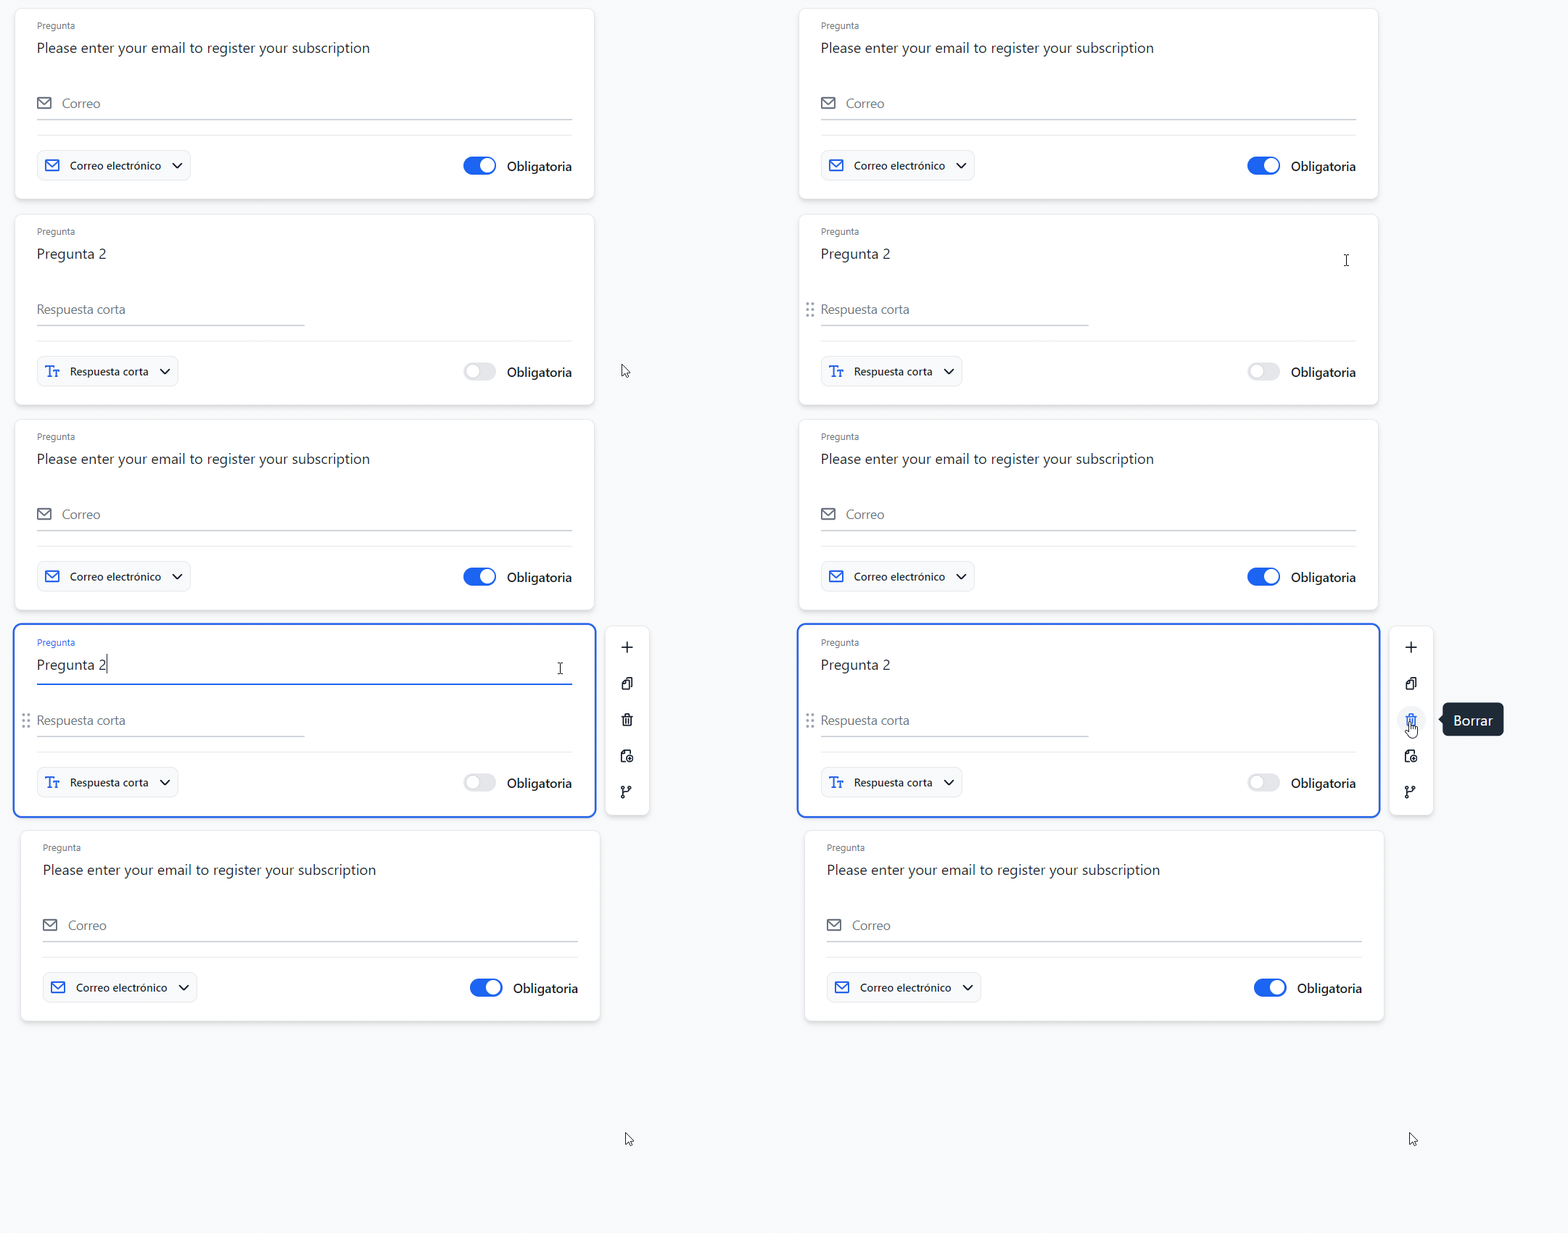
Click the Delete icon to remove a question.
Form sections
Sections help you organize questions into separate pages, making forms easier to navigate and preventing long, overwhelming screens. Each section can hold up to 50 questions.
- To add a new section, click the New section icon in the question card tools.
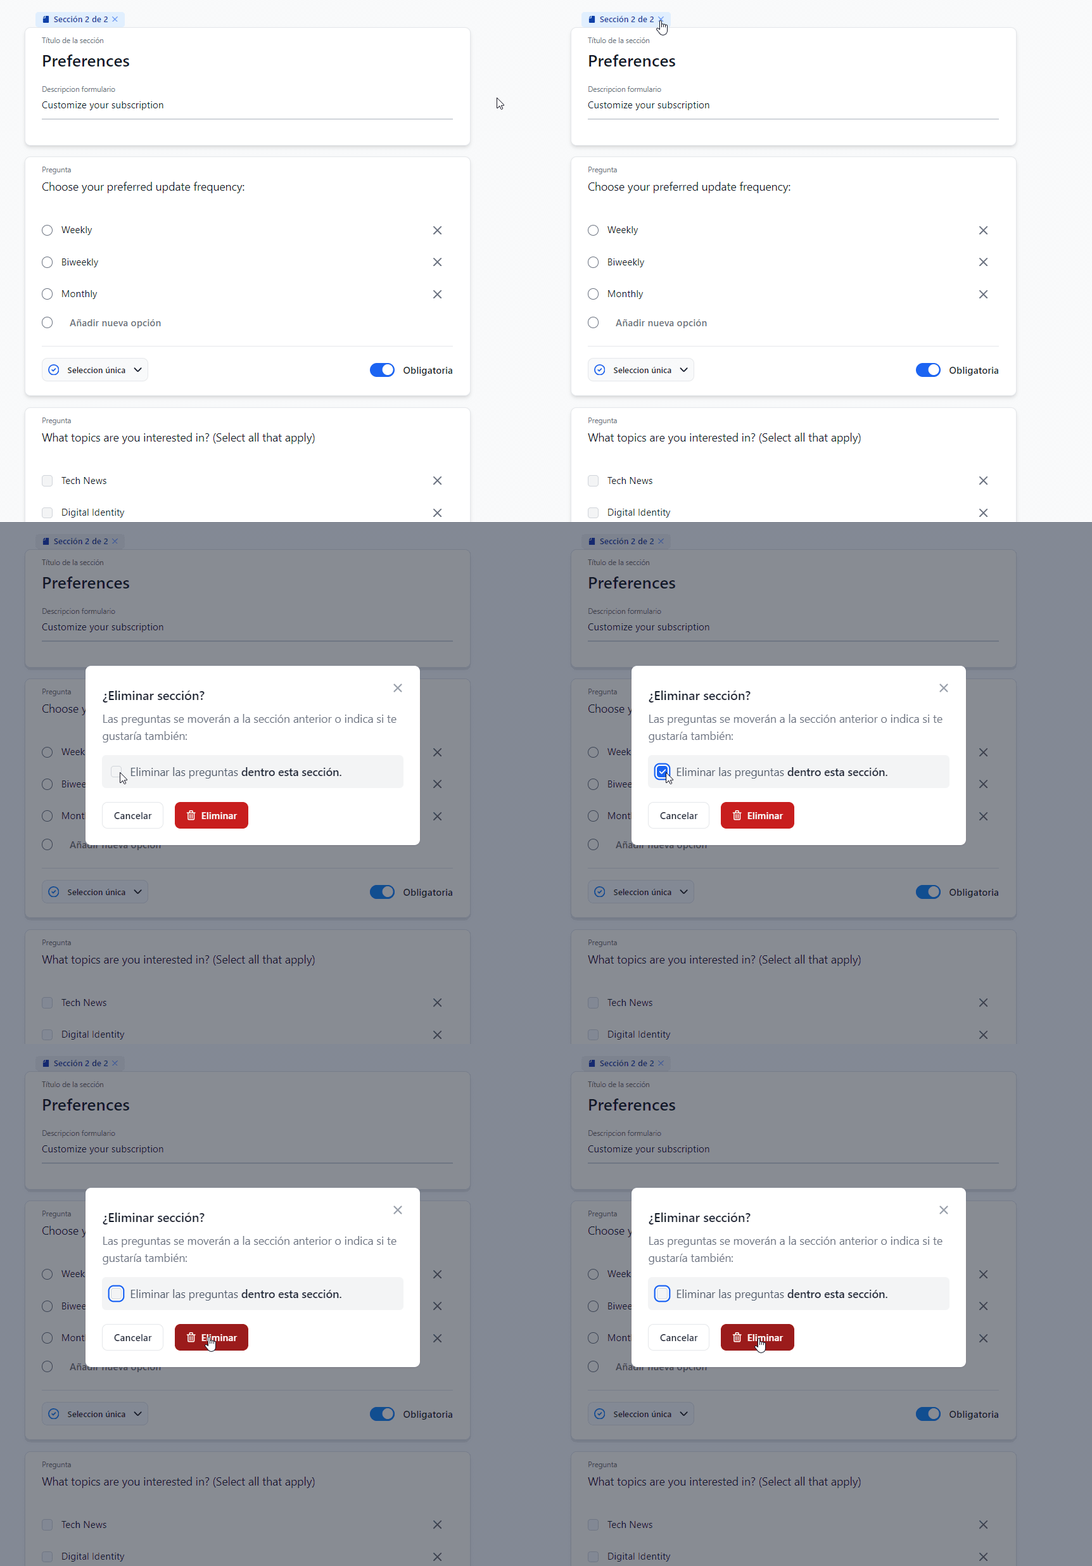
- A section thumbnail will appear at the top, displaying “Section N of Total sections” with an “X” to delete it.
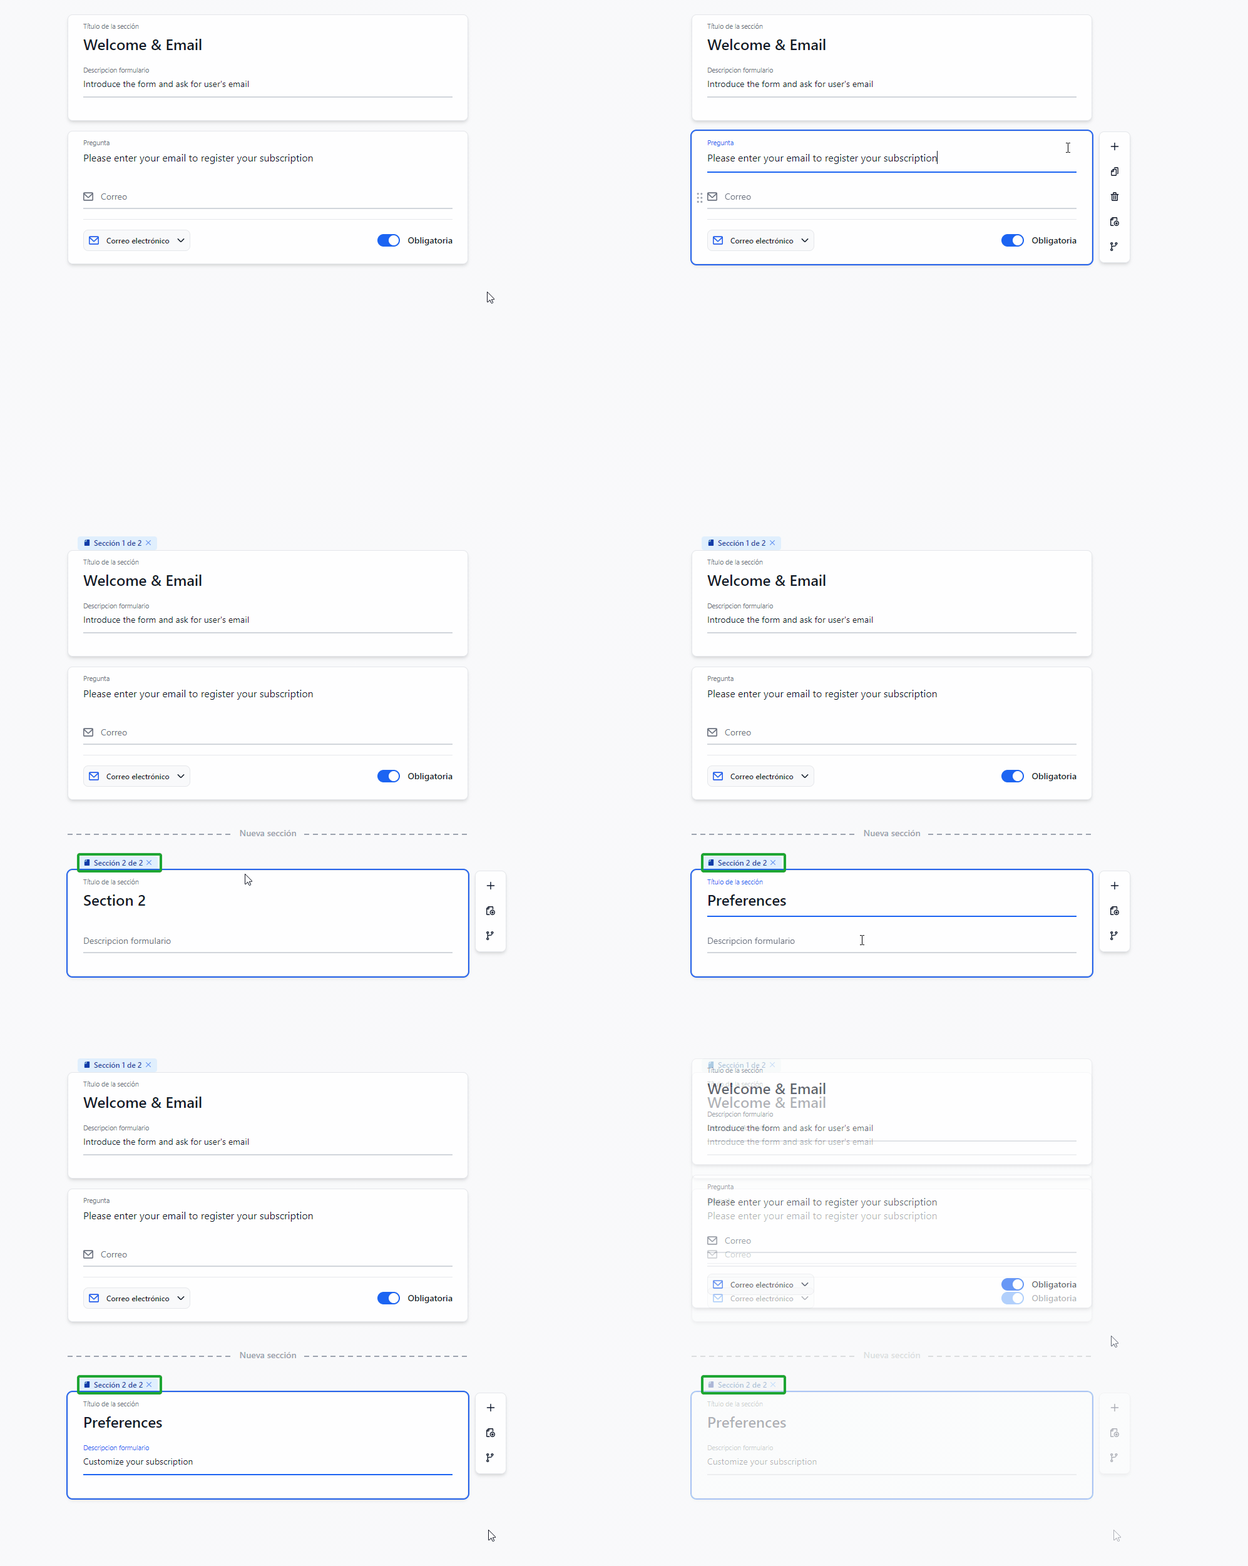
- If you want to delete a section with questions, a confirmation modal will appear, allowing you to select either to delete questions within this section or move them to the previous section.
Preview a form
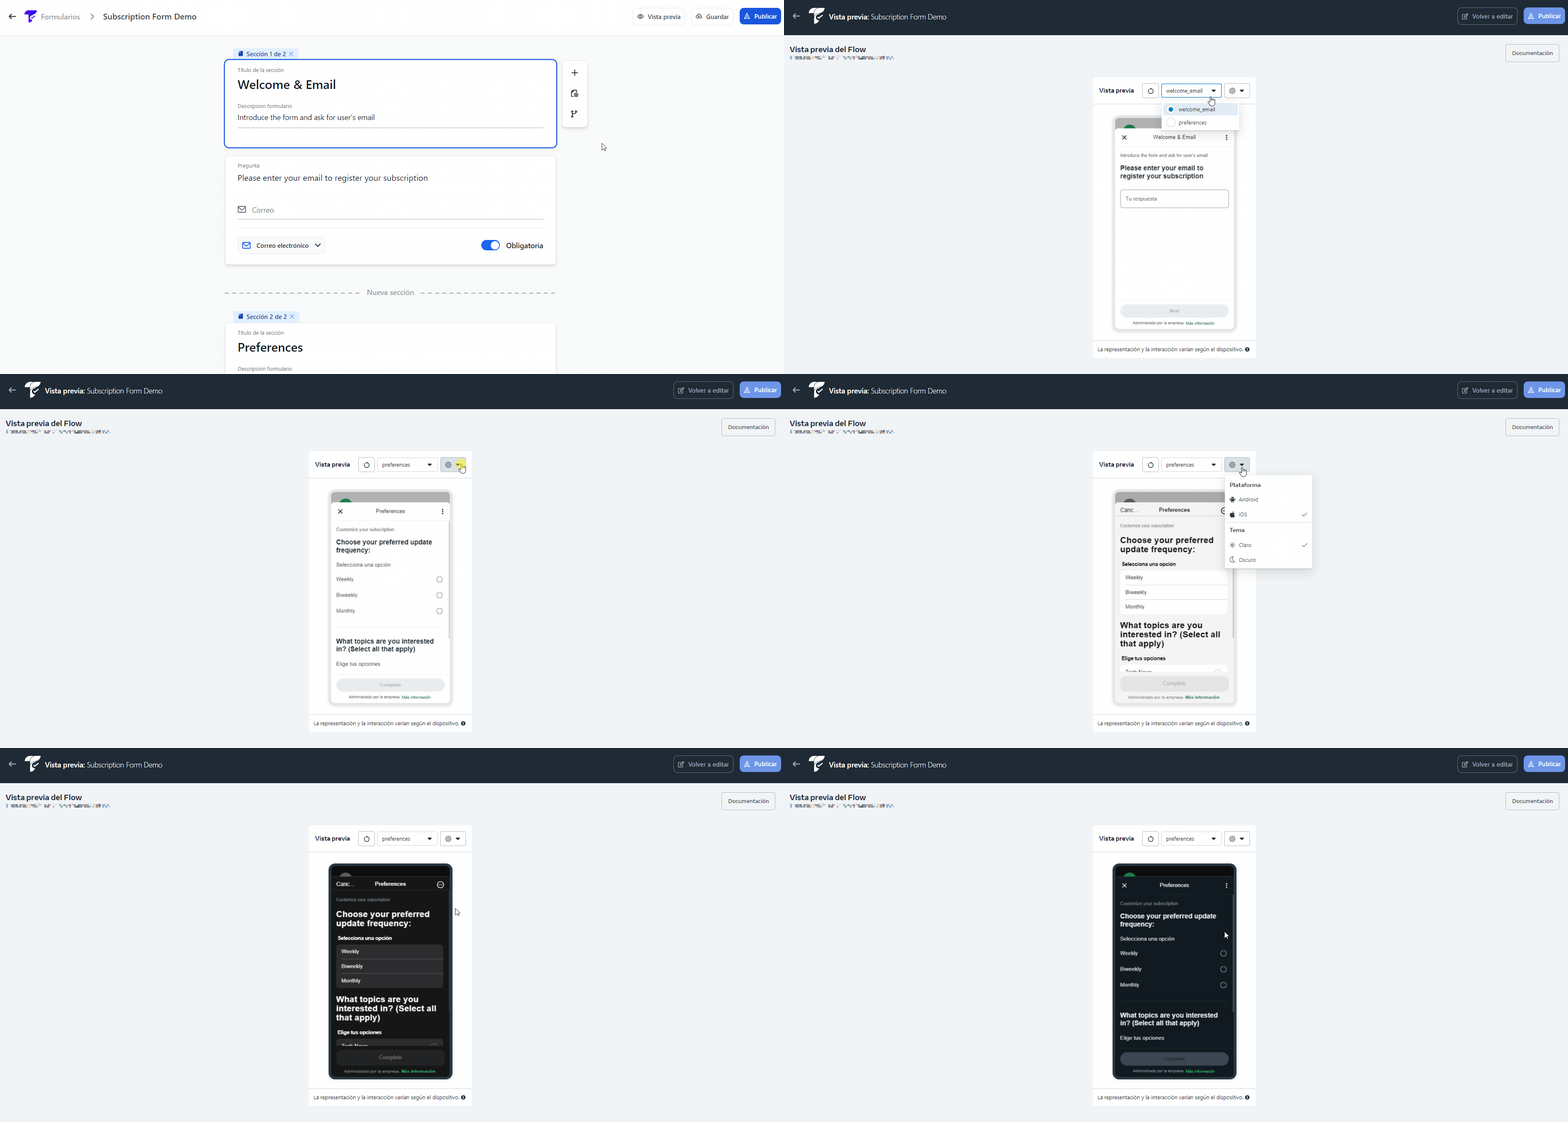
Click the Preview button in the navbar to see how users will experience the form. The preview mode lets you navigate through sections and view the form’s layout.
In the top menu of the preview bar, you can:
- Switch between form sections.
- Click the Settings icon to:
• Select Android or iOS preview.
• Toggle between light and dark mode.
Save and publish
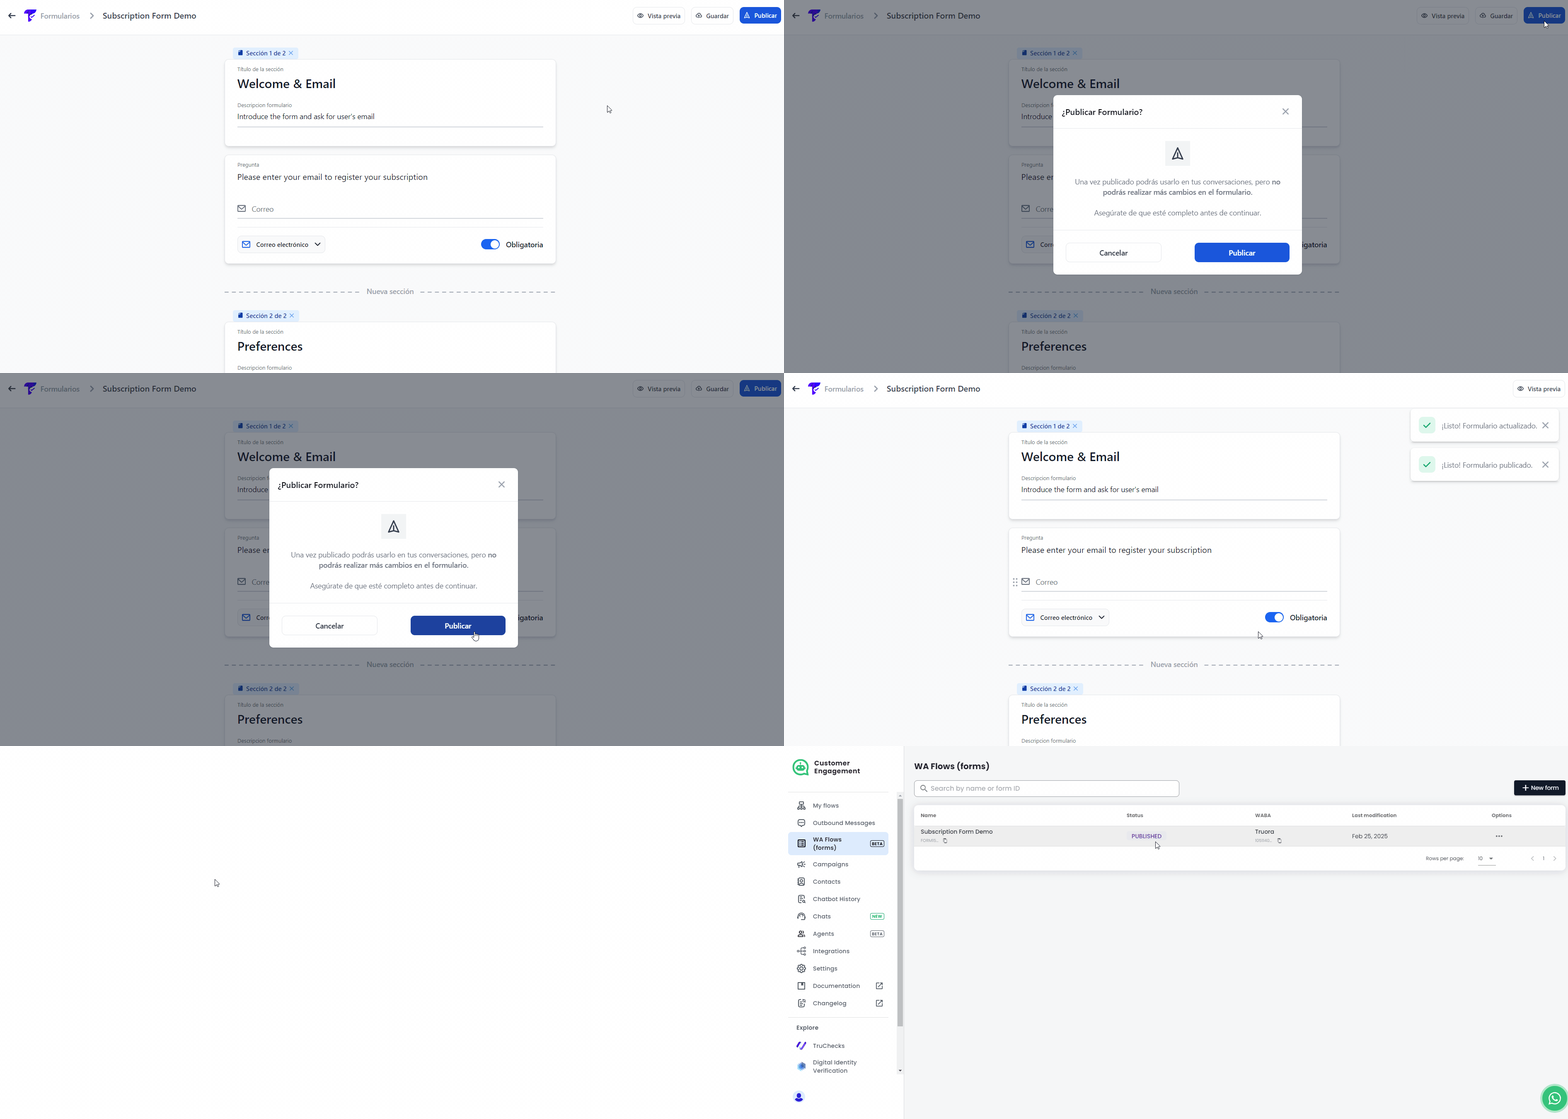
Click Publish in the navbar to make your form available for use in WhatsApp Flows.
Copy a form
To duplicate a published form:
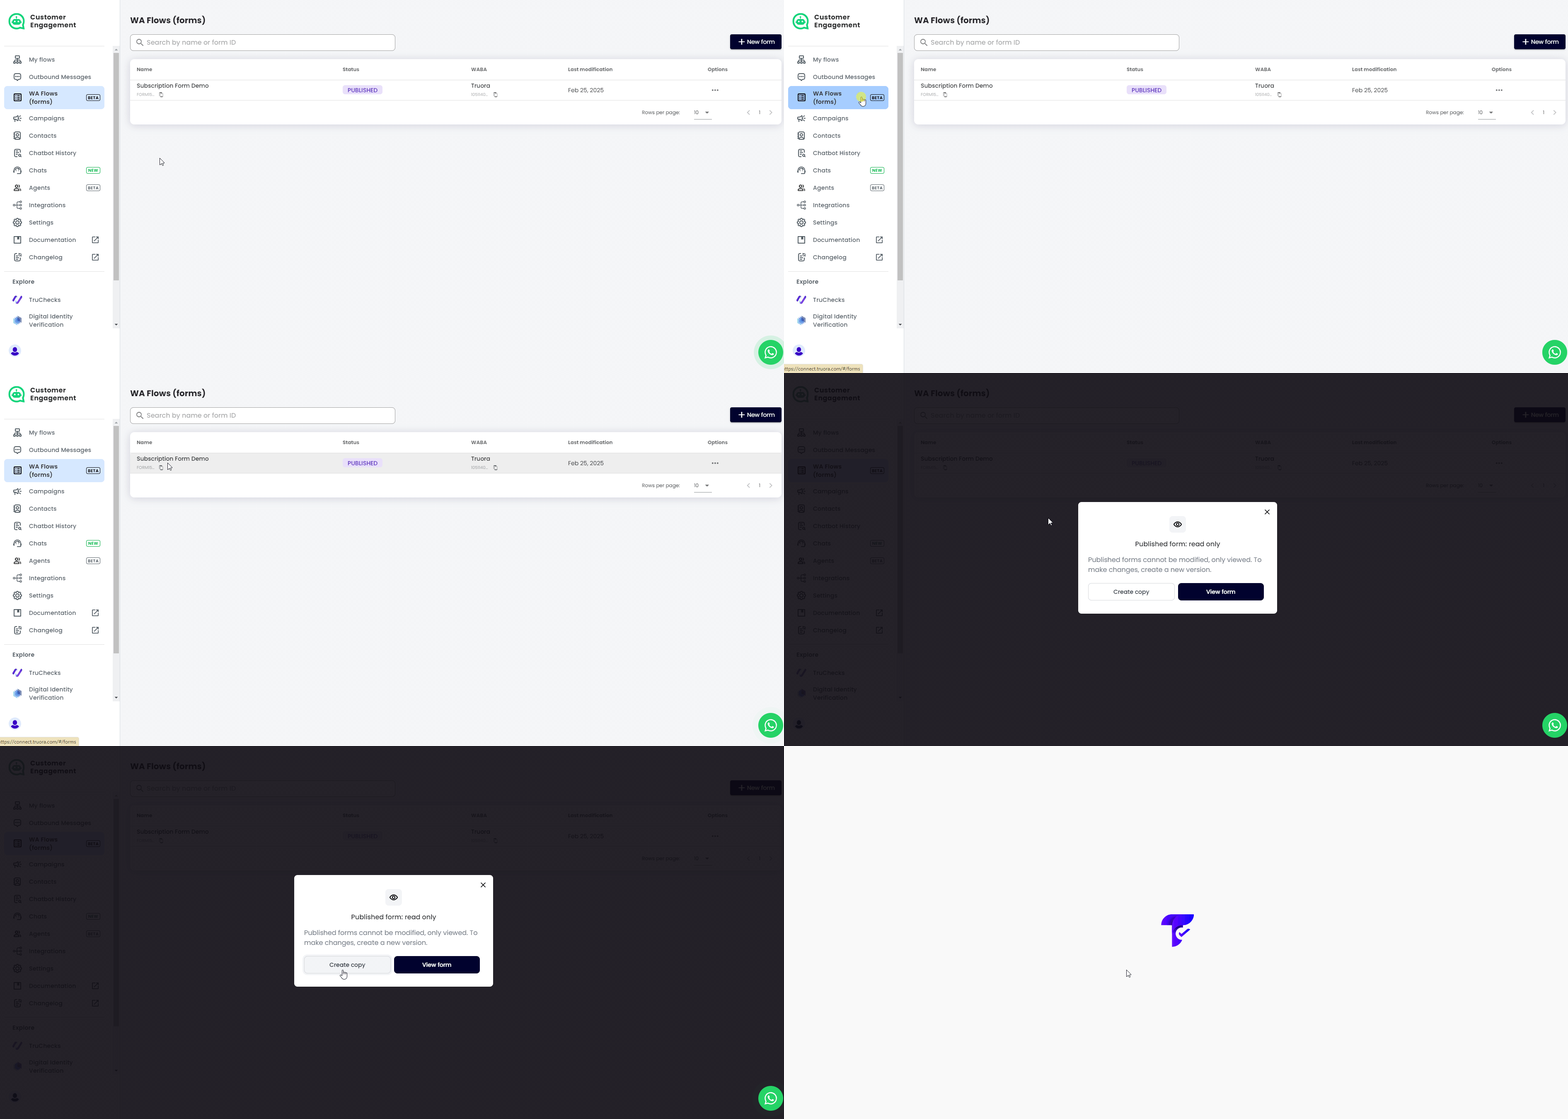
- Go to WA Flows (forms) tab.
- Find the form you want to copy and click on it.
- Click on Create Copy. A new, editable copy of the form will open.
- Make the necessary changes, then Save and Publish the new form.
Integrating a Form into a WhatsApp Flow
Follow these steps to integrate a form into a WhatsApp Flow to collect user data.
Adding a Form to the Flow
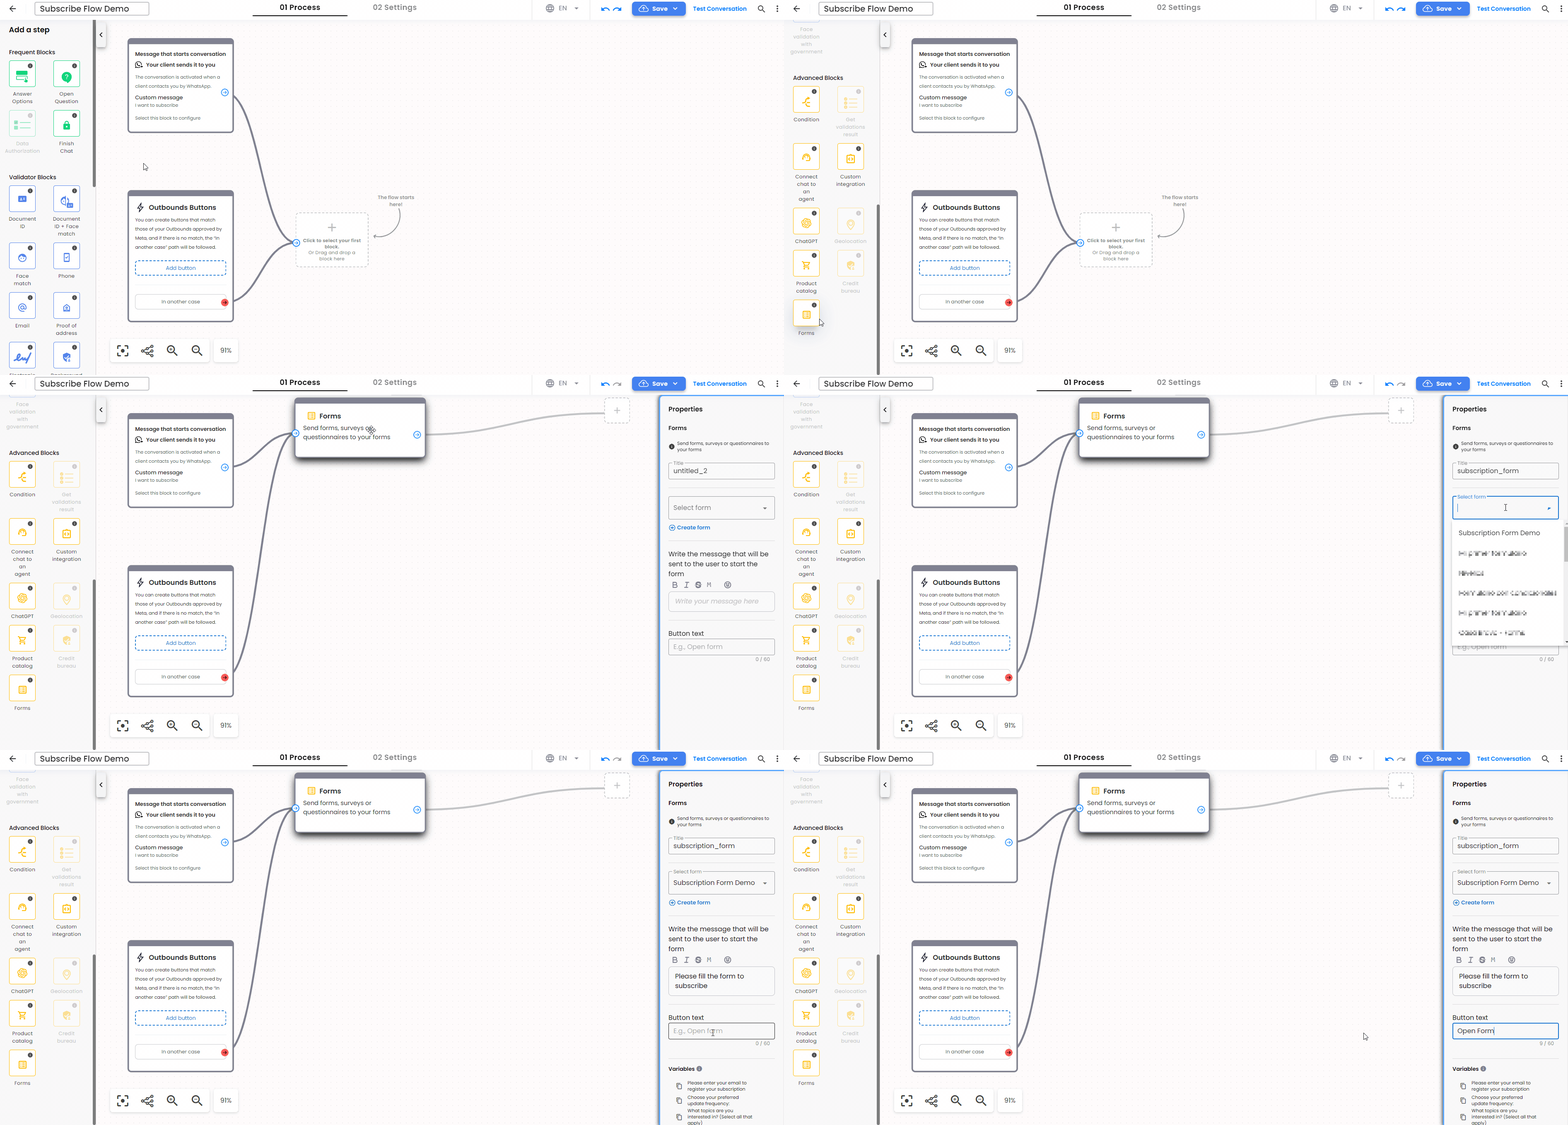
- In the Flow Builder, locate the Forms block under Advanced Blocks and drag it into your flow.
- Click the block to open its Properties:
- Title: Name the block for easy identification.
- Select Form: From the dropdown list, select the form that should be displayed during the flow execution.
- +Create form: If you haven’t created a form yet, click this option to open the form creation window.
- Message: Write the message that will be sent to the user to start the form.
- Button Text: Define the button label users will click to open the form.
Using Form variables
Below the form selector, you’ll find a list of variables corresponding to each form question:
- Click the copy icon next to a variable to use it in other blocks.
- Alternatively, type “@” in any destination block to open the variable selector and reference form responses.
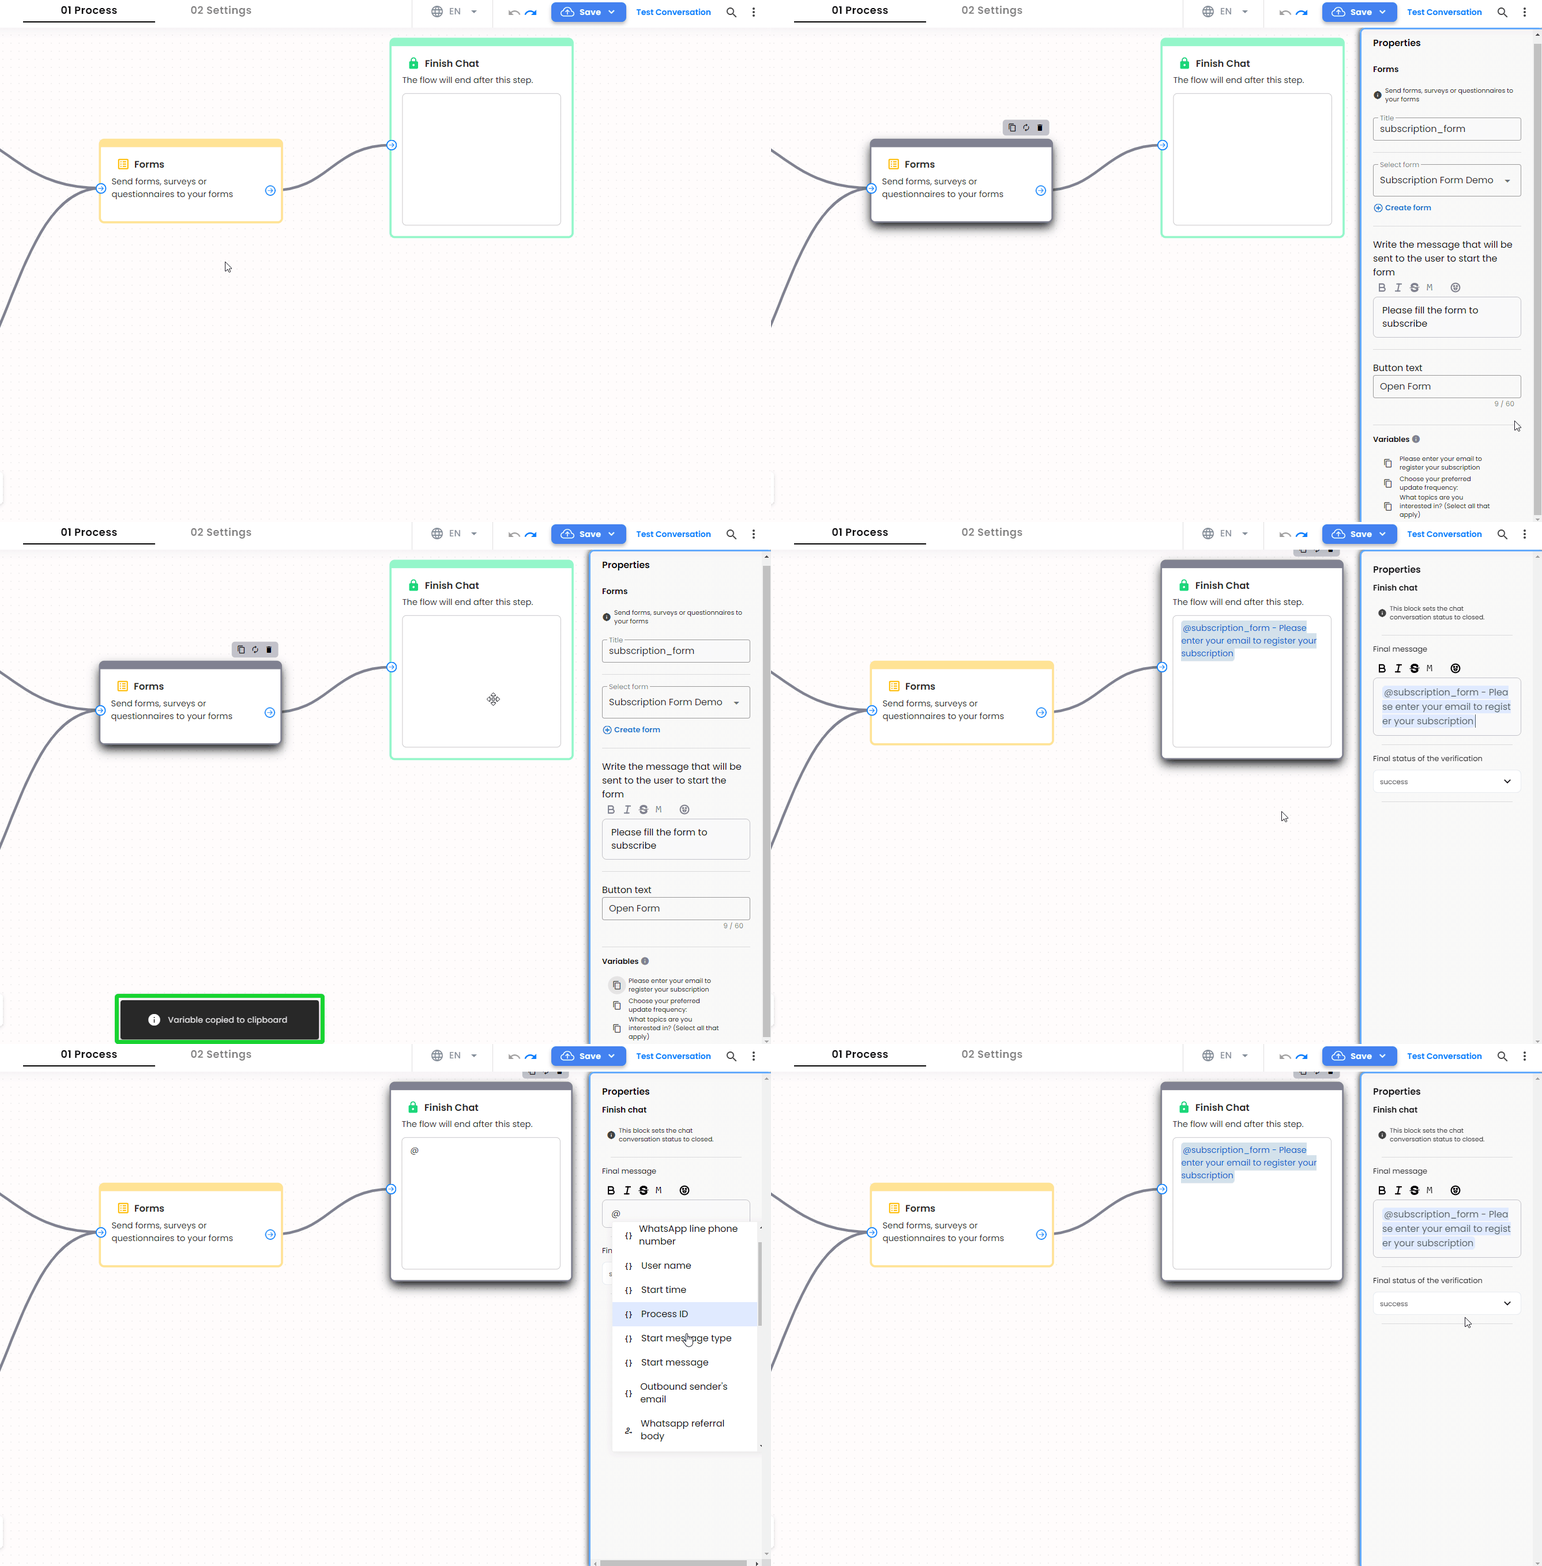
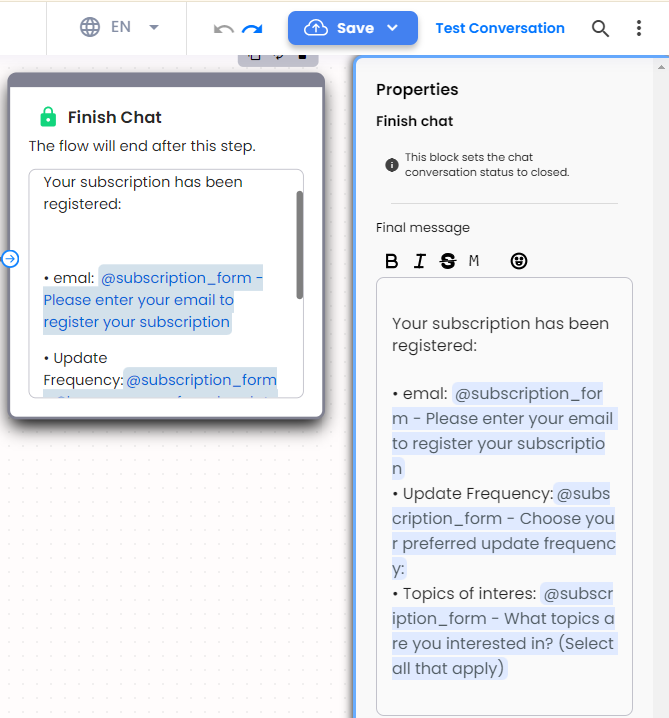
In this guide’s example, form variables were used in the Finish Chat block to confirm the user’s subscription with the details they provided.
Process with form execution
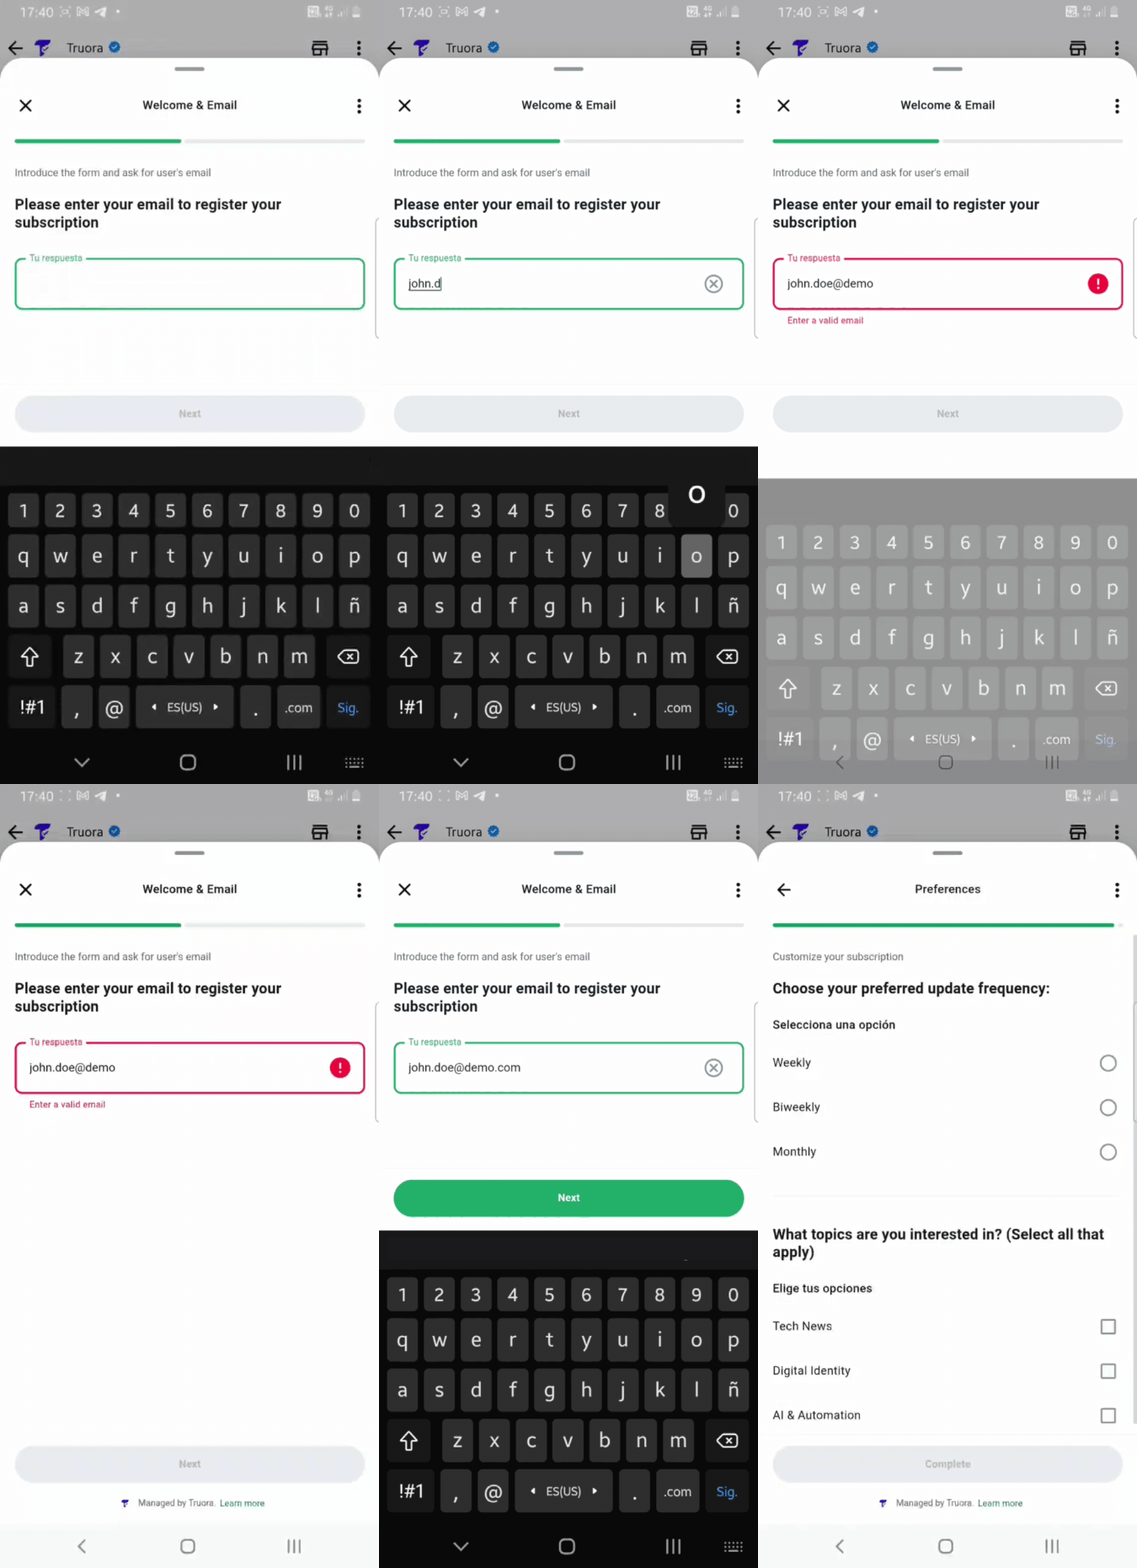
When a user executes the flow, the form will be displayed for the end user to fill it out. If the form has multiple sections, each section will appear on a separate page for easier navigation.
- Form input validation - Each input includes validation to prevent incorrect data type entry. If the input is invalid, a message will be displayed, and the user will not be able to proceed to the next section or complete the form.
- Process execution - Once the form is completed, the process will move to the next step of your flow, and the variables will be processed based on the configuration of the subsequent block: For this guide’s example, variables were included in the message sent to the user, to confirm the user’s subscription with the data they entered.
Form Input Validation
Process Execution
